Rear Suspension Stabilizer Bar
Removal
PROCEDURE
1. Raise the rear of the vehicle and support it on stands.
2. Remove the wheel.
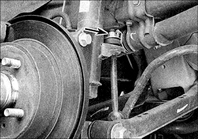
3. Remove the link nuts (indicated by the arrow) securing the links to the strut.
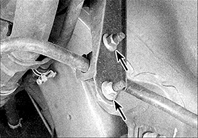
4. Remove the stabilizer bar clamp bolts securing it to the body bracket (indicated by the arrows).
5. Remove the stabilizer bar crossmember.
Inspection
PROCEDURE
If necessary, replace the bushings, installing them so that the slots face upward.Installation
PROCEDURE
1. Install the stabilizer bar in the reverse order of removal.
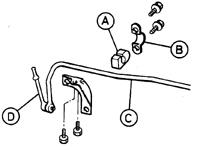
2. The slot for the bolt in the clamp must face down. The stabilizer bar link ball joint must be positioned at the center of the arc described by the link when it moves. In this position the ball joint must be fully unloaded (A – slot, B – clamp, C – stabilizer bar, D – link).
3. Replace the stabilizer bar and link nuts.
STABILIZER BAR LINK Removal and Installation
PROCEDURE
1. Raise the rear of the vehicle and support it on stands.
2. Remove the wheel.
3. Remove the nut securing the link to the stabilizer bar crossmember.
4. Remove the nut securing the link to the strut, then remove the link.
5. Check the condition of the link ball joints. Replace if necessary.
6. Install the link in the reverse order of removal.
7. Replace the link nuts.
8. The stabilizer bar link ball joint must be positioned at the center of the arc described by the link when it moves. In this position the ball joint must be fully unloaded.
Test yourself
A quick Nissan Sunny quiz: every answer comes with an explanation and a link to the manual page.