Front Suspension Strut
GENERAL INFORMATION
Warning: Struts must be replaced in pairs. RemovalPROCEDURE
1. Raise the front of the vehicle and support it on stands.
2. Remove the wheel.
3. Disconnect the brake hydraulic line from the strut.
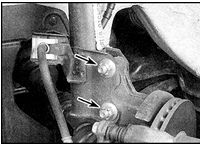
4. Remove the two strut-to-steering knuckle nuts (indicated by arrows) and disconnect the strut.

5. Have an assistant support the strut from below, and remove the three strut-to-engine compartment apron nuts (indicated by arrows).
Warning: Do not loosen the center nut! Remove the strut through the engine compartment. Disassembly
PROCEDURE
1. Clamp the lower part of the strut in a vise using protective pads.
2. Thread on the nuts, then use a lever against the studs to loosen the upper strut shaft nut. Do not remove the nut completely.
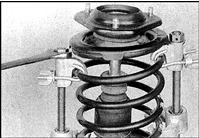
3. Compress the spring with the special tool so that the upper spring seat can be turned by hand.

4. Remove the shaft nut while holding the shaft from turning.
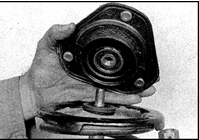
5. Remove the washer, gasket and upper cap.
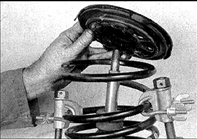
6. Remove the bushing, bearing, upper spring seat and rubber bumper. Note the installation order of the parts.

7. Remove the spring, dust boot, rubber bumper and seat.
8. Inspect the condition of the parts, especially the rubber bumpers. Replace if necessary.
9. Check the shock absorber for leakage and inspect the rod along its full length.
10. Check the body for cracks and damage.
11. Check strut operation by first extending the rod fully, then compressing and extending it over a stroke of 50–00 mm. Smooth resistance to rod movement should be felt.
12. If there are signs of leakage or mechanical damage, or if the rod moves with "jerks", replace the strut.
13. The spring and all parts can be reused on a new strut.
14. Inspect the spring.
15. If severe spring corrosion, cracks in the coils, deformation, or any signs of questionable condition are found, replace the spring.
16. Clamp the strut in a vise and install the rubber bumper, spring seat, and dust boot.

17. Compress the spring and install it into the seat. When installing, the end of the coil must engage the recess in the seat (arrow).
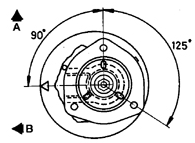
18. Install the upper bumper and seat, correctly positioning the spring coil in the seat. When installing the strut, the arrow on the upper seat must point outward in the transverse direction (A – toward the front of the vehicle, B – transverse direction).
19. Install the bearing, bushing, and upper cap.
20. Replace the strut rod nut and washer. Tighten the nut to the specified torque while holding the rod.
21. Remove the spring compressor.
22. Install the strut rod nut cap.
Installation
PROCEDURE
1. Install a new upper strut mount gasket.
2. Install the strut so that the studs enter the holes in the splash shield, and the notch and arrow on the upper seat face outward in the transverse direction.
3. Tighten the nuts to the specified torque.
4. Align the holes in the strut and steering knuckle. Tighten new nuts and bolts to the specified torque (nuts must face the front of the vehicle).
5. Secure the hose to the strut with the bracket.
6. Install the speed sensor wiring bracket (on vehicles with ABS).
7. Install the wheel and lower the vehicle.
Test yourself
A quick Nissan Sunny quiz: every answer comes with an explanation and a link to the manual page.