Interior Front Trim Components
Removal and installation
PROCEDURE
Glove compartment1. Remove the two lower screws and remove the glove box.
2. Installation is the reverse of removal.
Lower Instrument Panel Section (Driver's Side)
3. Remove the screws at the upper and lower edges and remove the section from the instrument panel.
4. Installation is the reverse of removal.
Center Instrument Panel Section with Push-Button Switches
5. Disconnect the battery negative cable.
6. Remove the shift lever boot.
7. Remove the screws on both sides of the panel and carefully move it forward.
8. Disconnect the switch connectors and remove the panel.
9. If necessary, mark the wiring harness routing so the harnesses can be placed in their original positions during installation.
10. Installation is the reverse of removal. Make sure the ventilation nozzles engage the corresponding ducts.
Steering Column Covers
11. Disconnect the battery negative cable.
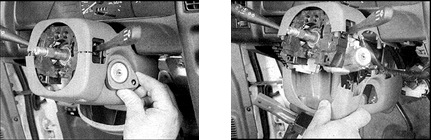
12. Remove the 6 lower screws, disconnect the lower cover from the ignition switch (left photo), and push it down, disconnecting it from the clips of the upper cover (right photo).
13. Move both levers to the fully lowered position and carefully remove the upper cover.
14. Installation is the reverse of removal.
Instrument Panel Cover with Ventilation Nozzle
15. Remove the steering column covers.
16. Remove the two upper bolts and tilt the column slightly downward.
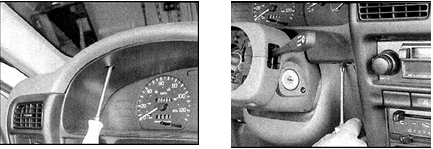
17. Remove the instrument panel decorative cover screws (two on the left, two on the right, one at the bottom (right photo), and one at the top (left photo)).
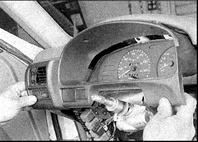
18. Carefully disconnect the cover from the instrument panel. If necessary, lower the column to create more space.
19. Installation is the reverse of removal. Tighten the upper column bolts to the specified torque.
Test yourself
A quick Nissan Sunny quiz: every answer comes with an explanation and a link to the manual page.