Front Suspension Stabilizer Bar
Removal
PROCEDURE
1. Raise the front of the vehicle and support it on stands.
2. Remove the wheel.
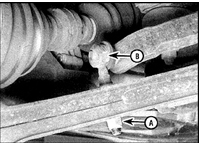
3. Remove the nut securing the link to the stabilizer bar (A – nut securing the link to the lower arm, B – nut securing the link to the stabilizer bar), and remove the washer.
4. Repeat the procedure on the opposite end of the stabilizer bar.
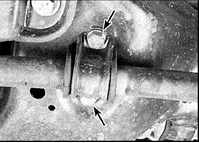
5. Remove the bolts (indicated by arrows) of the stabilizer bar clamps.
6. Remove the stabilizer bar.
Installation
PROCEDURE
1. If damage is found on the rubber bushings, replace them. Install them so that the painted stripe on the stabilizer bar faces the inner side of the bushing.
2. Install the stabilizer bar in reverse order.
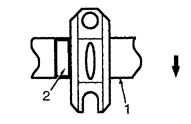
3. The slot for the bolt in the clamp must face the rear of the vehicle (direction indicated by arrow; 1 – stabilizer bar, 2 – mark (painted stripe)).
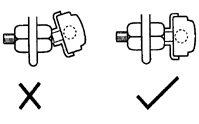
4. The stabilizer link joint must be positioned at the center of the arc described by the link during its movement. In this position the joint must be fully unloaded (left – incorrect orientation, right – correct orientation).
5. Tighten all nuts and bolts only after the vehicle is lowered off the jack and the suspension has settled.
STABILIZER BAR LINK Removal
PROCEDURE
1. Raise the front of the vehicle and support it on stands.
2. Remove the wheel.
3. Remove the nut securing the link to the stabilizer bar, and remove the washer.
4. Remove the nut securing the link to the suspension arm, and remove the bushing and washer.
5. Remove the link, bushings, and washers.
Installation
PROCEDURE
1. If necessary, replace the link bushings.
2. Install the link in reverse order.
3. Replace the link nuts. Install the washer with the convex side facing the bushing.
4. The stabilizer link joint must be positioned at the center of the arc described by the link during its movement.
Test yourself
A quick Nissan Sunny quiz: every answer comes with an explanation and a link to the manual page.