Luggage Compartment Door Outside Garnish
Components
COMPONENTS
ILLUSTRATION
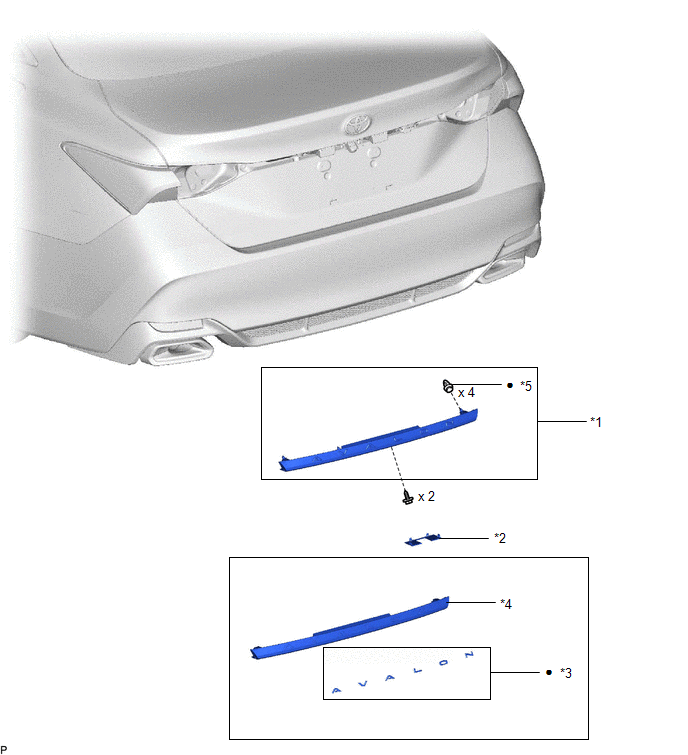
*1 |
LUGGAGE COMPARTMENT DOOR OUTSIDE GARNISH SUB-ASSEMBLY |
*2 |
NO. 2 BACK DOOR OUTSIDE GARNISH |
*3 |
NO. 2 LUGGAGE COMPARTMENT DOOR NAME PLATE |
*4 |
LUGGAGE COMPARTMENT DOOR OUTSIDE GARNISH |
*5 |
CLIP |
- |
- |
● |
Non-reusable part |
- |
- |
Disassembly
DISASSEMBLY
PROCEDURE
1. REMOVE NO. 2 LUGGAGE COMPARTMENT DOOR NAME PLATE
Click here 
Installation
INSTALLATION
PROCEDURE
1. INSTALL LUGGAGE COMPARTMENT DOOR OUTSIDE GARNISH SUB-ASSEMBLY
(a) Install 4 new clips to the luggage compartment door outside garnish.
(b) Engage the 4 clips as shown in the illustration.
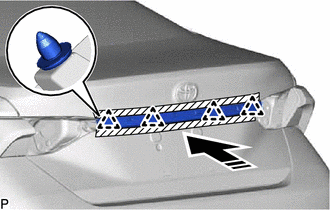
 |
Install in this Direction |
(c) Install the luggage compartment door outside garnish sub-assembly with the 2 screws.
2. INSTALL NO. 2 BACK DOOR OUTSIDE GARNISH
(a) Engage the 4 claws to install the No. 2 back door outside garnish. |
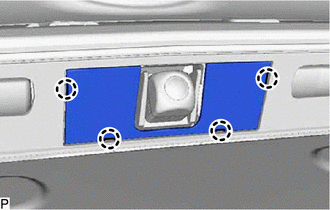 |
3. INSTALL REAR LIGHT ASSEMBLY LH
Click here 
4. INSTALL REAR LIGHT ASSEMBLY RH
HINT:
Use the same procedure as for the LH side.
Reassembly
REASSEMBLY
PROCEDURE
1. INSTALL NO. 2 LUGGAGE COMPARTMENT DOOR NAME PLATE
Click here 
Removal
REMOVAL
PROCEDURE
1. REMOVE REAR LIGHT ASSEMBLY LH
Click here 
2. REMOVE REAR LIGHT ASSEMBLY RH
HINT:
Use the same procedure as for the LH side.
3. REMOVE NO. 2 BACK DOOR OUTSIDE GARNISH
(a) Using a screwdriver with its tip wrapped with protective tape, disengage the 4 claws to remove the No. 2 back door outside garnish. |
|
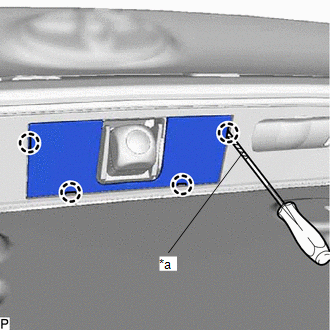
4. REMOVE LUGGAGE COMPARTMENT DOOR OUTSIDE GARNISH SUB-ASSEMBLY
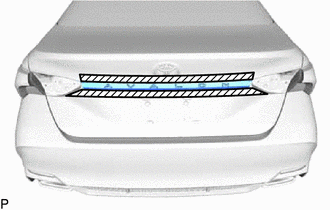
(a) Apply protective tape around the luggage compartment door outside garnish sub-assembly.
 |
Protective Tape |
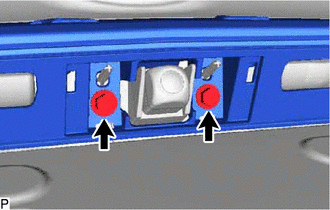
(b) Remove the 2 screws. |
 |
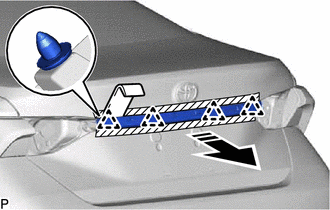
(c) Using a moulding remover, disengage the 4 clips and remove the luggage compartment door outside garnish sub-assembly as shown in the illustration.
 |
Remove in this Direction |
(d) Remove the 4 clips from the luggage compartment door outside garnish.