Rear Door
Adjustment
ADJUSTMENT
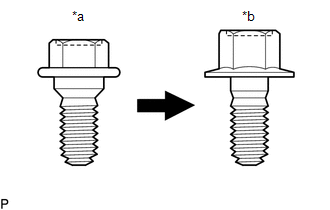
*a |
Centering Bolt |
*b |
Standard Bolt |
HINT:
- Use the same procedure for the RH side and LH side.
- The following procedure is for the LH side.
- Centering bolts are used to install the door hinges to the vehicle body and door. The door cannot be adjusted with the centering bolts installed. Substitute the centering bolts with standard bolts when making adjustments.
- The specified torque for standard bolts is shown in the standard bolt chart.
Click here

PROCEDURE
1. INSPECT REAR DOOR
(a) Check that the clearance measurements of areas a through n are within each standard range.
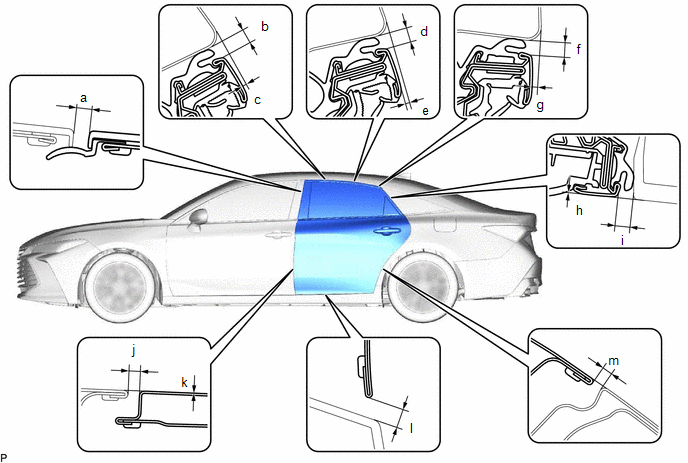 Standard Clearance
Area | Measurement | Area | Measurement |
|---|---|---|---|
a |
2.1 to 6.1 mm (0.0827 to 0.240 in.) |
b |
3.15 to 6.55 mm (0.124 to 0.258 in.) |
c |
0.05 to 4.05 mm (0.002 to 0.159 in.) |
d |
3.15 to 6.55 mm (0.124 to 0.258 in.) |
e |
-0.05 to 3.95 mm (-0.002 to 0.156 in.) |
f |
3.15 to 6.55 mm (0.124 to 0.258 in.) |
g |
0.25 to 4.25 mm (0.01 to 0.167 in.) |
h |
0.1 mm (0.00394 in.) |
i |
4.5 to 7.9 mm (0.177 to 0.311 in.) |
j |
4.0 mm (0.157 in.) |
k |
0 mm (0 in.) |
l |
3.65 to 6.65 mm (0.144 to 0.262 in.) |
m |
2.0 to 5.0 mm (0.079 to 0.197 in.) |
- |
- |
2. ADJUST REAR DOOR
NOTICE:
Make sure to turn the engine switch (for Gasoline Model) or power switch (for HV Model) off before adjusting the door lock strikers.
(a) Using SST, loosen the 4 hinge bolts on the vehicle body and adjust the door position. SST: 09812-00020 |
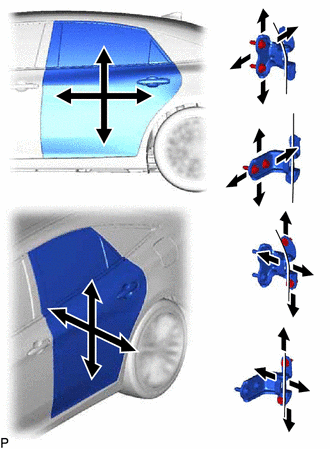 |
(b) Tighten the 4 hinge bolts on the vehicle body after adjustment.
Torque:
26 N·m {265 kgf·cm, 19 ft·lbf}
(c) Loosen the 4 hinge bolts on the door and adjust the door position.
(d) Tighten the 4 hinge bolts on the door after adjustment.
Torque:
26 N·m {265 kgf·cm, 19 ft·lbf}
(e) Using a T40 "TORX" socket wrench, slightly loosen the 2 striker mounting screws. |
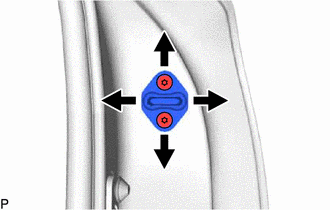 |
(f) Using a brass bar and a hammer, hit the striker to adjust its position.
(g) Using a T40 "TORX" socket wrench, tighten the 2 striker mounting screws after adjustment.
Torque:
23 N·m {235 kgf·cm, 17 ft·lbf}
Components
COMPONENTS
ILLUSTRATION
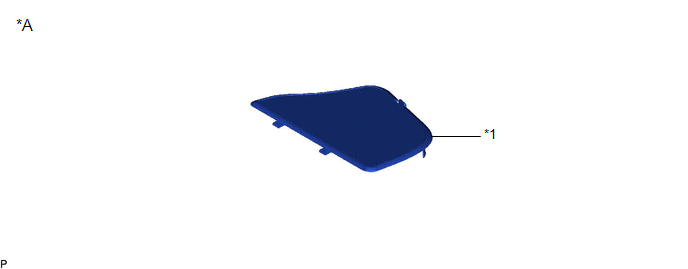
*A |
for HV Model |
- |
- |
*1 |
LUGGAGE TRIM SERVICE HOLE COVER |
- |
- |
ILLUSTRATION
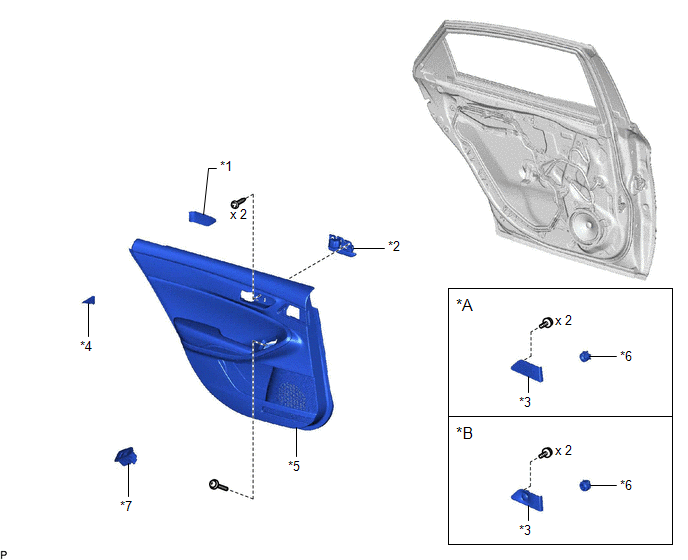
*A |
for 8 Speakers |
*B |
for 14 Speakers |
*1 |
REAR DOOR ARMREST COVER SUB-ASSEMBLY |
*2 |
REAR DOOR INSIDE HANDLE SUB-ASSEMBLY |
*3 |
REAR DOOR SPEAKER GRILLE SUB-ASSEMBLY |
*4 |
REAR DOOR TRIM ASSEMBLY COVER |
*5 |
REAR DOOR TRIM BOARD SUB-ASSEMBLY |
*6 |
REAR NO. 2 SPEAKER ASSEMBLY |
*7 |
REAR POWER WINDOW REGULATOR SWITCH ASSEMBLY WITH REAR DOOR UPPER ARMREST BASE PANEL |
- |
- |
ILLUSTRATION
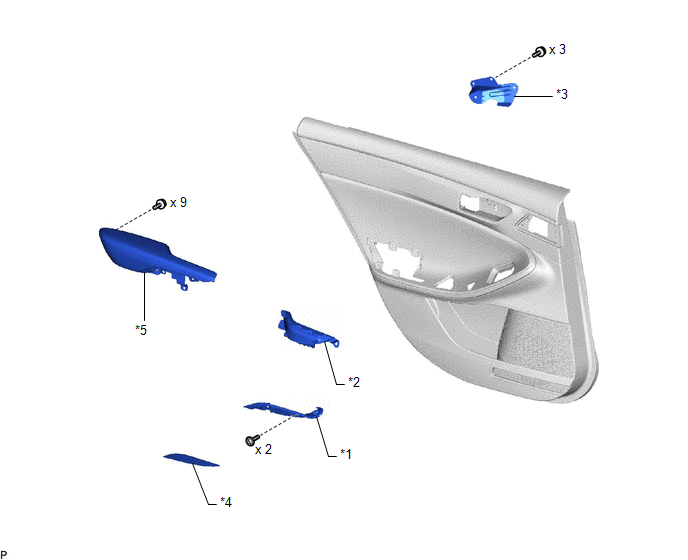
*1 |
REAR DOOR ORNAMENT |
*2 |
REAR DOOR PULL HANDLE |
*3 |
REAR DOOR TRIM BODY BRACKET |
*4 |
REAR DOOR TRIM COVER |
*5 |
REAR ARMREST ASSEMBLY |
- |
- |
ILLUSTRATION
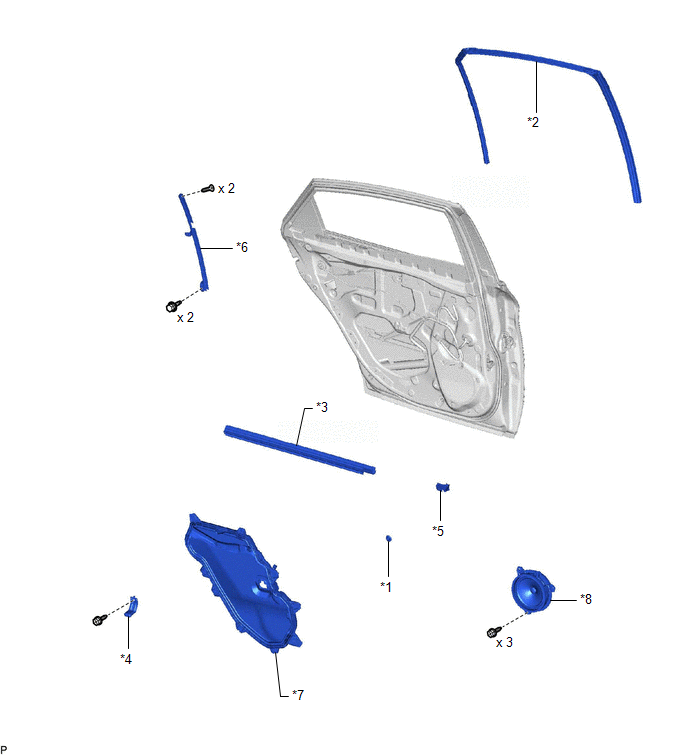
*1 |
HOLE PLUG |
*2 |
REAR DOOR GLASS RUN |
*3 |
REAR DOOR INNER GLASS WEATHERSTRIP |
*4 |
REAR DOOR NO. 1 TRIM BRACKET |
*5 |
REAR DOOR NO. 2 SERVICE HOLE COVER |
*6 |
REAR DOOR REAR LOWER WINDOW FRAME SUB-ASSEMBLY |
*7 |
REAR DOOR SERVICE HOLE COVER |
*8 |
REAR SPEAKER ASSEMBLY |
ILLUSTRATION
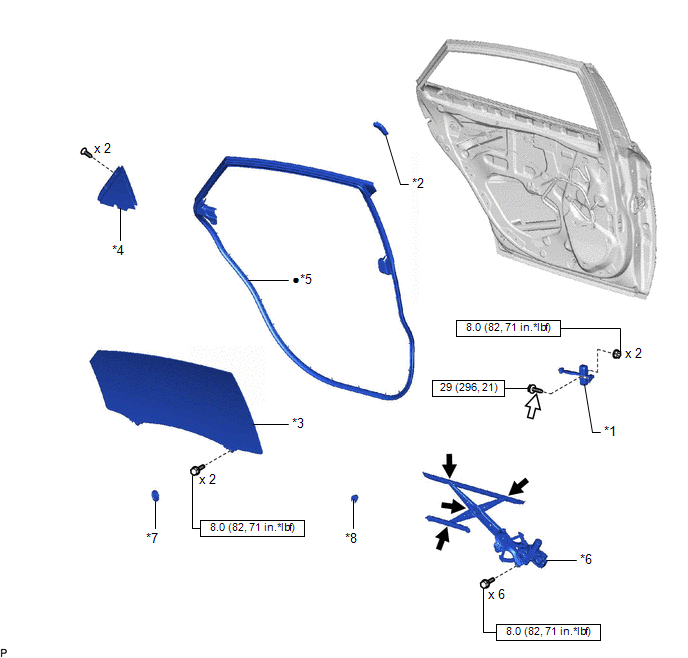
*1 |
REAR DOOR CHECK ASSEMBLY |
*2 |
REAR DOOR FRAME GARNISH |
*3 |
REAR DOOR GLASS SUB-ASSEMBLY |
*4 |
REAR DOOR REAR GUIDE SEAL |
*5 |
REAR DOOR WEATHERSTRIP |
*6 |
REAR DOOR WINDOW REGULATOR ASSEMBLY |
*7 |
HOLE PLUG |
*8 |
REAR DOOR NO. 3 SERVICE HOLE COVER |
 |
N*m (kgf*cm, ft.*lbf): Specified torque |
● |
Non-reusable part |
 |
MP grease |
 |
Toyota Genuine Adhesive 1324, Three Bond 1324 or equivalent |
★ |
Precoated part |
- |
- |
ILLUSTRATION
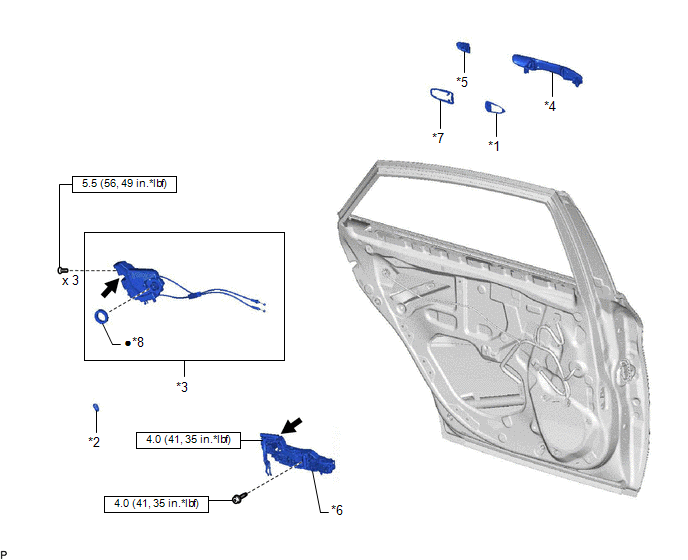
*1 |
REAR DOOR FRONT OUTSIDE HANDLE PAD |
*2 |
REAR DOOR LOCK CHILD PROTECTION COVER |
*3 |
REAR DOOR LOCK WITH MOTOR ASSEMBLY |
*4 |
REAR DOOR OUTSIDE HANDLE ASSEMBLY |
*5 |
REAR DOOR OUTSIDE HANDLE COVER |
*6 |
REAR DOOR OUTSIDE HANDLE FRAME SUB-ASSEMBLY |
*7 |
REAR DOOR REAR OUTSIDE HANDLE PAD |
*8 |
DOOR LOCK WIRING HARNESS SEAL |
|
N*m (kgf*cm, ft.*lbf): Specified torque |
● |
Non-reusable part |
|
MP grease |
- |
- |
ILLUSTRATION
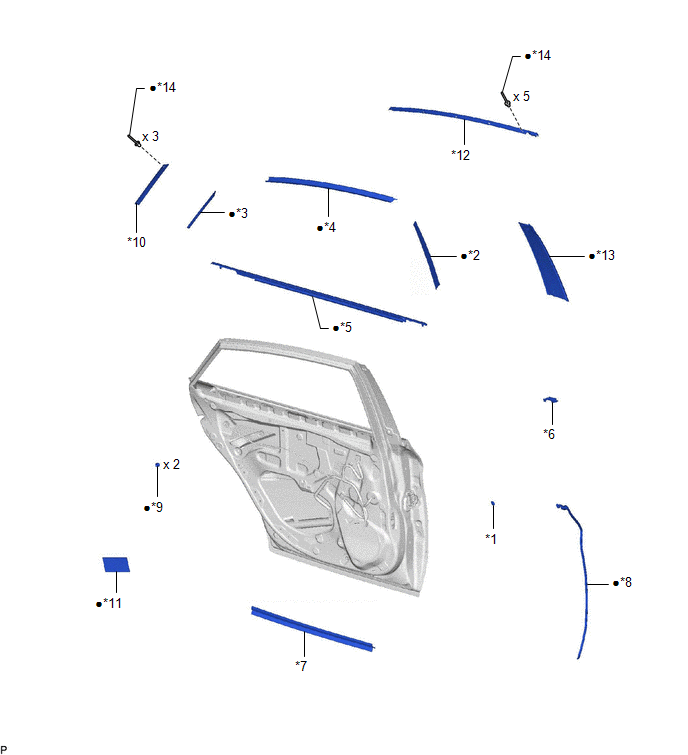
*1 |
DOOR WINDOW FRAME MOULDING CLIP |
*2 |
NO. 1 BLACK OUT TAPE |
*3 |
NO. 2 BLACK OUT TAPE |
*4 |
NO. 3 BLACK OUT TAPE |
*5 |
REAR DOOR BELT MOULDING ASSEMBLY |
*6 |
REAR DOOR FRONT OUTSIDE SEAL |
*7 |
REAR DOOR NO. 2 WEATHERSTRIP |
*8 |
REAR DOOR NO. 3 WEATHERSTRIP |
*9 |
REAR DOOR PANEL CUSHION |
*10 |
REAR DOOR REAR WINDOW FRAME MOULDING |
*11 |
REAR DOOR SILENCER PAD |
*12 |
REAR DOOR UPPER WINDOW FRAME MOULDING |
*13 |
REAR DOOR WINDOW FRAME MOULDING (CENTER PILLAR SIDE) |
*14 |
RIVET |
● |
Non-reusable part |
- |
- |
Disassembly
DISASSEMBLY
The necessary procedures (adjustment, calibration, initialization, or registration) that must be performed after parts are removed and installed, or replaced during rear door removal/installation are shown below.
Necessary Procedure After Parts Removed/Installed/Replaced (for Gasoline Model)Replaced Part or Performed Procedure | Necessary Procedure | Effect/Inoperative Function When Necessary Procedures are not Performed | Link |
|---|---|---|---|
| *: When performing learning using the Techstream. Click here |
|||
Disconnect cable from negative battery terminal |
Perform steering sensor zero point calibration |
Lane departure alert system (w/ Steering Control) |
 |
Pre-collision system |
|||
Intelligent clearance sonar system* |
|||
Lighting system (for Gasoline Model with Cornering Light) |
|||
Memorize steering angle neutral point |
Parking assist monitor system |
|
|
Panoramic view monitor system |
|
||
|
Initialize power window control system |
|
|
Replaced Part or Performed Procedure | Necessary Procedure | Effect/Inoperative Function When Necessary Procedures are not Performed | Link |
|---|---|---|---|
| *: When performing learning using the Techstream. Click here |
|||
Disconnect cable from negative auxiliary battery terminal |
Perform steering sensor zero point calibration |
Lane departure alert system (w/ Steering Control) |
|
Pre-collision system |
|||
Intelligent clearance sonar system* |
|||
Lighting system (for HV Model with Cornering Light) |
|||
Memorize steering angle neutral point |
Parking assist monitor system |
|
|
Panoramic view monitor system |
|
||
|
Initialize power window control system |
|
|
HINT:
- Use the same procedure for the RH side and LH side.
- The following procedure is for the LH side.
PROCEDURE
1. PRECAUTION
NOTICE:
After turning the engine switch (for Gasoline Model) or power switch (for HV Model) off, waiting time may be required before disconnecting the cable from the negative (-) auxiliary battery terminal. Therefore, make sure to read the disconnecting the cable from the negative (-) auxiliary battery terminal notices before proceeding with work.
Click here
2. REMOVE LUGGAGE TRIM SERVICE HOLE COVER (for HV Model)
Click here
3. DISCONNECT CABLE FROM NEGATIVE AUXILIARY BATTERY TERMINAL
for A25A-FXS:
Click here
for 2GR-FKS:
Click here
4. REMOVE REAR DOOR ARMREST COVER SUB-ASSEMBLY
(a) Using a moulding remover, disengage the 3 claws to remove the rear door armrest cover sub-assembly. |
 |
5. REMOVE REAR DOOR TRIM ASSEMBLY COVER
(a) Disengage the claw and 2 guides to remove the rear door trim assembly cover. |
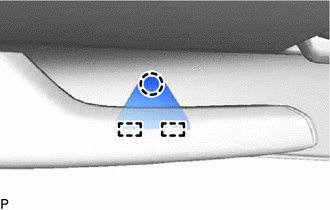 |
6. REMOVE REAR POWER WINDOW REGULATOR SWITCH ASSEMBLY WITH REAR DOOR UPPER ARMREST BASE PANEL
(a) Apply protective tape to the rear door trim board sub-assembly as shown in the illustration.
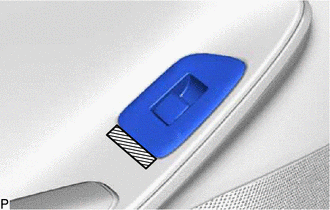
 |
Protective Tape |
(b) Using a moulding remover, disengage the 3 claws as shown in the illustration.
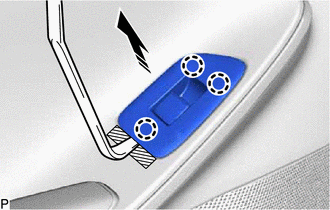
 |
Remove in this Direction |
(c) Disconnect the connector to remove the rear power window regulator switch assembly with rear door upper armrest base panel.
7. REMOVE REAR DOOR TRIM BOARD SUB-ASSEMBLY
(a) Remove the 3 screws. |
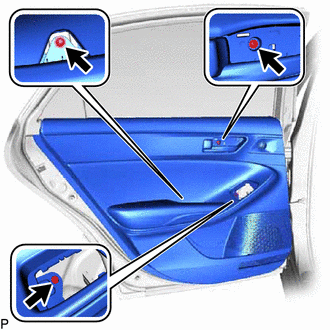 |
(b) Disengage the 8 clips as shown in the illustration.
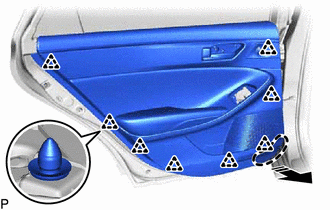
 |
Place Hand Here |
|
Remove in this Direction |
(c) Disengage the 6 claws and guide as shown in the illustration.
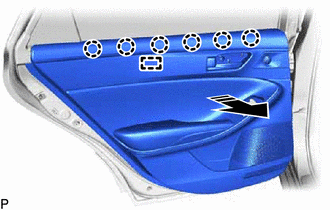
|
Remove in this Direction |
(d) Disconnect the rear door lock open lever remote control cable and rear door inside lock/unlock knob locking cable as shown in the illustration.
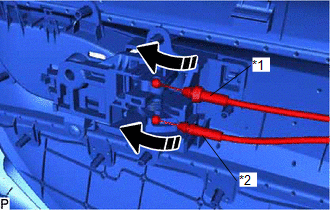
*1 |
Rear Door Inside Lock/Unlock Knob Locking Cable |
*2 |
Rear Door Lock Open Lever Remote Control Cable |
|
Remove in this Direction |
(e) Disconnect the connector to remove the rear door trim board sub-assembly. |
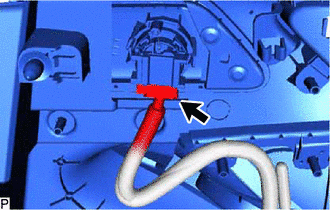 |
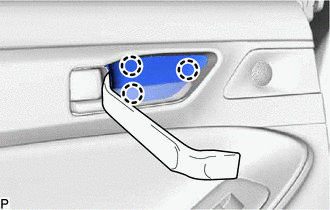
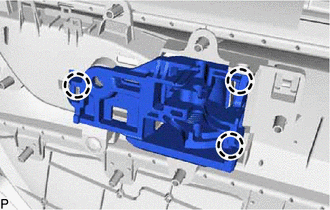
8. REMOVE REAR DOOR INSIDE HANDLE SUB-ASSEMBLY
(a) Disengage the 3 claws to remove the rear door inside handle sub-assembly. |
 |
9. REMOVE REAR NO. 2 SPEAKER ASSEMBLY
Click here
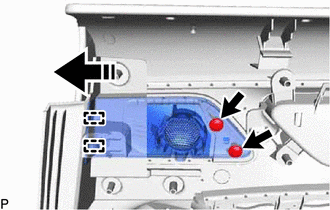
10. REMOVE REAR DOOR SPEAKER GRILLE SUB-ASSEMBLY
(a) Remove the 2 screws.
|
Remove in this Direction |
(b) Disengage the 2 guides to remove the rear door speaker grille sub-assembly as shown in the illustration.
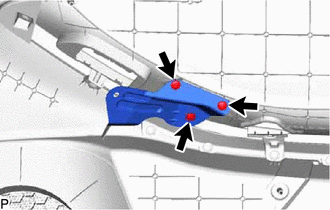
11. REMOVE REAR DOOR TRIM BODY BRACKET
(a) Remove the 3 screws and rear door trim body bracket. |
 |
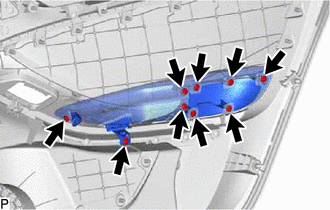
12. REMOVE REAR DOOR TRIM COVER
(a) Remove the 9 screws. |
 |
(b) Disengage the guide to remove the rear armrest assembly with rear door trim cover as shown in the illustration.
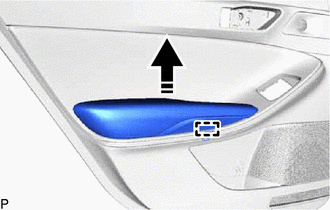
|
Remove in this Direction |
(c) Disengage the 2 guides to remove the rear door trim cover as shown in the illustration.
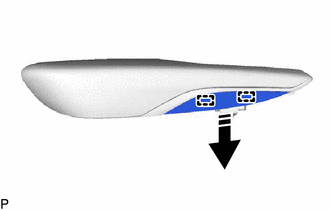
|
Remove in this Direction |
13. REMOVE REAR DOOR PULL HANDLE
(a) Remove the 2 screws.
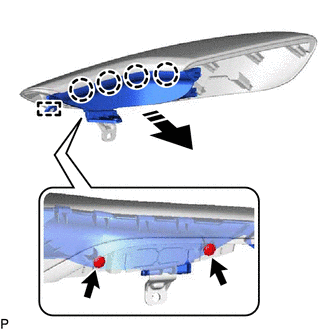
|
Remove in this Direction |
(b) Disengage the 4 claws and guide to remove the rear door pull handle as shown in the illustration.
14. REMOVE REAR DOOR ORNAMENT
(a) Disengage the 2 guides to remove the rear door ornament as shown in the illustration.
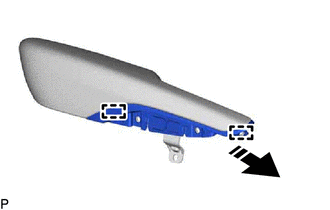
|
Remove in this Direction |
15. REMOVE REAR SPEAKER ASSEMBLY
Click here
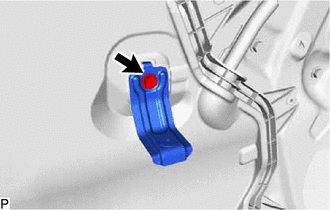
16. REMOVE REAR DOOR NO. 1 TRIM BRACKET
(a) Remove the screw and rear door No. 1 trim bracket. |
 |
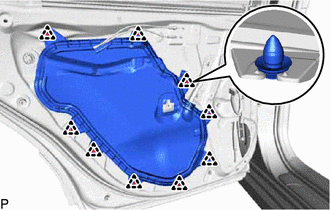
17. REMOVE REAR DOOR SERVICE HOLE COVER
(a) Disconnect the connector. |
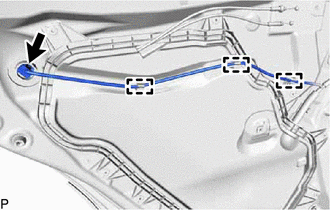 |
(b) Disengage the 3 clamps.
(c) Disengage the 9 clips to remove the rear door service hole cover. |
 |
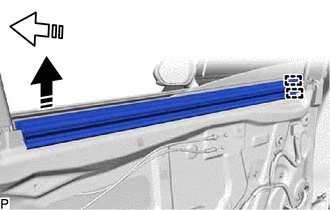
18. REMOVE REAR DOOR INNER GLASS WEATHERSTRIP
(a) Disengage the 2 guides and remove the rear door inner glass weatherstrip as shown in the illustration.
|
Remove in this Direction (1) |
 |
Remove in this Direction (2) |
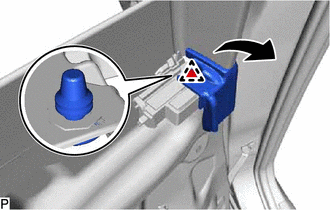
19. REMOVE REAR DOOR NO. 2 SERVICE HOLE COVER
(a) Disengage the clip and disconnect the rear door weatherstrip as shown in the illustration. |
 |
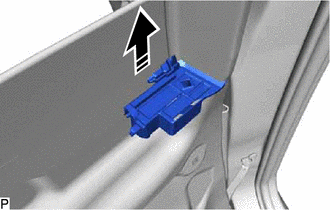
(b) Remove the rear door No. 2 service hole cover as shown in the illustration.
|
Remove in this Direction |
20. REMOVE HOLE PLUG
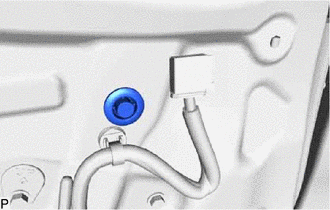
(a) Remove the hole plug. |
 |
21. REMOVE REAR DOOR GLASS RUN
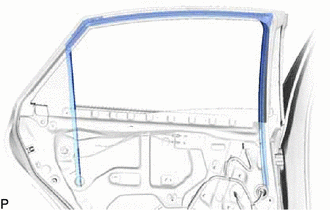
(a) Remove the rear door glass run. |
 |
22. REMOVE REAR DOOR REAR LOWER WINDOW FRAME SUB-ASSEMBLY
(a) Remove the 2 screws. |
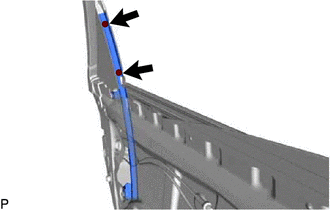 |
(b) Remove the 2 bolts and rear door rear lower window frame sub-assembly. |
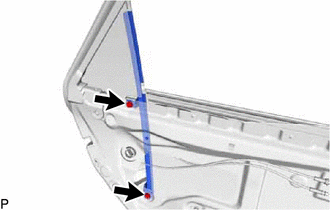 |
23. REMOVE REAR DOOR FRAME GARNISH
(a) Disengage the 2 claws to remove the rear door frame garnish. |
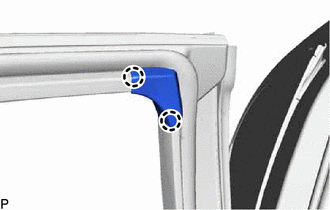 |
24. REMOVE REAR DOOR CHECK ASSEMBLY
(a) Remove the 2 nuts, bolt and rear door check assembly.
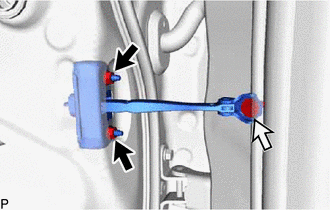
 |
Nut |
 |
Bolt |
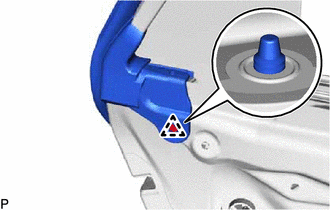
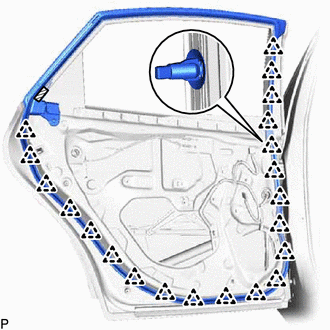
25. REMOVE REAR DOOR WEATHERSTRIP
(a) Disengage the clip. |
 |
(b) Using a clip remover, disengage the 21 clips and remove the rear door weatherstrip.
|
Double-sided Tape |
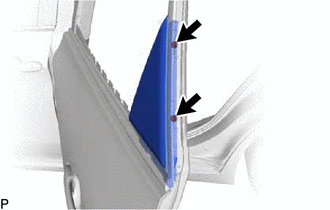
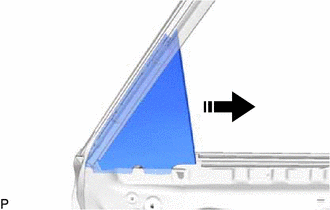
26. REMOVE REAR DOOR REAR GUIDE SEAL
(a) Remove the 2 screws. |
 |
(b) Remove the rear door rear guide seal as shown in the illustration.
|
Remove in this Direction |
27. REMOVE REAR DOOR GLASS SUB-ASSEMBLY
(a) Remove the hole plug. |
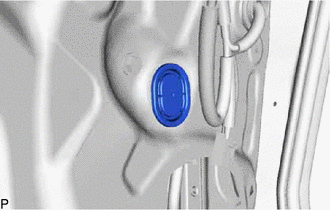 |
(b) Connect the rear power window regulator switch assembly.
(c) for Gasoline Model:
(1) Connect the cable to the negative (-) battery terminal.
(d) for HV Model:
(1) Connect the cable to the negative (-) auxiliary battery terminal.
(e) for Gasoline Model:
(1) Turn the engine switch on (IG).
(f) for HV Model:
(1) Turn the power switch on (IG).
(g) Move the rear door glass sub-assembly so that the door glass bolts can be seen.
(h) for Gasoline Model:
(1) Turn the engine switch off.
(i) for HV Model:
(1) Turn the power switch off.
(j) for Gasoline Model:
(1) Disconnect the cable from the negative (-) battery terminal.
(k) for HV Model:
(1) Disconnect the cable from the negative (-) auxiliary battery terminal.
(l) Disconnect the rear power window regulator switch assembly.
(m) Remove the 2 bolts. NOTICE: After the bolts are removed, do not allow the rear door glass sub-assembly to fall. |
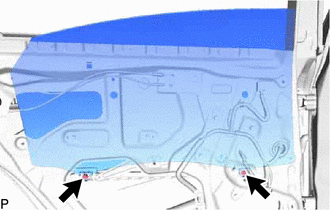 |
(n) Remove the rear door glass sub-assembly as shown in the illustration.
NOTICE:
Do not damage the rear door glass sub-assembly.
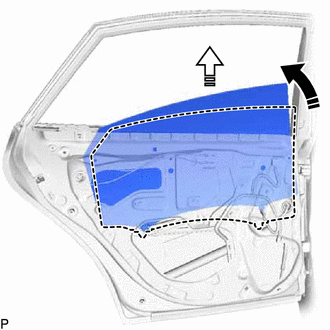
|
Remove in this Direction (1) |
|
Remove in this Direction (2) |
28. REMOVE REAR DOOR WINDOW REGULATOR ASSEMBLY
(a) Disengage the 2 claws to remove the rear door No. 3 service hole cover. |
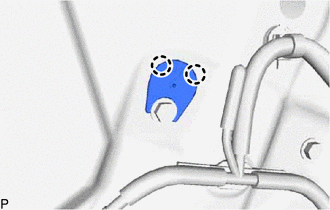 |
(b) Disconnect the connector. |
|
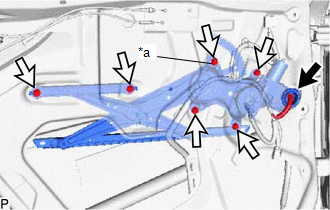
(c) Loosen the temporary bolt.
NOTICE:
Do not remove the temporary bolt. If the temporary bolt is removed, the rear door window regulator assembly may fall and cause damage.
(d) Remove the 5 bolts and rear door window regulator assembly.
(e) Remove the temporary bolt from the rear door window regulator assembly.
29. REMOVE REAR DOOR LOCK WITH MOTOR ASSEMBLY
Click here
30. REMOVE REAR DOOR OUTSIDE HANDLE ASSEMBLY
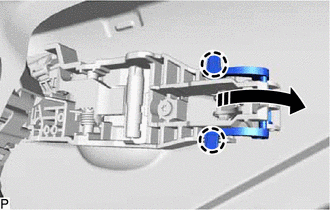
(a) Disengage the 2 claws and move the lever as shown in the illustration.
|
Disengage in this Direction |
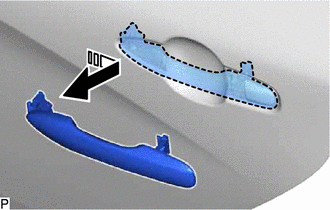
(b) Remove the rear door outside handle assembly as shown in the illustration.
|
Remove in this Direction |
31. REMOVE REAR DOOR OUTSIDE HANDLE COVER
(a) Using a T30 "TORX" socket wrench, loosen the screw. HINT: The screw cannot be removed because it is integrated into the rear door outside handle frame sub-assembly. |
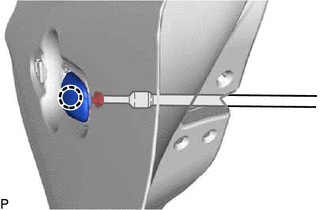 |
(b) Disengage the claw to remove the rear door outside handle cover.
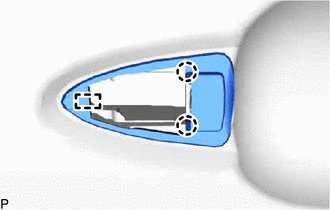
32. REMOVE REAR DOOR FRONT OUTSIDE HANDLE PAD
(a) Disengage the 2 claws and guide to remove the rear door front outside handle pad. |
 |
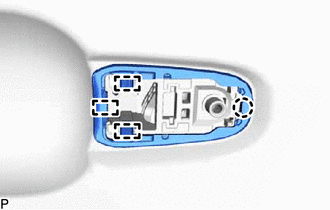
33. REMOVE REAR DOOR REAR OUTSIDE HANDLE PAD
(a) Disengage the claw and 3 guides to remove the rear door rear outside handle pad. |
 |
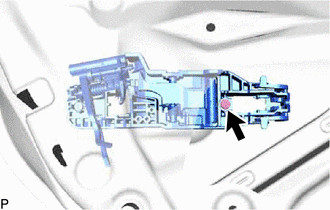
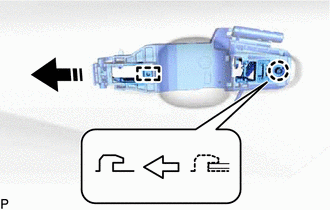
34. REMOVE REAR DOOR OUTSIDE HANDLE FRAME SUB-ASSEMBLY
(a) Using a T30 "TORX" socket wrench, remove the screw. |
 |
(b) Disengage the claw and guide to remove rear door outside handle frame sub-assembly as shown in the illustration.
|
Remove in this Direction |
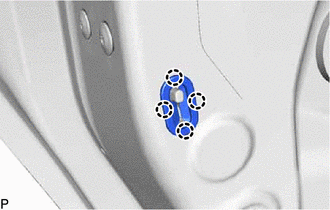
35. REMOVE REAR DOOR LOCK CHILD PROTECTION COVER
(a) Disengage the 4 claws to remove the rear door lock child protection cover. |
 |
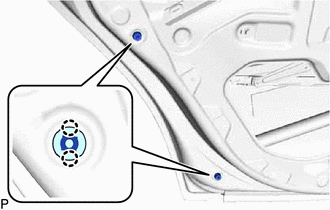
36. REMOVE REAR DOOR PANEL CUSHION
(a) Disengage the 4 claws to remove the 2 rear door panel cushions. |
 |
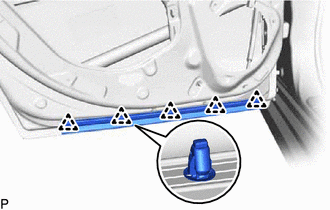
37. REMOVE REAR DOOR NO. 2 WEATHERSTRIP
(a) Disengage the 5 clips to remove the rear door No. 2 weatherstrip. |
 |
38. REMOVE REAR DOOR BELT MOULDING ASSEMBLY
Click here
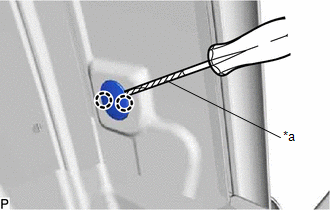
39. REMOVE DOOR WINDOW FRAME MOULDING CLIP
(a) Using a screwdriver with its tip wrapped with protective tape, disengage the 2 claws to remove the door window frame moulding clip. |
|
40. REMOVE REAR DOOR WINDOW FRAME MOULDING (CENTER PILLAR SIDE)
Click here
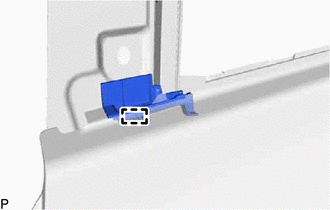
41. REMOVE REAR DOOR FRONT OUTSIDE SEAL
(a) Disengage the guide to remove the rear door front outside seal. |
 |
42. REMOVE REAR DOOR UPPER WINDOW FRAME MOULDING
Click here
43. REMOVE REAR DOOR REAR WINDOW FRAME MOULDING
Click here
44. REMOVE NO. 1 BLACK OUT TAPE
Click here
45. REMOVE NO. 3 BLACK OUT TAPE
Click here
46. REMOVE NO. 2 BLACK OUT TAPE
Click here
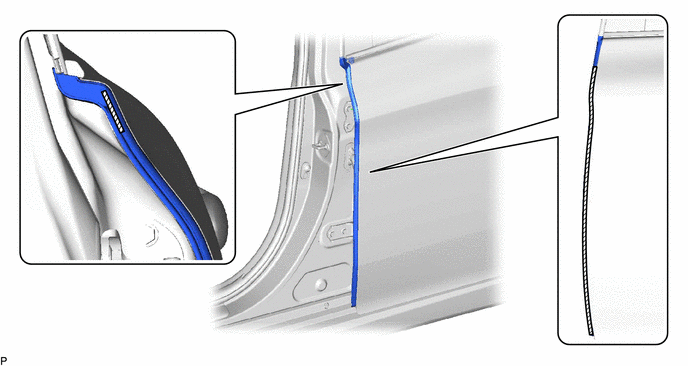
47. REMOVE REAR DOOR NO. 3 WEATHERSTRIP
(a) Remove the rear door No. 3 weatherstrip.
|
Double-sided Tape |
- |
- |
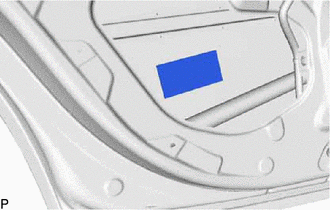
48. REMOVE REAR DOOR SILENCER PAD
(a) Remove the rear door silencer pad. |
 |
Reassembly
REASSEMBLY
HINT:
- Use the same procedure for the RH side and LH side.
- The following procedure is for the LH side.
PROCEDURE
1. PRECAUTION
NOTICE:
After turning the engine switch (for Gasoline Model) or power switch (for HV Model) off, waiting time may be required before disconnecting the cable from the negative (-) auxiliary battery terminal. Therefore, make sure to read the disconnecting the cable from the negative (-) auxiliary battery terminal notices before proceeding with work.
Click here 
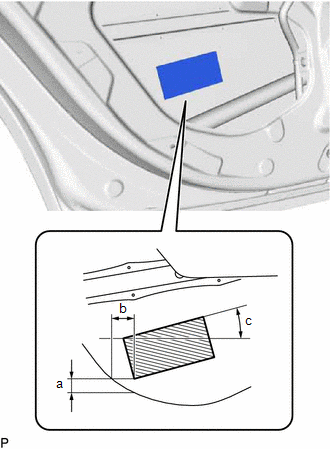
2. INSTALL REAR DOOR SILENCER PAD
(a) Clean the rear door panel surface.
(1) Remove any remaining butyl tape from the rear door panel.
(2) Wipe off any tape adhesive residue with cleaner.
(b) Remove the release paper from a new rear door silencer pad.
HINT:
After removing the release paper, keep the exposed adhesive free from foreign matter.
(c) Install the rear door silencer pad as shown in the illustration. Installation Position
|
 |
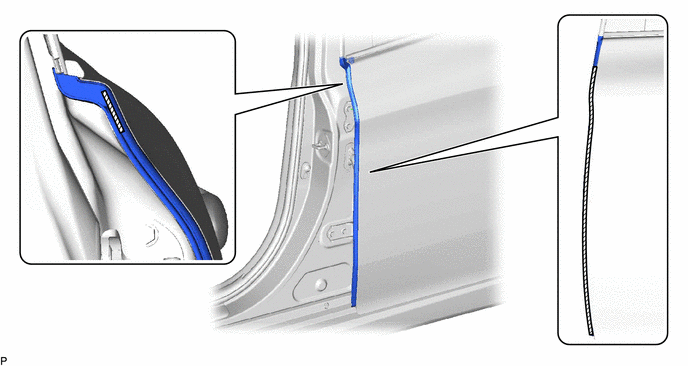
3. INSTALL REAR DOOR NO. 3 WEATHERSTRIP
(a) Clean the rear door panel.
(b) Remove the release paper from a new rear door No. 3 weatherstrip.
HINT:
After removing the release paper, keep the exposed adhesive free from foreign matter.
(c) Install the rear door No. 3 weatherstrip.
 |
Double-sided Tape |
- |
- |
4. REPAIR INSTRUCTION
Click here
5. INSTALL NO. 2 BLACK OUT TAPE
Click here
6. INSTALL NO. 3 BLACK OUT TAPE
Click here
7. INSTALL NO. 1 BLACK OUT TAPE
Click here
8. INSTALL REAR DOOR REAR WINDOW FRAME MOULDING
Click here
9. INSTALL REAR DOOR UPPER WINDOW FRAME MOULDING
Click here
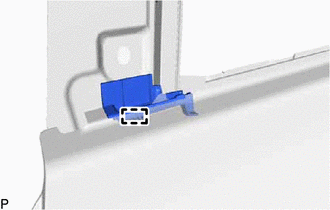
10. INSTALL REAR DOOR FRONT OUTSIDE SEAL
(a) Engage the guide to install the rear door front outside seal. |
 |
11. INSTALL REAR DOOR WINDOW FRAME MOULDING (CENTER PILLAR SIDE)
Click here
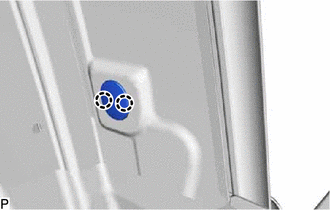
12. INSTALL DOOR WINDOW FRAME MOULDING CLIP
(a) Engage the 2 claws to install the door window frame moulding clip. |
 |
13. INSTALL REAR DOOR BELT MOULDING ASSEMBLY
Click here
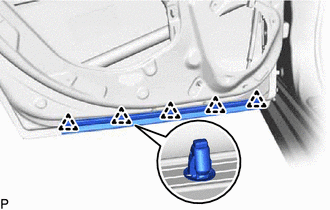
14. INSTALL REAR DOOR NO. 2 WEATHERSTRIP
(a) Engage the 5 clips to install the rear door No. 2 weatherstrip. |
 |
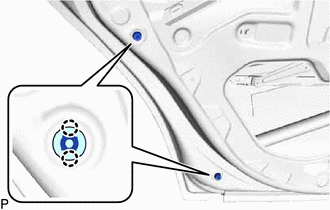
15. INSTALL REAR DOOR PANEL CUSHION
(a) Engage the 4 claws to install 2 new rear door panel cushions. |
 |
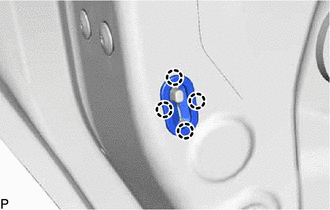
16. INSTALL REAR DOOR LOCK CHILD PROTECTION COVER
(a) Engage the 4 claws to install the rear door lock child protection cover. |
 |
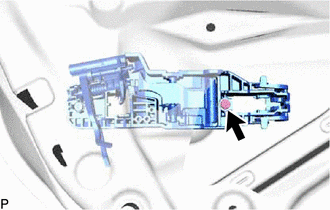
17. INSTALL REAR DOOR OUTSIDE HANDLE FRAME SUB-ASSEMBLY
(a) Apply MP grease to the sliding parts of the rear door outside handle frame sub-assembly.
(b) Engage the guide and claw as shown in the illustration.
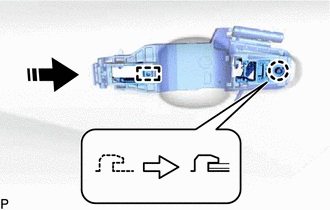
 |
Install in this Direction |
(c) Using a T30 "TORX" socket wrench, install the rear door outside handle frame sub-assembly with the screw. Torque: 4 N·m {41 kgf·cm, 35 in·lbf} |
 |
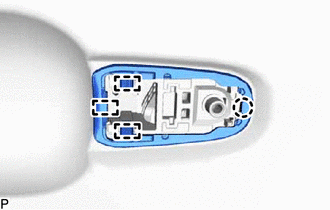
18. INSTALL REAR DOOR REAR OUTSIDE HANDLE PAD
(a) Engage the 3 guides and claw to install the rear door rear outside handle pad. |
 |
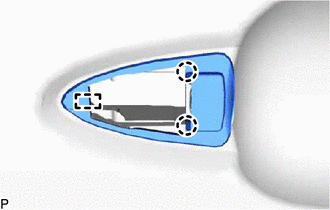
19. INSTALL REAR DOOR FRONT OUTSIDE HANDLE PAD
(a) Engage the guide and 2 claws to install the rear door front outside handle pad. |
 |
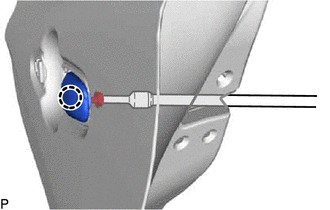
20. INSTALL REAR DOOR OUTSIDE HANDLE COVER
(a) Engage the claw. |
 |
(b) Using a T30 "TORX" socket wrench, install the rear door outside handle cover with the screw.
Torque:
4 N·m {41 kgf·cm, 35 in·lbf}
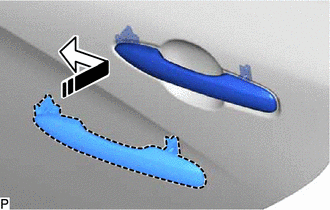
21. INSTALL REAR DOOR OUTSIDE HANDLE ASSEMBLY
(a) Insert the front end of the rear door outside handle assembly into the rear door outside handle frame sub-assembly.
|
Install in this Direction |
(b) Insert the rear end of the rear door outside handle assembly into the rear door outside handle frame sub-assembly, then slide the rear door outside handle assembly toward the front of the vehicle to install it.
(c) Move the lever as shown in the illustration and engage the 2 claws to secure the rear door outside handle assembly.
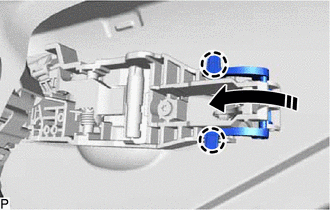
|
Engage in this Direction |
22. INSTALL REAR DOOR LOCK WITH MOTOR ASSEMBLY
Click here
23. INSTALL REAR DOOR WINDOW REGULATOR ASSEMBLY
(a) Apply MP grease to the sliding parts of the rear door window regulator assembly.
(b) Temporarily install the temporary bolt to the rear door window regulator assembly.
(c) Temporarily install the rear door window regulator assembly with the 5 bolts. |
|
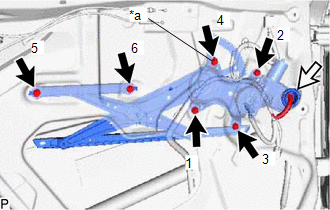
(d) Tighten the temporary bolt and 5 bolts to install the rear door window regulator assembly.
HINT:
Tighten the bolts in the order shown in the illustration.
Torque:
8 N·m {82 kgf·cm, 71 in·lbf}
(e) Connect the connector.
(f) Engage the 2 claws to install the rear door No. 3 service hole cover. |
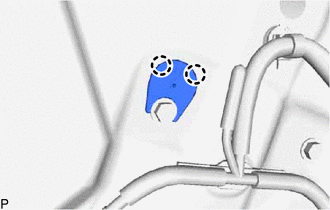 |
24. INSTALL REAR DOOR GLASS SUB-ASSEMBLY
(a) Connect the rear power window regulator switch assembly.
(b) for Gasoline Model:
(1) Connect the cable to the negative (-) battery terminal.
(c) for HV Model:
(1) Connect the cable to the negative (-) auxiliary battery terminal.
(d) for Gasoline Model:
(1) Turn the engine switch on (IG).
(e) for HV Model:
(1) Turn the power switch on (IG).
(f) Move the rear door window regulator assembly so that the door glass bolt holes can be seen.
(g) for Gasoline Model:
(1) Turn the engine switch off.
(h) for HV Model:
(1) Turn the power switch off.
(i) for Gasoline Model:
(1) Disconnect the cable from the negative (-) battery terminal.
(j) for HV Model:
(1) Disconnect the cable from the negative (-) auxiliary battery terminal.
(k) Disconnect the rear power window regulator switch assembly.
(l) Insert the rear door glass sub-assembly into the rear door panel as shown in the illustration.
NOTICE:
Do not damage the rear door glass sub-assembly.
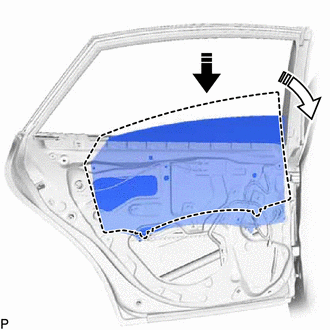
|
Install in this Direction (1) |
 |
Install in this Direction (2) |
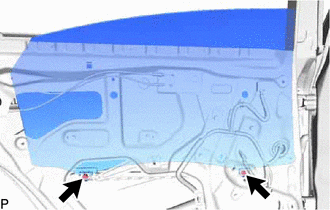
(m) Install the rear door glass sub-assembly with the 2 bolts. Torque: 8 N·m {82 kgf·cm, 71 in·lbf} |
 |
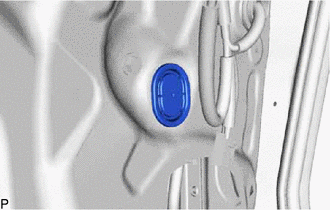
(n) Install the hole plug. |
 |
25. INSTALL REAR DOOR REAR GUIDE SEAL
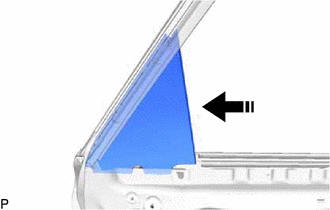
(a) Temporarily install the rear door rear guide seal as shown in the illustration.
|
Install in this Direction |
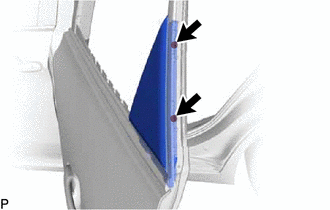
(b) Install the rear door rear guide seal with the 2 screws. |
 |
26. INSTALL REAR DOOR WEATHERSTRIP
(a) Clean the rear door panel.
(b) Remove the release paper from a new rear door weatherstrip.
HINT:
After removing the release paper, keep the exposed adhesive free from foreign matter.
(c) Engage the 21 clips and install the rear door weatherstrip.
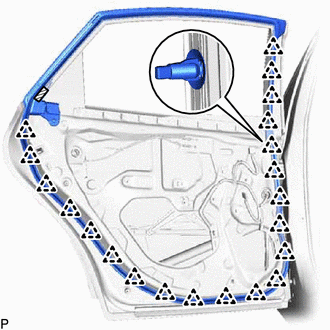
|
Double-sided Tape |
(d) Engage the clip. |
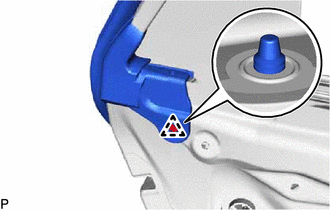 |
27. INSTALL REAR DOOR CHECK ASSEMBLY
(a) Clean the bolt hole in the vehicle body.
(b) Clean the threads of the bolt.
(c) Apply adhesive to the threads of the bolt.
Adhesive:
Toyota Genuine Adhesive 1324, Three Bond 1324 or equivalent
(d) Install the rear door check assembly with the 2 nuts and bolt.
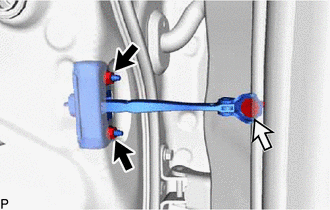
 |
Nut |
 |
Bolt |
Torque:
Bolt :
29 N·m {296 kgf·cm, 21 ft·lbf}
Nut :
8 N·m {82 kgf·cm, 71 in·lbf}
28. INSTALL REAR DOOR FRAME GARNISH
(a) Engage the 2 claws to install the rear door frame garnish. |
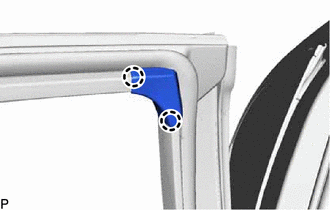 |
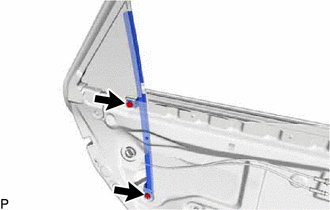
29. INSTALL REAR DOOR REAR LOWER WINDOW FRAME SUB-ASSEMBLY
(a) Install the 2 bolts. |
 |
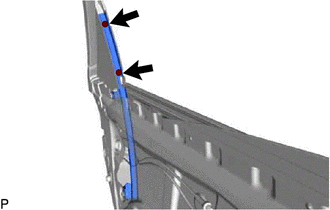
(b) Install the rear door rear lower window frame sub-assembly with the 2 screws. |
 |
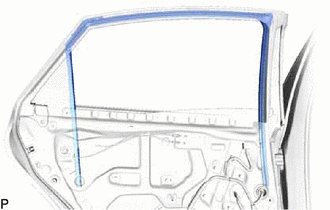
30. INSTALL REAR DOOR GLASS RUN
(a) Install the rear door glass run. |
 |
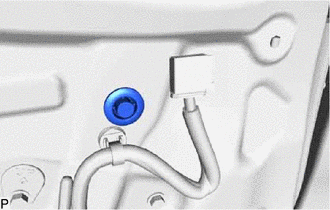
31. INSTALL HOLE PLUG
(a) Install the hole plug. |
 |
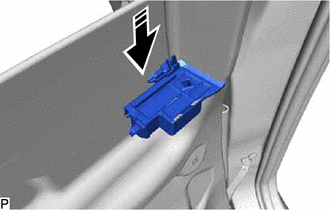
32. INSTALL REAR DOOR NO. 2 SERVICE HOLE COVER
(a) Install the rear door No. 2 service hole cover as shown in the illustration.
|
Install in this Direction |
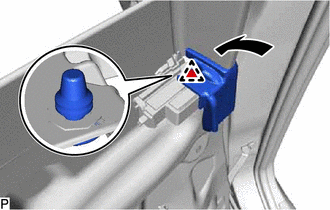
(b) Engage the clip to connect the rear door weatherstrip as shown in the illustration. |
 |
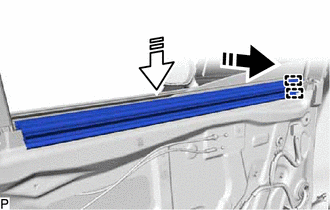
33. INSTALL REAR DOOR INNER GLASS WEATHERSTRIP
(a) Engage the 2 guides and install the rear door inner glass weatherstrip as shown in the illustration.
|
Install in this Direction (1) |
|
Install in this Direction (2) |
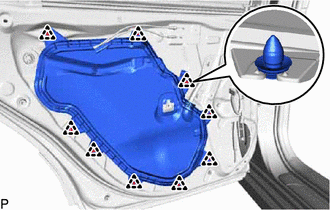
34. INSTALL REAR DOOR SERVICE HOLE COVER
(a) Engage the 9 clips to install the rear door service hole cover. |
 |
(b) Engage the 3 clamps. |
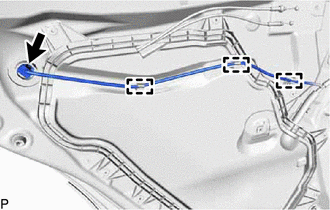 |
(c) Connect the connector.
35. INSTALL REAR DOOR NO. 1 TRIM BRACKET
(a) Install the rear door No. 1 trim bracket with the screw. |
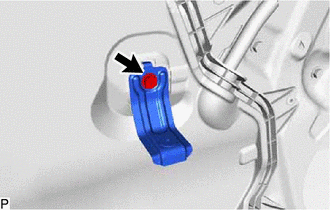 |
36. INSTALL REAR SPEAKER ASSEMBLY
Click here
37. INSTALL REAR DOOR ORNAMENT
(a) Engage the 2 guides to install the rear door ornament as shown in the illustration.
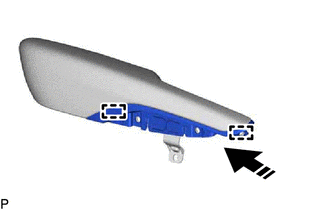
|
Install in this Direction |
38. INSTALL REAR DOOR PULL HANDLE
(a) Engage the guide and 4 claws as shown in the illustration.
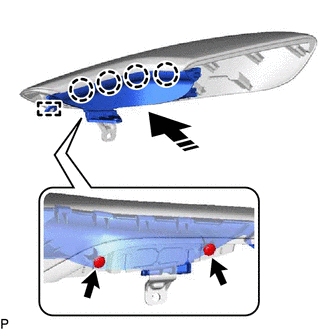
|
Install in this Direction |
(b) Install the rear door pull handle with the 2 screws.
39. INSTALL REAR DOOR TRIM COVER
(a) Engage the 2 guides to install the rear door trim cover as shown in the illustration.
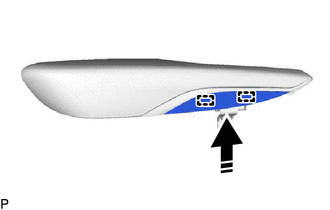
|
Install in this Direction |
(b) Engage the guide as shown in the illustration.
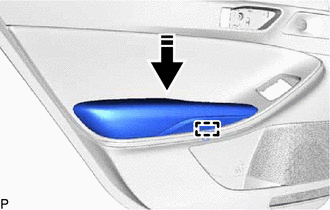
|
Install in this Direction |
(c) Install the rear armrest assembly with rear door trim cover with the 9 screws. |
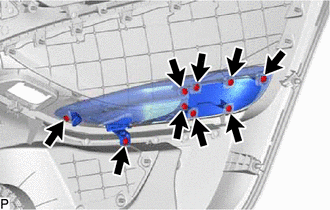 |
40. INSTALL REAR DOOR TRIM BODY BRACKET
(a) Install the rear door trim body bracket with the 3 screws. |
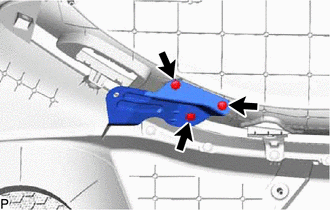 |
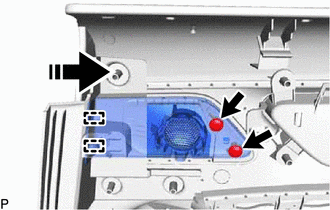
41. INSTALL REAR DOOR SPEAKER GRILLE SUB-ASSEMBLY
(a) Engage the 2 guides as shown in the illustration.
|
Install in this Direction |
(b) Install the rear door speaker grille sub-assembly with the 2 screws.
42. INSTALL REAR NO. 2 SPEAKER ASSEMBLY
Click here
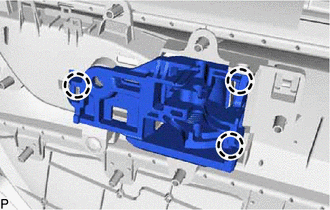
43. INSTALL REAR DOOR INSIDE HANDLE SUB-ASSEMBLY
(a) Engage the 3 claws to install the rear door inside handle sub-assembly. |
 |
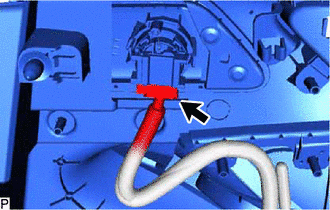
44. INSTALL REAR DOOR TRIM BOARD SUB-ASSEMBLY
(a) Connect the connector. |
 |
(b) Connect the rear door lock open lever remote control cable and rear door inside lock/unlock knob locking cable to the rear door inside handle sub-assembly as shown in the illustration.
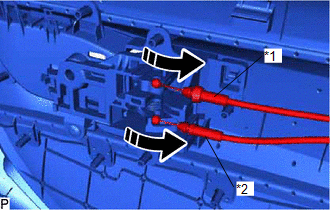
*1 |
Rear Door Inside Lock/Unlock Knob Locking Cable |
*2 |
Rear Door Lock Open Lever Remote Control Cable |
|
Install in this Direction |
(c) Engage the guide, 8 clips and 6 claws as shown in the illustration.
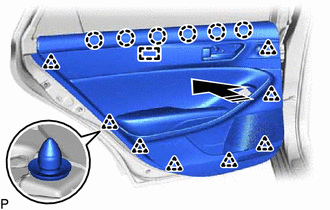
|
Install in this Direction |
(d) Install the rear door trim board sub-assembly with the 3 screws. |
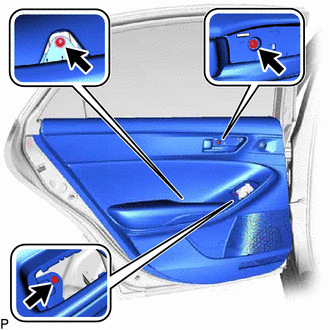 |
45. INSTALL REAR POWER WINDOW REGULATOR SWITCH ASSEMBLY WITH REAR DOOR UPPER ARMREST BASE PANEL
(a) Connect the connector.
(b) Engage the 3 claws to install the rear power window regulator switch assembly with rear door upper armrest base panel as shown in the illustration.
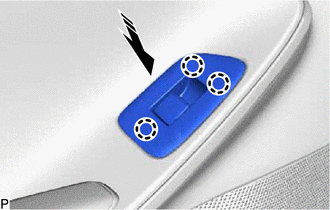
|
Install in this Direction |
46. INSTALL REAR DOOR TRIM ASSEMBLY COVER
(a) Engage the 2 guides and claw to install the rear door trim assembly cover. |
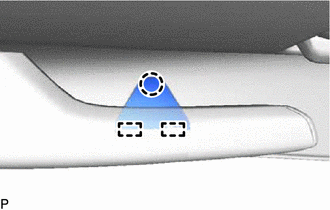 |
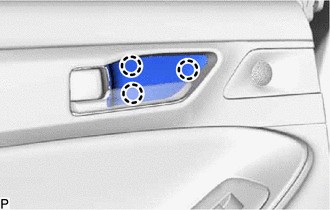
47. INSTALL REAR DOOR ARMREST COVER SUB-ASSEMBLY
(a) Engage the 3 claws to install the rear door armrest cover sub-assembly. |
 |
48. CONNECT CABLE TO NEGATIVE AUXILIARY BATTERY TERMINAL
for A25A-FXS:
Click here
for 2GR-FKS:
Click here
49. INSTALL LUGGAGE TRIM SERVICE HOLE COVER (for HV Model)
Click here
50. INITIALIZE POWER WINDOW CONTROL SYSTEM
for Gasoline Model:
Click here
for HV Model:
Click here
51. INSPECT POWER WINDOW OPERATION
for Gasoline Model:
Click here
for HV Model:
Click here