Outer Rear View Mirror
Components
COMPONENTS
ILLUSTRATION
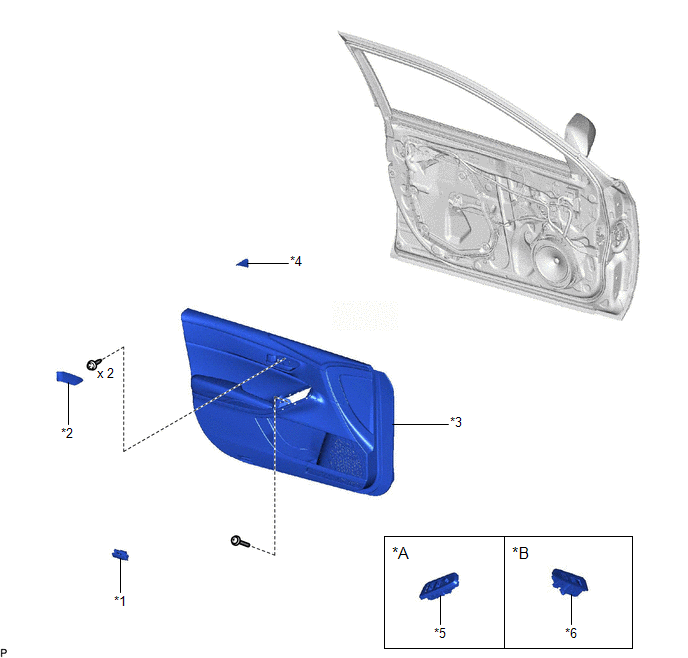
*A |
for Driver Side |
*B |
for Front Passenger Side |
*1 |
COURTESY LIGHT ASSEMBLY |
*2 |
FRONT DOOR ARMREST COVER SUB-ASSEMBLY |
*3 |
FRONT DOOR TRIM BOARD SUB-ASSEMBLY |
*4 |
FRONT DOOR TRIM POCKET COVER |
*5 |
MULTIPLEX NETWORK MASTER SWITCH ASSEMBLY WITH FRONT DOOR UPPER ARMREST BASE PANEL |
*6 |
POWER WINDOW REGULATOR SWITCH ASSEMBLY WITH FRONT DOOR UPPER ARMREST BASE PANEL |
ILLUSTRATION
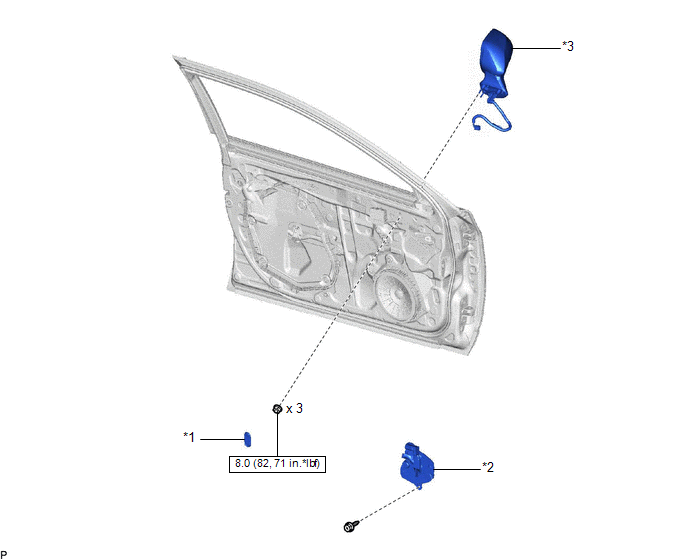
*1 |
HOLE PLUG |
*2 |
OUTER MIRROR INSTALL HOLE COVER |
*3 |
OUTER REAR VIEW MIRROR ASSEMBLY WITH COVER |
- |
- |
 |
N*m (kgf*cm, ft.*lbf): Specified torque |
- |
- |
ILLUSTRATION
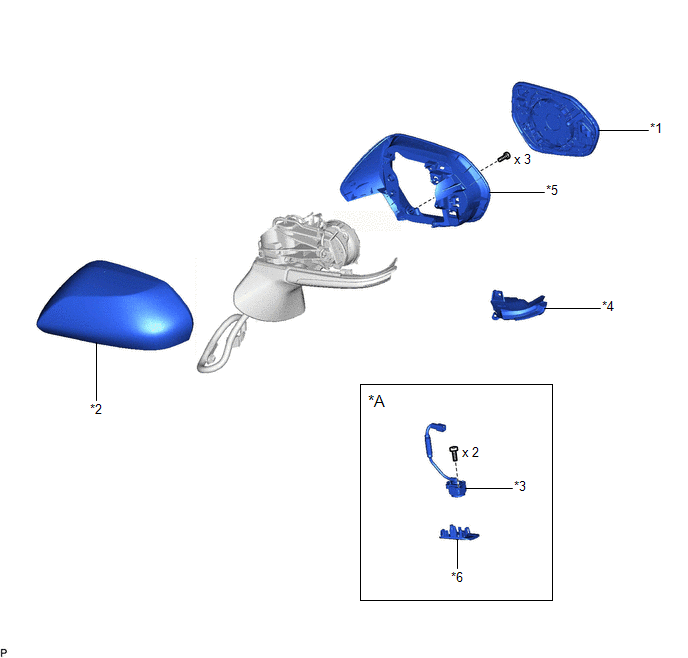
*A |
w/ Panoramic View Monitor System |
- |
- |
*1 |
OUTER MIRROR |
*2 |
OUTER MIRROR COVER |
*3 |
SIDE TELEVISION CAMERA ASSEMBLY |
*4 |
SIDE TURN SIGNAL LIGHT ASSEMBLY |
*5 |
VISOR HOUSING |
*6 |
CAMERA COVER |
Disassembly
DISASSEMBLY
HINT:
- Use the same procedure for the RH side and LH side.
- The following procedure is for the LH side.
PROCEDURE
1. REMOVE OUTER MIRROR
Click here 
2. REMOVE OUTER MIRROR COVER
Click here
3. REMOVE VISOR HOUSING
(a) Move the outer rear view mirror as shown in the illustration. |
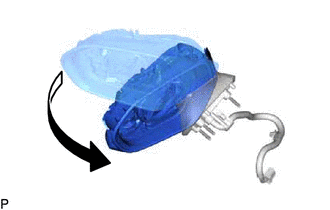 |
(b) Using a T20 "TORX" driver, remove the 3 screws. |
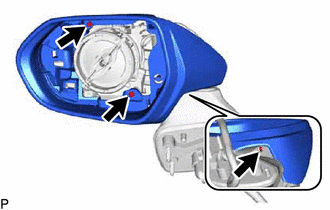 |
(c) Disengage the 5 claws as shown in the illustration to remove the visor housing.
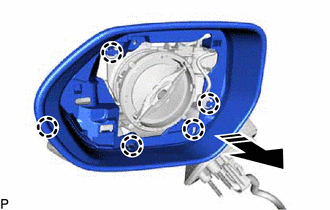
 |
Remove in this Direction |
4. REMOVE SIDE TURN SIGNAL LIGHT ASSEMBLY
Click here
5. REMOVE SIDE TELEVISION CAMERA ASSEMBLY (w/ Panoramic View Monitor System)
Click here
Inspection
INSPECTION
PROCEDURE
1. INSPECT OUTER REAR VIEW MIRROR ASSEMBLY RH (w/o Panoramic View Monitor System)
(a) Check the operation of the mirror surface.
NOTICE:
If the mirror surface is fully turned to the right, left, upward or downward position, the motor slips and produces a clicking noise. This is not a malfunction.
(1) Disconnect the outer rear view mirror assembly RH connector. |
|
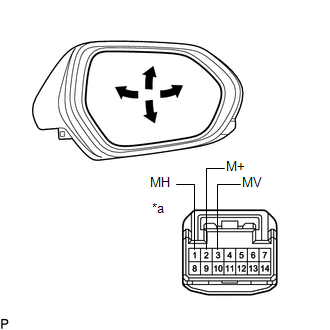
(2) Apply auxiliary battery voltage and check the operation of the mirror surface.
OK:
Auxiliary Battery Connection | Specified Condition |
|---|---|
Auxiliary battery positive (+) → Terminal 3 (MV) Auxiliary battery negative (-) → Terminal 2 (M+) |
Turns upward |
Auxiliary battery positive (+) → Terminal 2 (M+) Auxiliary battery negative (-) → Terminal 3 (MV) |
Turns downward |
Auxiliary battery positive (+) → Terminal 1 (MH) Auxiliary battery negative (-) → Terminal 2 (M+) |
Turns left |
Auxiliary battery positive (+) → Terminal 2 (M+) Auxiliary battery negative (-) → Terminal 1 (MH) |
Turns right |
If the result is not as specified, replace the outer rear view mirror assembly RH.
(b) Check the operation of the mirror heater.
(1) Disconnect the outer rear view mirror assembly RH connector. |
|
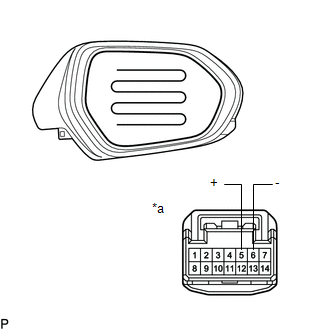
(2) Measure the resistance according to the value(s) in the table below.
Standard Resistance:
Tester Connection | Condition | Specified Condition |
|---|---|---|
5 (+) - 6 (-) |
25 °C |
10 to 17 Ω |
If the result is not as specified, replace the outer rear view mirror assembly RH.
(3) Connect a cable from the positive (+) auxiliary battery terminal to terminal 5 and the negative (-) auxiliary battery terminal to terminal 6, then check that the mirror becomes warm.
HINT:
It takes a short time for the mirror to become warm.
OK:
Mirror becomes warm.
If the result is not as specified, replace the outer rear view mirror assembly RH.
2. INSPECT OUTER REAR VIEW MIRROR ASSEMBLY RH (w/ Panoramic View Monitor System)
(a) Check the operation of the mirror surface.
NOTICE:
If the mirror surface is fully turned to the right, left, upward or downward position, the motor slips and produces a clicking noise. This is not a malfunction.
(1) Disconnect the outer rear view mirror assembly RH connector. |
|
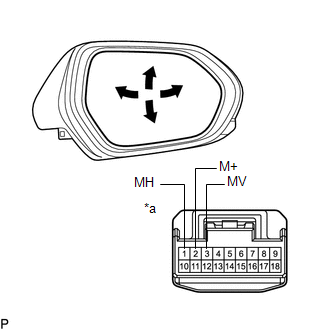
(2) Apply auxiliary battery voltage and check the operation of the mirror surface.
OK:
Auxiliary Battery Connection | Specified Condition |
|---|---|
Auxiliary battery positive (+) → Terminal 3 (MV) Auxiliary battery negative (-) → Terminal 2 (M+) |
Turns upward |
Auxiliary battery positive (+) → Terminal 2 (M+) Auxiliary battery negative (-) → Terminal 3 (MV) |
Turns downward |
Auxiliary battery positive (+) → Terminal 1 (MH) Auxiliary battery negative (-) → Terminal 2 (M+) |
Turns left |
Auxiliary battery positive (+) → Terminal 2 (M+) Auxiliary battery negative (-) → Terminal 1 (MH) |
Turns right |
If the result is not as specified, replace the outer rear view mirror assembly RH.
(b) Check the operation of the mirror heater.
(1) Disconnect the outer rear view mirror assembly RH connector. |
|
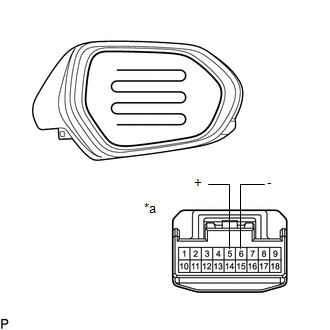
(2) Measure the resistance according to the value(s) in the table below.
Standard Resistance:
Tester Connection | Condition | Specified Condition |
|---|---|---|
5 (+) - 6 (-) |
25 °C |
10 to 17 Ω |
If the result is not as specified, replace the outer rear view mirror assembly RH.
(3) Connect a cable from the positive (+) auxiliary battery terminal to terminal 5 and the negative (-) auxiliary battery terminal to terminal 6, then check that the mirror becomes warm.
HINT:
It takes a short time for the mirror to become warm.
OK:
Mirror becomes warm.
If the result is not as specified, replace the outer rear view mirror assembly RH.
3. INSPECT OUTER REAR VIEW MIRROR ASSEMBLY LH (w/o Panoramic View Monitor System)
(a) Check the operation of the mirror surface.
NOTICE:
If the mirror surface is fully turned to the right, left, upward or downward position, the motor slips and produces a clicking noise. This is not a malfunction.
(1) Disconnect the outer rear view mirror assembly LH connector. |
|
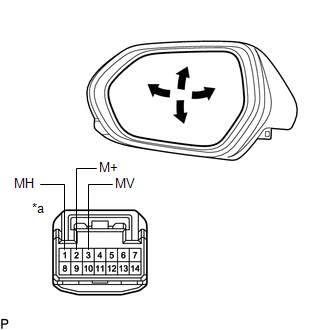
(2) Apply auxiliary battery voltage and check the operation of the mirror surface.
OK:
Auxiliary Battery Connection | Specified Condition |
|---|---|
Auxiliary battery positive (+) → Terminal 3 (MV) Auxiliary battery negative (-) → Terminal 2 (M+) |
Turns upward |
Auxiliary battery positive (+) → Terminal 2 (M+) Auxiliary battery negative (-) → Terminal 3 (MV) |
Turns downward |
Auxiliary battery positive (+) → Terminal 1 (MH) Auxiliary battery negative (-) → Terminal 2 (M+) |
Turns left |
Auxiliary battery positive (+) → Terminal 2 (M+) Auxiliary battery negative (-) → Terminal 1 (MH) |
Turns right |
If the result is not as specified, replace the outer rear view mirror assembly LH.
(b) Check the operation of the mirror heater.
(1) Disconnect the outer rear view mirror assembly LH connector. |
|
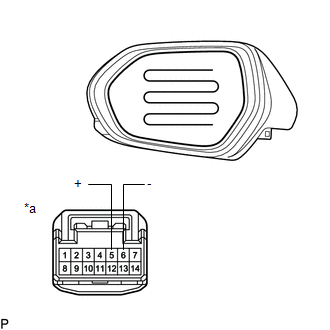
(2) Measure the resistance according to the value(s) in the table below.
Standard Resistance:
Tester Connection | Condition | Specified Condition |
|---|---|---|
5 (+) - 6 (-) |
25 °C |
10 to 17 Ω |
If the result is not as specified, replace the outer rear view mirror assembly LH.
(3) Connect a cable from the positive (+) auxiliary battery terminal to terminal 5 and the negative (-) auxiliary battery terminal to terminal 6, then check that the mirror becomes warm.
HINT:
It takes a short time for the mirror to become warm.
OK:
Mirror becomes warm.
If the result is not as specified, replace the outer rear view mirror assembly LH.
4. INSPECT OUTER REAR VIEW MIRROR ASSEMBLY LH (w/ Panoramic View Monitor System)
(a) Check the operation of the mirror surface.
NOTICE:
If the mirror surface is fully turned to the right, left, upward or downward position, the motor slips and produces a clicking noise. This is not a malfunction.
(1) Disconnect the outer rear view mirror assembly LH connector. |
|
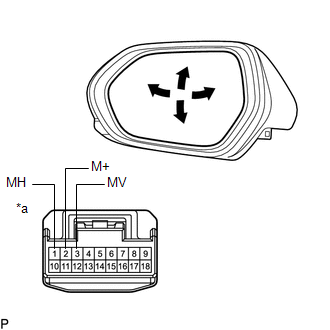
(2) Apply auxiliary battery voltage and check the operation of the mirror surface.
OK:
Auxiliary Battery Connection | Specified Condition |
|---|---|
Auxiliary battery positive (+) → Terminal 3 (MV) Auxiliary battery negative (-) → Terminal 2 (M+) |
Turns upward |
Auxiliary battery positive (+) → Terminal 2 (M+) Auxiliary battery negative (-) → Terminal 3 (MV) |
Turns downward |
Auxiliary battery positive (+) → Terminal 1 (MH) Auxiliary battery negative (-) → Terminal 2 (M+) |
Turns left |
Auxiliary battery positive (+) → Terminal 2 (M+) Auxiliary battery negative (-) → Terminal 1 (MH) |
Turns right |
If the result is not as specified, replace the outer rear view mirror assembly LH.
(b) Check the operation of the mirror heater.
(1) Disconnect the outer rear view mirror assembly LH connector. |
|
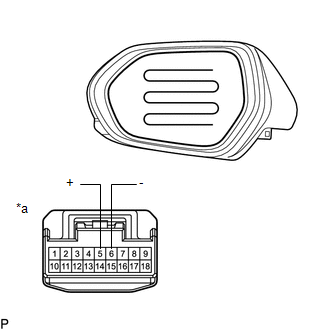
(2) Measure the resistance according to the value(s) in the table below.
Standard Resistance:
Tester Connection | Condition | Specified Condition |
|---|---|---|
5 (+) - 6 (-) |
25 °C |
10 to 17 Ω |
If the result is not as specified, replace the outer rear view mirror assembly LH.
(3) Connect a cable from the positive (+) auxiliary battery terminal to terminal 5 and the negative (-) auxiliary battery terminal to terminal 6, then check that the mirror becomes warm.
HINT:
It takes a short time for the mirror to become warm.
OK:
Mirror becomes warm.
If the result is not as specified, replace the outer rear view mirror assembly LH.
Installation
INSTALLATION
HINT:
- Use the same procedure for the RH side and LH side.
- The following procedure is for the LH side.
PROCEDURE
1. INSTALL OUTER REAR VIEW MIRROR ASSEMBLY WITH COVER
(a) Engage the 2 guides and claw.
(b) Install the outer rear view mirror assembly with cover with the 3 nuts.
Torque:
8 N·m {82 kgf·cm, 71 in·lbf}
(c) Engage the clamp.
2. INSTALL OUTER MIRROR INSTALL HOLE COVER
(a) Engage the clip and 2 claws.
(b) Install the outer mirror install hole cover with the screw.
(c) Engage the clamp.
(d) Connect the connector.
3. INSTALL HOLE PLUG
(a) Install the hole plug.
4. INSTALL FRONT DOOR TRIM BOARD SUB-ASSEMBLY
Click here 
5. INSTALL COURTESY LIGHT ASSEMBLY
Click here
6. INSTALL MULTIPLEX NETWORK MASTER SWITCH ASSEMBLY WITH FRONT DOOR UPPER ARMREST BASE PANEL (for Driver Side)
Click here
7. INSTALL POWER WINDOW REGULATOR SWITCH ASSEMBLY WITH FRONT DOOR UPPER ARMREST BASE PANEL (for Front Passenger Side)
Click here
8. INSTALL FRONT DOOR TRIM POCKET COVER
Click here
9. INSTALL FRONT DOOR ARMREST COVER SUB-ASSEMBLY
Click here
10. PERFORM CALIBRATION (w/ Panoramic View Monitor System)
for Gasoline Model:
Click here
for HV Model:
Click here
Reassembly
REASSEMBLY
HINT:
- Use the same procedure for the RH side and LH side.
- The following procedure is for the LH side.
PROCEDURE
1. INSTALL SIDE TELEVISION CAMERA ASSEMBLY (w/ Panoramic View Monitor System)
Click here 
2. INSTALL SIDE TURN SIGNAL LIGHT ASSEMBLY
Click here
3. INSTALL VISOR HOUSING
(a) Engage the 5 claws as shown in the illustration.
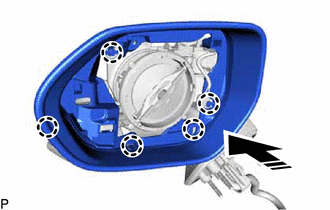
 |
Install in this Direction |
(b) Using a T20 "TORX" driver, install the visor housing with the 3 screws. |
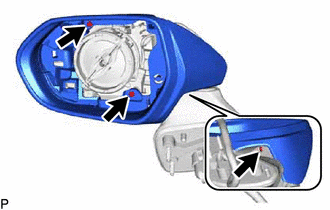 |
(c) Move the outer rear view mirror assembly as shown in the illustration. |
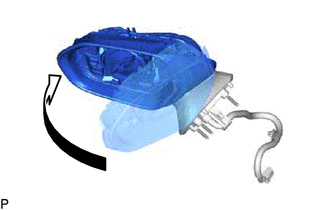 |
4. INSTALL OUTER MIRROR COVER
Click here
5. INSTALL OUTER MIRROR
Click here
Removal
REMOVAL
The necessary procedures (adjustment, calibration, initialization, or registration) that must be performed after parts are removed and installed, or replaced during outer rear view mirror assembly with cover removal/installation are shown below.
Necessary Procedure After Parts Removed/Installed/Replaced (for Gasoline Model)Replaced Part or Performed Procedure | Necessary Procedure | Effect/Inoperative Function When Necessary Procedures are not Performed | Link |
|---|---|---|---|
|
Side television camera view adjustment |
Panoramic view monitor system |
 |
Replaced Part or Performed Procedure | Necessary Procedure | Effect/Inoperative Function When Necessary Procedures are not Performed | Link |
|---|---|---|---|
|
Side television camera view adjustment |
Panoramic view monitor system |
|
HINT:
- Use the same procedure for the RH side and LH side.
- The following procedure is for the LH side.
PROCEDURE
1. REMOVE FRONT DOOR ARMREST COVER SUB-ASSEMBLY
Click here
2. REMOVE FRONT DOOR TRIM POCKET COVER
Click here
3. REMOVE MULTIPLEX NETWORK MASTER SWITCH ASSEMBLY WITH FRONT DOOR UPPER ARMREST BASE PANEL (for Driver Side)
Click here
4. REMOVE POWER WINDOW REGULATOR SWITCH ASSEMBLY WITH FRONT DOOR UPPER ARMREST BASE PANEL (for Front Passenger Side)
Click here
5. REMOVE COURTESY LIGHT ASSEMBLY
Click here
6. REMOVE FRONT DOOR TRIM BOARD SUB-ASSEMBLY
Click here
7. REMOVE HOLE PLUG
(a) Remove the hole plug. |
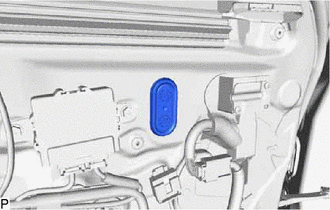 |
8. REMOVE OUTER MIRROR INSTALL HOLE COVER
(a) Disconnect the connector. |
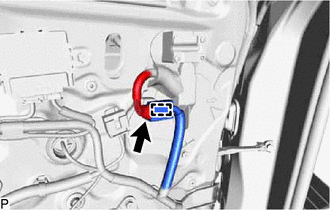 |
(b) Disengage the clamp.
(c) Remove the screw. |
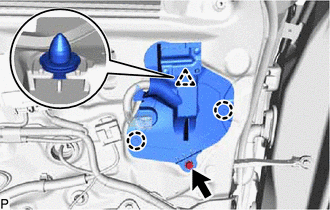 |
(d) Disengage the clip and 2 claws to remove the outer mirror install hole cover.
9. REMOVE OUTER REAR VIEW MIRROR ASSEMBLY WITH COVER
(a) Disengage the clamp. |
|
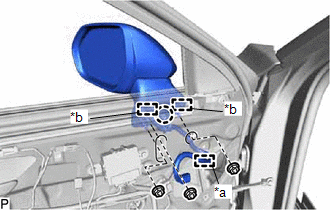
(b) Remove the 3 nuts.
(c) Disengage the claw and 2 guides, and remove the outer rear view mirror assembly with cover.