Rear Door Window Frame Moulding
Components
COMPONENTS
ILLUSTRATION
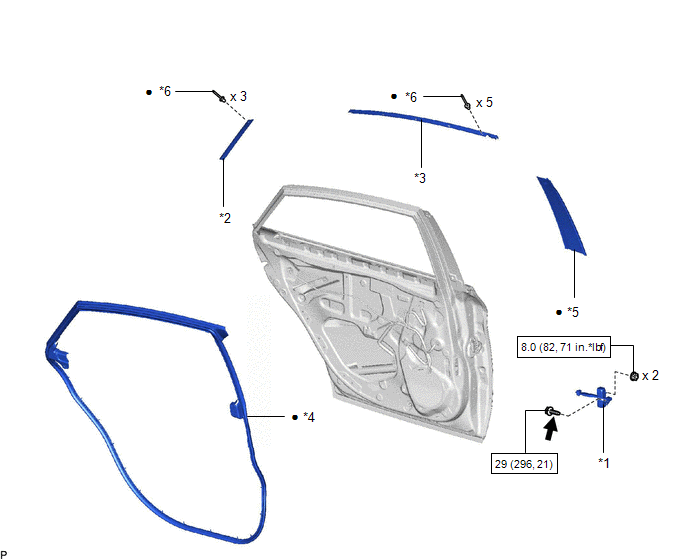
*1 |
REAR DOOR CHECK ASSEMBLY |
*2 |
REAR DOOR REAR WINDOW FRAME MOULDING |
*3 |
REAR DOOR UPPER WINDOW FRAME MOULDING |
*4 |
REAR DOOR WEATHERSTRIP |
*5 |
REAR DOOR WINDOW FRAME MOULDING (CENTER PILLAR SIDE) |
*6 |
RIVET |
 |
N*m (kgf*cm, ft.*lbf): Specified torque |
● |
Non-reusable part |
 |
Toyota Genuine Adhesive 1324, Three Bond 1324 or equivalent |
★ |
Precoated part |
Installation
INSTALLATION
HINT:
- Use the same procedure for the RH side and LH side.
- The following procedure is for the LH side.
PROCEDURE
1. INSTALL REAR DOOR REAR WINDOW FRAME MOULDING
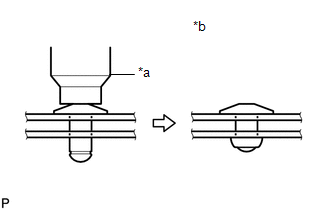
(a) Using an air riveter or hand riveter with a nose piece, install the rear door rear window frame moulding with 3 new rivets.
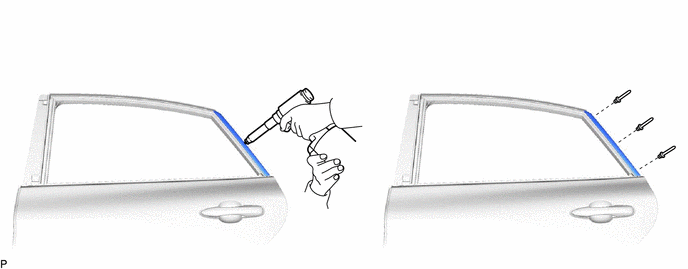
HINT:
If the mandrel of the rivet does not come off on the first operation of the riveter, slide the riveter forward on the mandrel and operate it again.
NOTICE:
- Do not pry the rivet with the riveter, as this will cause damage to the riveter and mandrel.
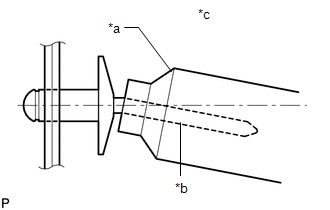
*a
Riveter
*b
Mandrel
*c
Incorrect
- Confirm that the rivets are seated properly against the moulding.
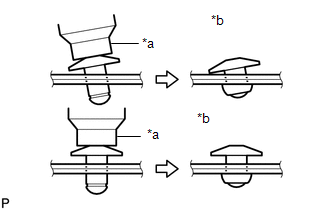
*a
Riveter
*b
Incorrect
- Do not tilt the riveter when installing the rivet to the moulding.
- Do not leave any space between the rivet head and moulding.
- Do not leave any space between the moulding and door frame. Firmly hold the 2 items together while installing the rivet.
*a
Riveter
*b
Incorrect
2. INSTALL REAR DOOR UPPER WINDOW FRAME MOULDING
(a) Engage the guide to temporarily install the rear door upper window frame moulding to the door frame.
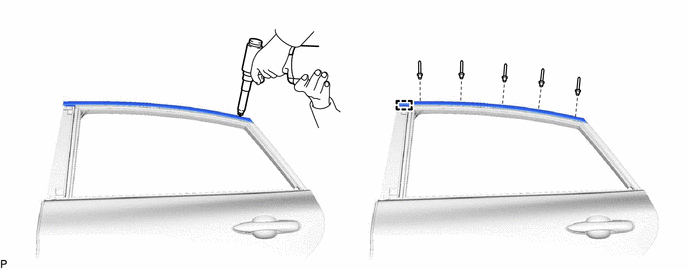
(b) Using an air riveter or hand riveter with a nose piece, install the rear door upper window frame moulding with 5 new rivets.
HINT:
If the mandrel of the rivet does not come off on the first operation of the riveter, slide the riveter forward on the mandrel and operate it again.
NOTICE:
- Do not pry the rivet with the riveter, as this will cause damage to the riveter and mandrel.
*a
Riveter
*b
Mandrel
*c
Incorrect
- Confirm that the rivets are seated properly against the moulding.
*a
Riveter
*b
Incorrect
- Do not tilt the riveter when installing the rivet to the moulding.
- Do not leave any space between the rivet head and moulding.
- Do not leave any space between the moulding and door frame. Firmly hold the 2 items together while installing the rivet.
*a
Riveter
*b
Incorrect
3. INSTALL REAR DOOR WINDOW FRAME MOULDING (CENTER PILLAR SIDE)
HINT:
When installing a new rear door window frame moulding (center pillar side), heat the vehicle body and rear door window frame moulding (center pillar side) using a heat light.
Heating TemperatureItem | Temperature |
|---|---|
Vehicle Body |
40 to 60 °C |
Rear Door Window Frame Moulding (Center Pillar Side) |
20 to 30 °C |
CAUTION:
- Do not touch the heat light and heated parts, touching the heat light may result in burns.
- Touching heated parts for a long time may result in burns.
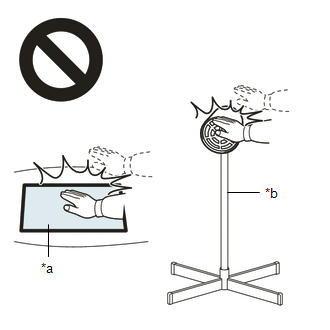
*a |
Heated Part |
*b |
Heat Light |
NOTICE:
Do not heat the vehicle body or rear door window frame moulding (center pillar side) excessively.
(a) Clean the vehicle body surface.
(1) Using a heat light, heat the vehicle body surface.
(2) Remove any double-sided tape from the vehicle body.
(3) Wipe off any tape adhesive residue with cleaner.
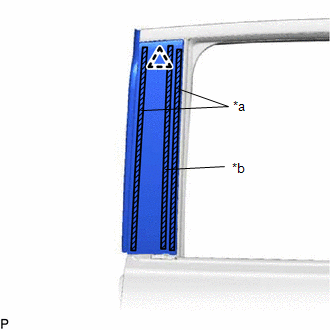
(b) Install a new rear door window frame moulding (center pillar side).
(1) Using a heat light, heat the vehicle body and rear door window frame moulding (center pillar side).
(2) Remove the release paper from the rear door window frame moulding (center pillar side).
HINT:
After removing the release paper, keep the exposed adhesive free from foreign matter.
(3) Engage the clip and attach the double-sided tape and caulking sponge to install the rear door window frame moulding (center pillar side). HINT: Press the rear door window frame moulding (center pillar side) firmly to install it. |
|
4. INSTALL REAR DOOR WEATHERSTRIP
Click here 
5. INSTALL REAR DOOR CHECK ASSEMBLY
Click here
6. INSTALL REAR DOOR BELT MOULDING ASSEMBLY
Click here
Removal
REMOVAL
The necessary procedures (adjustment, calibration, initialization, or registration) that must be performed after parts are removed and installed, or replaced during rear door window frame moulding removal/installation are shown below.
Necessary Procedure After Parts Removed/Installed/Replaced (for Gasoline Model)Replaced Part or Performed Procedure | Necessary Procedure | Effect/Inoperative Function When Necessary Procedures are not Performed | Link |
|---|---|---|---|
| *: When performing learning using the Techstream. Click here |
|||
Disconnect cable from negative battery terminal |
Perform steering sensor zero point calibration |
Lane Departure Alert System (w/ Steering Control) |
 |
Pre-collision System |
|||
Intelligent Clearance Sonar System* |
|||
Lighting System (for Gasoline Model with Cornering Light) |
|||
Memorize steering angle neutral point |
Parking Assist Monitor System |
|
|
Panoramic View Monitor System |
|
||
|
Initialize power window control system |
|
|
Replaced Part or Performed Procedure | Necessary Procedure | Effect/Inoperative Function When Necessary Procedures are not Performed | Link |
|---|---|---|---|
| *: When performing learning using the Techstream. Click here |
|||
Disconnect cable from negative auxiliary battery terminal |
Perform steering sensor zero point calibration |
Lane Departure Alert System (w/ Steering Control) |
|
Pre-collision System |
|||
Intelligent Clearance Sonar System* |
|||
Lighting System (for HV Model with Cornering Light) |
|||
Memorize steering angle neutral point |
Parking Assist Monitor System |
|
|
Panoramic View Monitor System |
|
||
|
Initialize power window control system |
|
|
HINT:
- Use the same procedure for the RH side and LH side.
- The following procedure is for the LH side.
PROCEDURE
1. REMOVE REAR DOOR BELT MOULDING ASSEMBLY
Click here
2. REMOVE REAR DOOR CHECK ASSEMBLY
Click here
3. REMOVE REAR DOOR WEATHERSTRIP
Click here
4. REMOVE REAR DOOR WINDOW FRAME MOULDING (CENTER PILLAR SIDE)
HINT:
When removing the rear door window frame moulding (center pillar side), heat the vehicle body and rear door window frame moulding (center pillar side) using a heat light.
Heating TemperatureItem | Temperature |
|---|---|
Vehicle Body |
40 to 60 °C |
Rear Door Window Frame Moulding (Center Pillar Side) |
20 to 30 °C |
CAUTION:
- Do not touch the heat light and heated parts, touching the heat light may result in burns.
- Touching heated parts for a long time may result in burns.
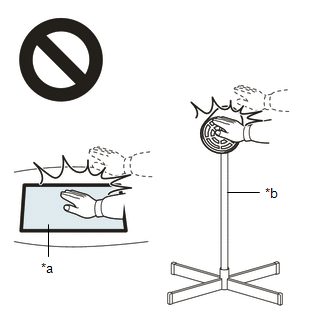
*a |
Heated Part |
*b |
Heat Light |
NOTICE:
Do not heat the vehicle body or rear door window frame moulding (center pillar side) excessively.
(a) Using a heat light, heat the rear door window frame moulding (center pillar side).
(b) Using a moulding remover, disengage the clip and separate the double-sided tape and caulking sponge to remove the rear door window frame moulding (center pillar side). |
|
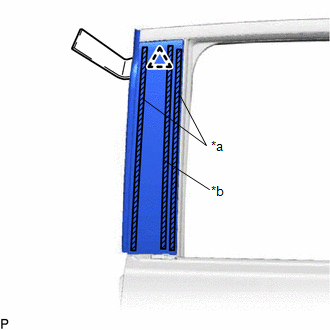
5. REMOVE REAR DOOR UPPER WINDOW FRAME MOULDING
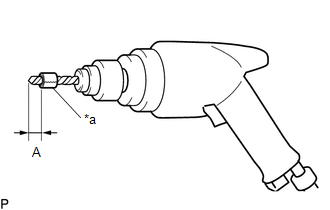
(a) Insert a 4.0 mm (0.157 in.) drill bit into a drill.
(b) Tape the 4.0 mm (0.157 in.) drill bit 5.0 mm (0.197 in.) from the tip as shown in the illustration. Standard Measurement:
NOTICE: Tape the 4.0 mm (0.157 in.) drill bit to prevent the drill bit from going too deep. |
|
(c) Lightly press the drill bit against the rivets to drill off the rivet flanges, and remove the 5 rivets.
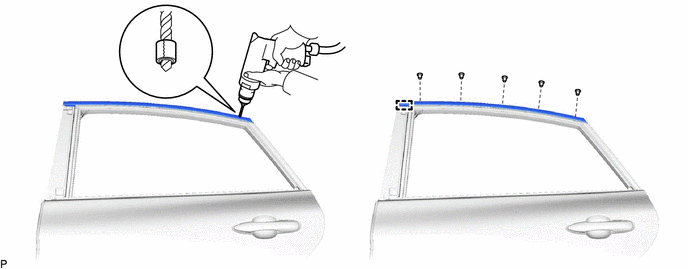
CAUTION:
Be careful of the drilled rivets, as they may be hot.
NOTICE:
- Pressing the drill too firmly will cause the rivet to turn and result in the rivet not being drilled through.
- Prying the rivets with the drill may damage the rivet installation holes or drill bit.
(d) Using a vacuum cleaner, remove the rivet fragments and shavings from the drilled areas.
(e) Disengage the guide to remove the rear door upper window frame moulding.
6. REMOVE REAR DOOR REAR WINDOW FRAME MOULDING
(a) Insert a 4.0 mm (0.157 in.) drill bit into a drill.
(b) Tape the 4.0 mm (0.157 in.) drill bit 5.0 mm (0.197 in.) from the tip as shown in the illustration. Standard Measurement:
NOTICE: Tape the 4.0 mm (0.157 in.) drill bit to prevent the drill bit from going too deep. |
|
(c) Lightly press the drill bit against the rivets to drill off the rivet flanges, and remove the 3 rivets and rear door rear window frame moulding.
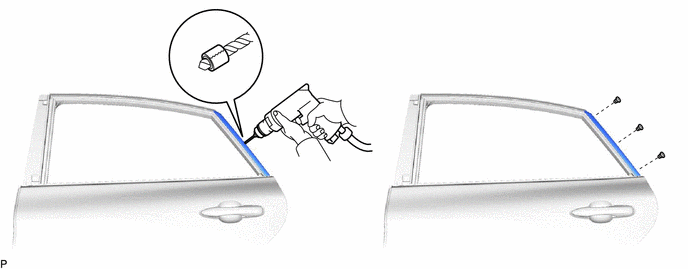
CAUTION:
Be careful of the drilled rivets, as they may be hot.
NOTICE:
- Pressing the drill too firmly will cause the rivet to turn and result in the rivet not being drilled through.
- Prying the rivets with the drill may damage the rivet installation holes or drill bit.
(d) Using a vacuum cleaner, remove the rivet fragments and shavings from the drilled areas.