Installation
Always replace all 4 brake shoes and use the same brand. Blow out the brake drum and backing plate with compressed air or clean them with denatured alcohol.
Caution: Do not inhale the brake dust, as it is harmful to health. While the brake shoes are removed, do not press the brake pedal, as the brake pistons could slide out of the wheel brake cylinder. If the wheel brake cylinder is wet with brake fluid, replace the wheel brake cylinder.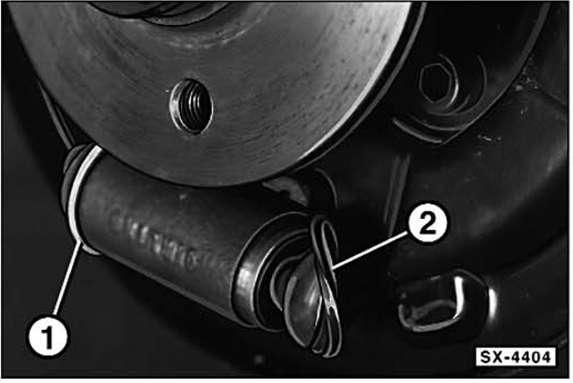
Pull off the dust boots - 1 - and - 2 - on the wheel cylinder. Caution: do not pull out the brake piston. Check whether there is moisture behind the dust boot. If necessary, replace the wheel cylinder. Refit the dust boot.
Check the brake surface of the drum for grooves by running a finger over it.
Replace grooved brake drums. Always replace both brake drums.
Remove minor unevenness and rust marks on the brake surface with fine emery cloth (grit 120 to 150).
Hold the brake shoes in the brake drum to check that both parts have approximately the same curvature. If necessary, replace the brake drum.
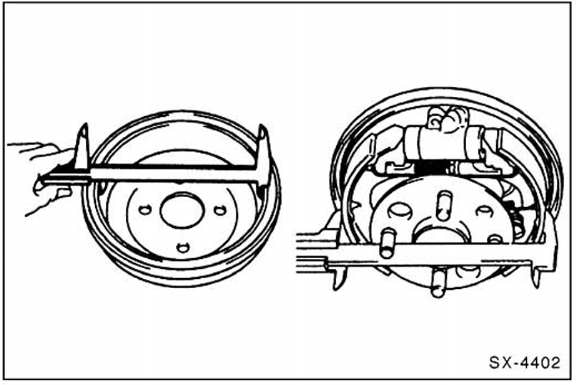
Measure the inside diameter of the brake drum and have it machined if necessary. If the wear limit is reached, replace the drum. Always replace both brake drums on one axle.
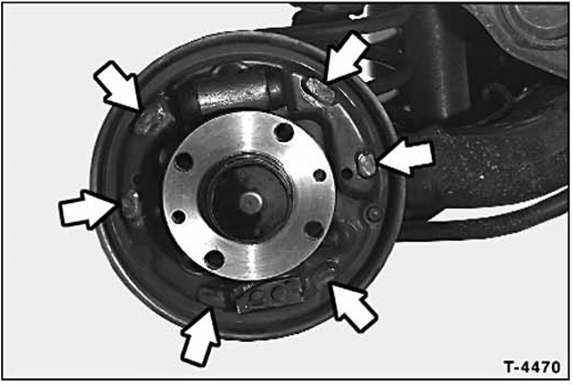
Clean the six contact surfaces between the brake shoes and the backing plate, and before installing the brake shoes, apply a thin coat of high-temperature grease, for example Liqui Moly LM-36 or LM-508-ASC. If necessary, clean these areas first with a soft metal wire brush.
Hook the handbrake cable into the brake lever.
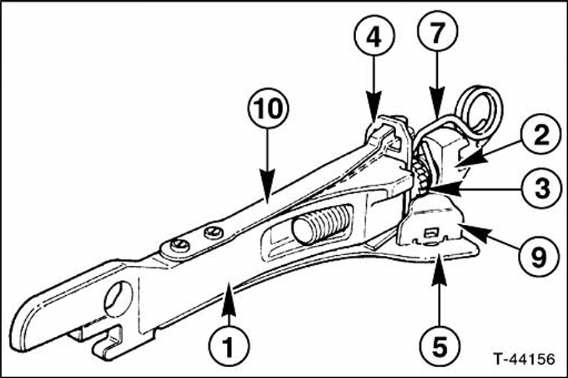
Reset the adjuster unit in the push rod. To do this, pull back clip - 9 - against the spring force of the leaf spring - 5 -. Turn pinion - 3 - counterclockwise. This shortens push rod - 1 - via adjusting screw - 2 -. Then turn the pinion clockwise until spring - 7 - is touched. Then turn the pinion clockwise a further 1/6 turn.
10 - Bimetal leaf spring.
Note: when the brake is very hot (+100 to +110 °C), bimetal spring - 10 - bends upward and blocks tab - 4 - in the neutral position. This prevents incorrect adjustment when the brake is strongly heated.
If removed, attach the adjuster unit to the rear brake shoe and hook in retaining spring - 8 -, see illustration T-4474 on page 179.

Position rear brake shoe - 1 - against wheel cylinder - 2 - and support bearing - 4 -, press it against the backing plate and secure it with a G-clamp. Push pin - 5 - through the backing plate and brake shoe from the rear.
Fit the spring, compress it with the spring retainer and combination pliers, turn it 90° and hook the spring retainer into the retaining pin. Caution: when installing the brake shoes, do not damage the dust boots - 3 - on the wheel cylinder.
Install the front brake shoe in the same way.
Hook the left retaining spring - 6 - onto the adjuster unit.
Hook in the upper - 7 - and lower return spring - 8 -.
If used, remove the G-clamps.
If fitted, remove the rubber band from the wheel cylinder.
Fit the brake drum in line with the mark made during removal and tighten it to 10 N·m.
Fit the rear wheels so that the marks made during removal line up. Beforehand, lightly grease the centering seat of the rim on the wheel hub and the conical surface of the wheel bolts with wheel bearing grease. Do not grease or oil the threads of the wheel bolts. Install the wheels.
Lower the vehicle and tighten the wheel bolts crosswise to 90 N·m.
Press the foot brake several times so that the brake shoes center and adjust themselves.
Adjust the handbrake, see page 188.
Are the brake hose connections tightened?
Is the brake hose seated in the bracket?
Are the bleeder screws tightened?
Is there enough brake fluid in the reservoir?
With the engine running, carry out a leak check.
To do this, press the brake pedal with 200 to 300 N (equivalent to 20 to 30 kg) for about 10 seconds. The brake pedal must not sink. Check all connections for leaks.
Bed in new brake pads carefully: on a quiet road, brake several times from approx. 80 km/h to 40 km/h with light pedal pressure.
Let the brakes cool down somewhat between applications.
Note: brake pads must be disposed of as hazardous waste.
Local authorities can advise whether disposal with commercial waste similar to household waste is permitted.
Test yourself
A quick Fiat Bravo quiz: every answer comes with an explanation and a link to the manual page.