1.4 L Engine
Disconnect the negative (-) battery terminal cable. Caution: this may erase electronic memories, such as the radio code. Observe the notes in the chapter "Battery Removal and Installation".
Mark the position of the front right wheel relative to the wheel hub with paint. This allows the balanced wheel to be refitted in the same position. When loosening the wheel bolts, the vehicle must be standing on the ground. Raise the front of the vehicle and remove the front right wheel.
Remove the front right inner fender liner, see page 204.
Remove the serpentine belt, see page 58.
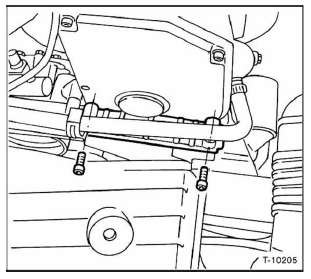
Remove the coolant pipe bracket from the timing belt cover.

Remove and detach the upper timing belt cover.
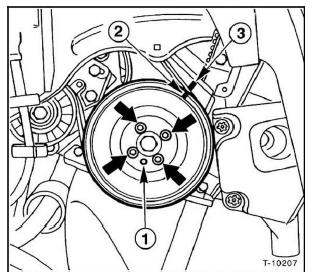
Loosen the bolts (arrows) for the crankshaft pulley, but do not remove them yet. To prevent the crankshaft from turning when loosening the bolts, engage fifth gear and apply the parking brake, thereby locking the engine.
Turn the engine until the mark - 2 - on the crankshaft pulley aligns with the mark - 3 - on the rear timing belt cover. (1 - pulley locating pin).
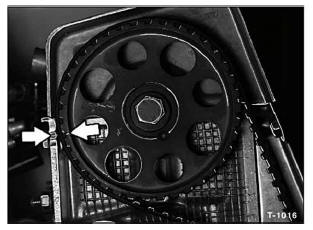
In this position, the mark on the camshaft gear must align with the TDC mark on the rear timing belt cover. If there is no mark, mark the position of the camshaft gear with a coloured pencil.
Remove the V-belt pulley without changing the engine position.
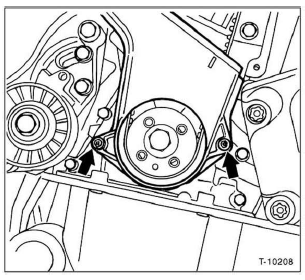
Remove the lower timing belt cover, bolts (arrows).
Remove the cylinder head cover, see page 36.
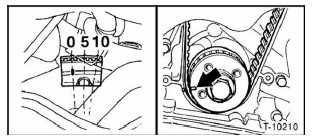
The engine is at TDC of cylinder 1. Check the TDC position again: the notch on the crankshaft timing belt pulley must align with the mark on the oil pump cover (arrow, right illustration). On the transmission inspection window, the flywheel must align with the "0" mark (left illustration).
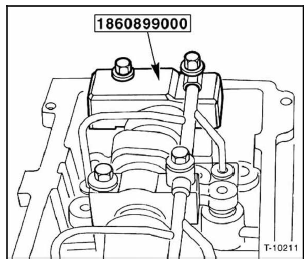
Fiat workshops lock the camshaft with the special tool shown. To do this, remove the last (5th) camshaft bearing cap on the transmission side.
Loosen the bolts of the second-to-last (4th) cap slightly. Take care not to bend the oil line. Fit the tool and tighten it down.
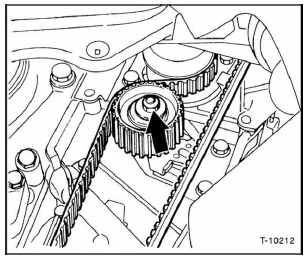
Loosen the tensioner pulley mounting nut (arrow) with an open-ring wrench. This releases the timing belt tension.
Remove the timing belt. Afterwards, do not change the position of the gears. Caution: if the camshaft must be turned through a large angle, make sure no piston is at top dead center (TDC), otherwise valves or pistons may be damaged.
If necessary, turn the crankshaft approx. 90° (1/4 turn) before or after TDC. However, do not turn the pulley more than 90° in total.
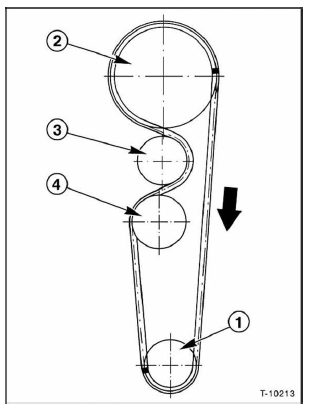
Crankshaft
Camshaft,
Coolant pump
Tensioner pulley
Fit the timing belt so that the arrow on the belt points in the direction of engine rotation (arrow).
Start at crankshaft sprocket - 1 - and fit the timing belt following the numbering in the illustration.
Caution: when fitting the timing belt, do not change the camshaft or crankshaft position.
Otherwise, serious engine damage may occur, or the engine will no longer deliver its full power. After the timing belt has been tensioned, check the camshaft and crankshaft settings again.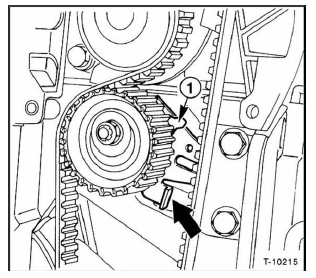
Using a suitable wooden piece (e.g. a hammer handle), tension the tensioner pulley at the lever (arrow) until pointer - 1 - is at the upper stop. The tensioner pulley is then at maximum tension. Tighten the tensioner pulley mounting nut.
If used, remove the camshaft locking tool. Fit camshaft bearing cap no. 5 and tighten evenly to 15 N·m. Also tighten bearing cap no. 4 to 15 N·m.
Turn the crankshaft 2 revolutions in the direction of engine rotation (clockwise). This distributes the timing belt tension evenly.
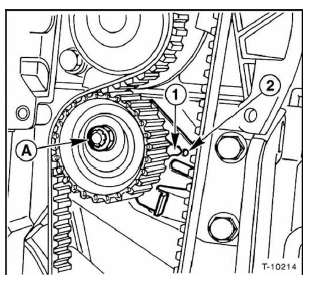
Carefully loosen the tensioner pulley mounting nut - a - with an open-ring wrench. Counterhold the tensioner lever with a wooden piece, otherwise the timing belt will slacken again.
Slowly release the tensioner lever and align the movable pointer - 1 - with mark - 2 -. In this position, tighten the timing belt tensioner nut to 30 N·m with a torque wrench.
Turn the crankshaft twice in the direction of engine rotation and recheck the setting. The TDC mark on the camshaft sprocket must align with the TDC mark on the cylinder head, and at the same time the marks on the crankshaft sprocket (see illustrations under "Removal").
If the marks do not align exactly, loosen the timing belt, offset it on the belt pulleys, and tension it again as specified.
Check the rubber seal for the cylinder head cover for damage and replace if necessary. Place the cylinder head cover on the cylinder head and tighten lightly to 8 N·m.
Bolt the ignition coils with brackets to the cylinder head.
Fit the lower timing belt cover first, then the upper one, and bolt them in place.
Fit the crankshaft pulley and tighten the 4 bolts to 30 N·m. The centering pin must engage the hole - 1 - in the pulley; see illustration t-10207 under "Removal".
Install and tension the poly-V belt, see page 58.
Clip the poly-V belt cover into the wheel arch and bolt it in place.
Position the right front wheel so that the marks made during removal line up. Before fitting, lightly grease the wheel centering seat and the conical surface of the wheel bolts with wheel bearing grease. Do not grease or oil the wheel bolt threads. Fit the wheels and lower the vehicle, then tighten the wheel bolts in a crosswise sequence to 90 N·m.
Connect the negative (-) battery cable. Set the clock.
Program the radio stations.
Test yourself
A quick Fiat Bravo quiz: every answer comes with an explanation and a link to the manual page.