1.8 L engine
Disconnect the negative (-) battery terminal cable. Caution: this may erase electronic memories, such as the radio code. Observe the notes in the chapter "Battery Removal and Installation".
Mark the position of the front right wheel relative to the wheel hub with paint. This allows the balanced wheel to be refitted in the same position. When loosening the wheel bolts, the vehicle must be standing on the ground. Raise the front of the vehicle and remove the front right wheel.
Remove the V-belt for the power steering pump and the poly-V belt, see page 58.

Unscrew the idler pulley for the V-ribbed belt -arrow-, otherwise the timing belt cover cannot be removed.
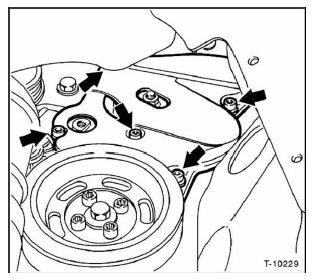
Unscrew the lower screws of the timing belt cover -arrows-,
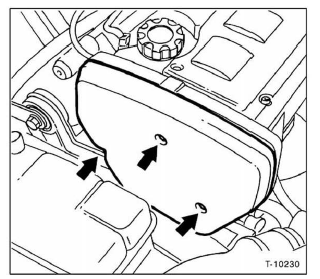
Unscrew the upper timing belt cover -arrows- and remove it.
Remove the cylinder head cover, see page 36.
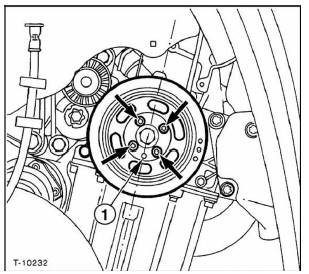
Turn the engine until the centring pin - 1 - of the crankshaft pulley points downwards along the engine centre axis.
Unscrew the V-ribbed belt pulley -arrows-, without changing the engine position.

Check the TDC position of the engine again. The centring pin of the crankshaft pulley must point downwards. At the transmission inspection window, the engine flywheel must align with the "0" mark, see detail illustration bottom right.

The Fiat workshop checks the TDC position of the piston in No. 1 cylinder with a dial gauge. To do this, screw the dial gauge into No. 1 cylinder using a suitable dial gauge holder; the gauge plunger rests on the piston. No. 1 cylinder is on the timing belt side of the engine.
Turn the crankshaft slightly left and right. While doing so, watch the dial gauge at the spark plug thread of No. 1 cylinder: at exact TDC the dial gauge pointer must show the highest piston position.
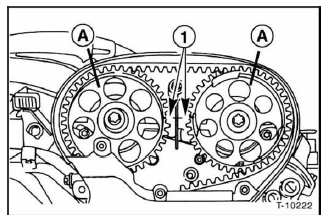
Mark the position of the camshaft gears relative to each other with a coloured pencil or scribe - 1 -. Note: these marks are essential, as no other markings are present. Fiat workshops lock the camshafts with special tools when the timing belt is removed. This is only necessary if a basic engine setting is carried out or new parts are installed. The illustration does not show the Fiat engine.
To refit the timing belt exactly, also count the number of timing belt teeth between the 2 marked positions - a - of the two camshaft gears and note the number.
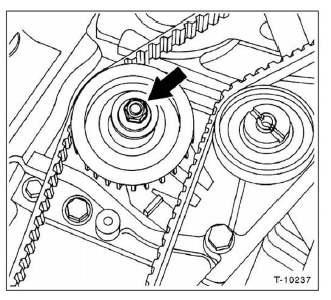
Loosen the nut -arrow- on the automatic belt tensioner.
Press the tensioner pulley away from the timing belt.
Remove the timing belt, then do not change the position of the gears any more.
Warning: the following precise locking of the engine is only required if there is doubt about the correct engine position. Several special Fiat tools are required. If the camshaft must be turned through a large angle, make sure that no piston is at top dead center (TDC), otherwise valves or pistons may be damaged. If necessary, position the crankshaft approx. 90° (1/4 turn) before or after TDC.
However, do not turn the pulley more than 90° in total.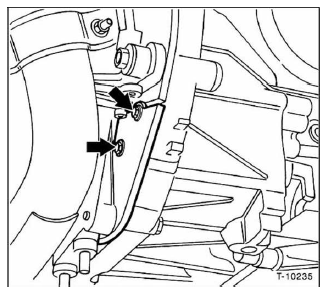
Lock the crankshaft at the determined exact TDC position on the flywheel. To do this, remove the flywheel cover plate from underneath the vehicle - arrows - and lock the flywheel with a suitable tool.
The flywheel can also be locked with a screwdriver. Assistance is required.
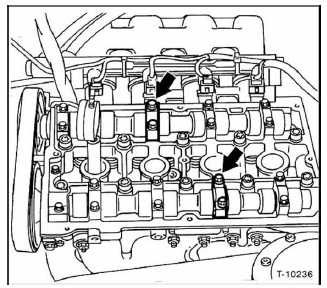
Fiat workshops lock the camshafts with special tools. To do this, unscrew the 2nd camshaft bearing cap on the intake side and the 3rd bearing cap of the exhaust camshaft - arrows. Fit Fiat tool no. 1860875000 in place of the bearing caps and bolt it down. The camshafts are now locked.
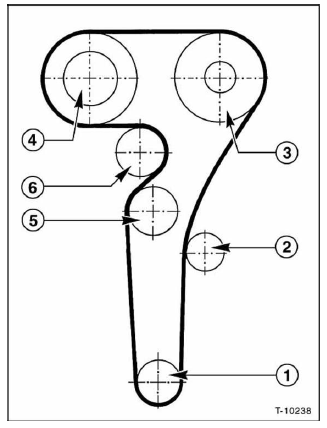
Crankshaft
Idler pulley
Exhaust camshaft
Intake camshaft
Tensioner pulley
Coolant pump
Fit the timing belt so that the arrow on the timing belt points in the direction of engine rotation.
Start at the crankshaft sprocket - 1 - and fit the timing belt in the order shown in the illustration. The timing belt has 3 marks which must align with the marks on the crankshaft sprocket and the camshaft sprockets when a new timing belt is first fitted. Viewed from the right side of the vehicle, the engine rotates clockwise.
Warning: when fitting the timing belt, neither the camshaft nor the crankshaft position may be changed.
Otherwise, serious engine damage may occur, or the engine will no longer deliver its full output. After the timing belt has been tensioned, check the camshaft and crankshaft marks again; they must line up as they did before removal.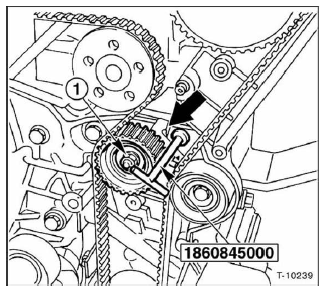
Insert the Fiat tool above the tensioner pulley on the right, see illustration. The tool's function is to push the tensioner pulley toward the timing belt. Instead of the tool, the tensioner pulley can also be pushed toward the timing belt with a screwdriver at the tensioner lever - arrow.
Tension the tensioner pulley until pointer - 1 - is at the upper stop, see following illustration. The tensioner pulley is then at maximum tension. Tighten the tensioner pulley retaining nut.
Warning: if used, remove the dial gauge from the spark plug thread of No. 1 cylinder. Remove the locking tools from the camshafts and the crankshaft.
Fit both camshaft bearing caps and tighten them evenly to 15 N·m.
Refit the flywheel cover plate.
Fit the crankshaft pulley and tighten the 4 bolts to 30 N·m. The centering pin must engage in the hole in the pulley; see illustration t-10232 under "Removal".
Turn the crankshaft 2 revolutions in the direction of engine rotation (clockwise). This distributes the timing belt tension evenly.
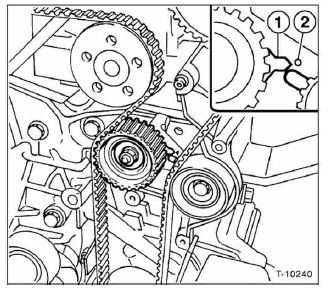
Carefully loosen the tensioner pulley retaining nut with an open-ended wrench, holding the tensioner pulley with the tool, otherwise the timing belt will slacken again. Release the tensioner pulley and align the movable pointer - 1 - with the mark - 2 - , see detail illustration. In this position, tighten the timing belt tensioner nut to 25 N·m using a torque wrench.
If used, remove the tensioning tool.
Turn the crankshaft twice in the direction of engine rotation and check the setting again. The marks on the camshaft sprockets must align, and at the same time the mark on the crankshaft sprocket must align; see illustrations under "Removal". If the Fiat camshaft locking tools were not used, check by counting the timing belt teeth between the 2 marks made on both camshaft sprockets during removal. The count must match the number noted during removal.
If the alignment is not exact, slacken the timing belt, offset it on the belt wheels accordingly, and tension it again as specified.
Install the cylinder head cover and spark plugs; see page 298.
Fit the timing belt cover and tighten the screws.
Tighten the poly-V belt idler pulley to 30 N·m.
Install and tension the poly-V belt, see page 58.
Clip the poly-V belt cover into the wheel arch and bolt it in place.
Position the right front wheel so that the marks made during removal line up. Before fitting, lightly grease the wheel centering seat and the conical surface of the wheel bolts with wheel bearing grease. Do not grease or oil the wheel bolt threads. Fit the wheels and lower the vehicle, then tighten the wheel bolts in a crosswise sequence to 90 N·m.
Connect the battery earth cable (-). Set the clock.
Program the radio stations.
Test yourself
A quick Fiat Bravo quiz: every answer comes with an explanation and a link to the manual page.