Fuel and Refueling. Running the Fuel System Dry
Running the fuel system dry can cause serious problems on the Ford Mustang VI, which is why this chapter explains how to refill correctly when the tank is empty. It describes safe filling from a spare fuel container, including use of a funnel, and provides guidance on avoiding electrostatic discharge. It also explains how to correctly open and close the fuel cap. A practical guide for emergencies: compact, clear, and safety-conscious.
If the tank is driven completely empty, damage may occur that is not covered by the vehicle warranty.
If there is no fuel left in the tank:
- Add at least 5 L of fuel to restart the engine.
If the tank is empty and the vehicle is parked on an incline, more fuel may be required.
Filling a Fuel Can
When filling an ungrounded fuel container, observe the following precautions to prevent electrostatic charge, which can cause sparks.
- Use only an approved fuel container as a spare fuel can for your vehicle. Place the fuel container on the ground while filling it.
- Do not fill the container while it is in the vehicle (including in the cargo area).
- Keep the fuel nozzle in contact with the fuel container while filling.
- Do not operate the automatic shut-off of the fuel nozzle.
Refueling from a Spare Fuel Can
WARNINGS
Never insert the spout of a fuel can or a funnel from the aftermarket into the fuel filler neck. This could damage the fuel filler neck or its seal and cause fuel to leak onto the ground.
Never open or force the capless fuel system with foreign objects. This could damage the fuel system and seal and cause injury to you or bystanders.
Fuel must not be disposed of with household waste or in the sewage system. Disposal must be carried out at an official disposal facility.
When filling your vehicle's fuel tank from a fuel can, use the plastic funnel provided in your vehicle. See Storage Location of the Fuel Funnel.
Note: Never use funnels from the aftermarket; they do not work with capless fuel systems and can damage them.
To fill your vehicle's fuel tank from a fuel can, proceed as follows:
- Fully open the fuel filler door until it latches.
- Insert the plastic funnel completely into the opening of the fuel filler neck.
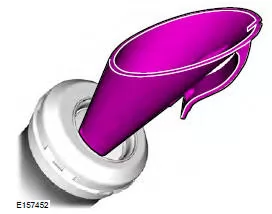
3. Fill the vehicle with fuel from the fuel can.
4. Remove the plastic funnel from the opening of the fuel filler neck.
5. Fully close the fuel filler door.
6. Clean the plastic funnel and store it back in the vehicle or dispose of it properly.
Note: A new fuel filler neck can be purchased from an authorized dealer if the original has been disposed of.
The notes on dry-running the fuel system of the Ford Mustang (VI Gen, 2014–2023) help prevent damage to the vehicle. The 2014–2023 Ford Mustang provides clear instructions for safely refilling fuel when the tank has been run empty and for avoiding unnecessary risks.
The use of the original fuel funnel is especially emphasized so as not to damage the capless fuel system. The Ford Mustang VI Generation combines technology here with a high standard of ease of use and safety.
Frequently Asked Questions
How much fuel must be added when the tank has been run empty?
At least 5 liters of fuel should be added to restart the engine.
Why should an aftermarket funnel not be used?
Aftermarket funnels could damage the fuel filler neck or cause fuel to leak. The original funnel is specifically designed for the capless fuel system.
Test yourself
A quick Ford Mustang quiz: every answer comes with an explanation and a link to the manual page.