Door Adjustment
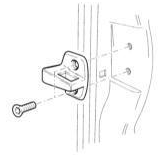 Door Latch Element Adjustment
Door Depth Adjustment with the Latch Element
PROCEDURE
1. Loosen the latch element screws slightly.
2. Close the door.
3. Move the door so that the latch element is pressed in and the door is flush with the adjacent body components.
CAUTION
Adjust the door with the latch element only in the direction of rotation of the door hinges, not in height.4. Carefully open the door without changing the position of the latch element.
5. Tighten the screws to 20 N·m.
Door Height Adjustment with the Door Wedge Elements
Wedge Adjustment
PROCEDURE
1. The door must first be adjusted with the latch element.
2. Remove the door trim panel. Refer to subsection Removing and Installing Door Trim Panel.
3. Align the door longitudinally by moving the adjusting wedge –4–, after loosening bolt –3– (refer to illustration Front Door in subsection Removing and Installing Front Door and Adjusting Element Holder).
4. Move the adjusting wedge –7– with bolt –6– slightly loosened (refer to illustration Front Door in subsection Removing and Installing Front Door and Adjusting Element Holder). This changes the angle of the holder relative to the B-pillar.
5. Adjust the holder so that the correct gaps are achieved and an even gap is obtained relative to the adjacent body components. Gap values are specified in the Specifications.
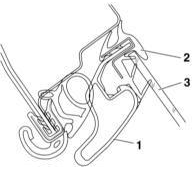
6. Make sure the sealing edges of seal –2– rest evenly against the A-pillar and the roof frame. Tension holder –1– slightly more than required to counteract the return force of the rubber seal. 3 – door window.
7. Tighten bolts –3– and –6– (refer to illustration Front Door in subsection Removing and Installing Front Door and Adjusting Element Holder) to 30 N·m.
8. Install the door trim panel. Refer to subsection Removing and Installing Door Trim Panel.
Test yourself
A quick Audi A3 quiz: every answer comes with an explanation and a link to the manual page.