Hood Removal, Installation and Adjustment
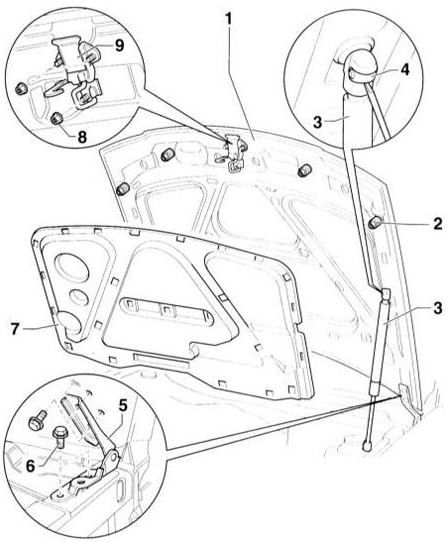 Hood Mounting and Adjustment Components 1 – hood 2 – bumper stop For adjusting hood height. 3 – gas strut 4 – spring 5 – hood hinge 6 – bolt, 20 N·m 7 – noise damper Diesel engine only. 8 – nut, 8 N·m 9 – catch
REMOVAL
PROCEDURE
1. Open the hood.
2. Mark the hood position. To do this, outline the hinge mounting bolts (on the hood side) with a marker.
3. Have an assistant support the hood.
CAUTION
When removing the gas strut, do not fully remove retaining spring –4–. Otherwise the strut may be damaged and must be replaced.4. Disconnect gas strut –3– from the hood. To do this, carefully lift retaining spring –4– with a screwdriver. Remove the strut from the ball stud. If the strut must be removed completely, lift the lower spring in the same way as the upper one and remove the ball joint.
5. Unscrew the mounting bolts –6– on the hood. Remove the hood with the help of an assistant.
INSTALLATION
PROCEDURE
1. If necessary, restore the paint finish of the hood.
2. Install the hood. Align it using the marks made during removal and secure with bolts –6–. If a new hood is installed, it must be adjusted.
3. Install strut –3– onto the ball stud and secure with spring –4–.
4. If dampers –2– were removed, they must be adjusted again. Turn the external dampers to adjust height. Screw the internal dampers in fully, then unscrew them by 1/2 turn. The hood must sit flush with the adjacent body panels. Hood Adjustment
PROCEDURE
1. Slightly loosen the mounting bolts –6– on the hood side so that the hood can be moved longitudinally and laterally.
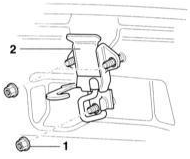
2. Slightly unscrew the catch mounting nuts (nuts –1–, catch –2–).
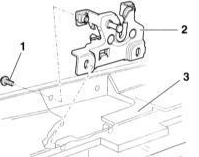
3. Slightly loosen the hood lock mounting bolts (screws –1–, hood lock –2–, bracket –3–).
4. Close the hood and position it so that there is an even gap between the adjacent body panels. Refer to Specifications.
5. Adjust the hood height by turning the external dampers –2–.
6. Carefully open the aligned hood without changing the position of the hood hinges.
7. Tighten the hinge mounting bolts to 20 N·m.
8. Tighten the hood lock mounting bolts to 20 N·m.
9. Tighten the hood catch nuts to 8 N·m.
Test yourself
A quick Audi A3 quiz: every answer comes with an explanation and a link to the manual page.