Removing and Installing Adjusting Element Beam and Rear Door Hinges
 Rear door, adjusting element beam 1 – bolt, 30 N·m 2 – rear door 3 – shim. Install if required. Before removal, record the number and thickness of shims. During installation, reinstall the same shims in the same positions. 4 – adjusting element beam 5 – adjusting wedge. Moving the wedge changes the door angle in the area of the C-pillar. Adjustment is performed in the same way as for the front door 6 – bolt, 30 N·m 7 – cable. Connects to door lock.
 Upper door hinge 1 – bolt, installed from inside, 30 N·m 2 – upper door hinge 3 – cover, 23 N·m 4 – bolt, 30 N·m 5 – Torx screw, 30 N·m
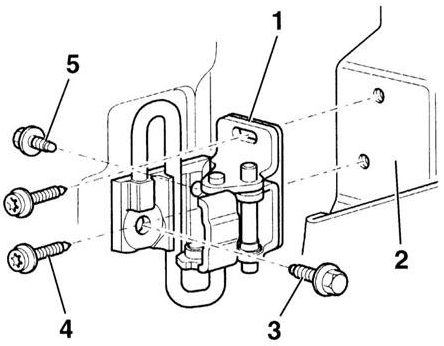 Lower door hinge 1 – lower hinge 2 – front door 3 – bolt, 30 N·m 4 – Torx screw, 30 N·m 5 – bolt, 30 N·m
REMOVAL
PROCEDURE
1. Remove the door trim panel.
2. Unscrew screws –1– and –5–.
3. Lift the beam out upward.
4. Disconnect the door lock cable.
5. Disconnect the cover at the B-pillar and disconnect the electrical and pneumatic connectors. INSTALLATION
PROCEDURE
1. Insert the beam into the door and loosely secure it with screws –1– and –6– and adjusting wedge –5–.
2. Tighten fastening screws –1– and –6– in sequence a, b, c, d.
3. Install the door wedge element. Adjust the wedge element in the same way as for the front door.
Test yourself
A quick Audi A3 quiz: every answer comes with an explanation and a link to the manual page.