Removal and Installation of Fender
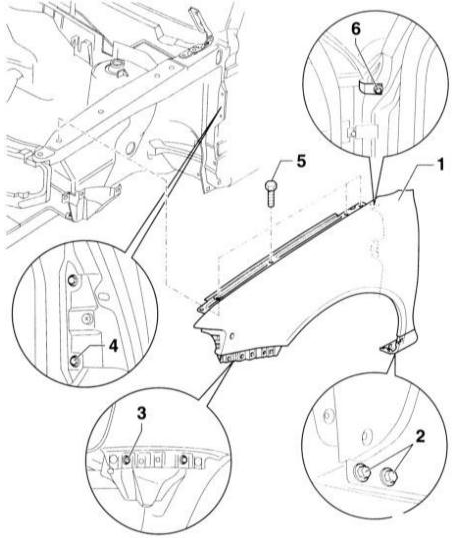 Front Fender Mounting Components 1 - fender 2 - bolt, 10 Nm 3 - self-tapping screw, 1.5 Nm 4 - self-tapping screw, 1.5 Nm 5 - bolt, 15 Nm 6 - bolt, 15 Nm
REMOVAL
PROCEDURE
1. Remove the bumper cover. Refer to Bumper Removal and Installation.
2. Remove the wheel arch liner. Refer to Front and Rear Wheel Arch Liner Removal and Installation.
3. Unscrew mounting bolts -5- and fender and side member brackets -2-.
4. With the door open, unscrew bolt -6-.
5. Unscrew self-tapping screws -3- at the guide element.
6. Unscrew self-tapping screws -4- under the closing panel.
7. Remove fender -1-.
INSTALLATION
PROCEDURE
1. If necessary, restore the paint finish of the fender.
2. Install fender -1- in place.
CAUTION
Make sure the specified gaps are maintained. Refer to Specifications.3. Install self-tapping screws -3- and -4- at the guide element and under the closing panel.
4. With the door open, install bolt -6-.
5. Install bolts -5- at the fender bracket and at the side member -2-.
6. Install the wheel arch liner. Refer to Front and Rear Wheel Arch Liner Removal and Installation.
7. Install the bumper cover. Refer to Bumper Removal and Installation.
Test yourself
A quick Audi A3 quiz: every answer comes with an explanation and a link to the manual page.