Removing and Installing Central Locking Actuators
Door Lock Actuator REMOVAL
PROCEDURE
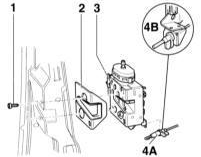
1. Remove the bar, refer to Front Door and Door Element Bracket Removal and Installation and the illustration.
2. Remove the door lock cover. Refer to Front Door Handle and Lock Cylinder Removal and Installation.
3. Disconnect the operating rods and locking rods. Refer to Front Door Handle and Lock Cylinder Removal and Installation.
4. Disconnect the vacuum hose of the central locking system.
5. Disconnect the cable (4A).
6. Unscrew the bolts –1–.
7. Remove the door lock –3– with the shim –2–. INSTALLATION
PROCEDURE
1. Install the lock –3– with the shim –2–. Tighten the bolts –1– to 10 Nm.
2. Connect the cable. Detail (4B) shows the connected cable.
3. Connect the locking and operating rods and the door lock cover. Refer to Front Door Handle and Lock Cylinder Removal and Installation.
4. Install the beam. Refer to Front Door and Adjusting Element Holder Removal and Installation.
Tailgate Lock Actuator REMOVAL
PROCEDURE
1. Remove the tailgate trim panel. Refer to the subsection Tailgate Trim Panel Removal and Installation.
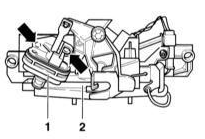
2. Press out the pins (arrows) and remove the actuating element –1– from the tailgate lock. If necessary, use a screwdriver. INSTALLATION
PROCEDURE
Installation is performed in the reverse order of removal.Fuel Filler Flap Actuator REMOVAL
PROCEDURE
1. Remove the rear light. Refer to Rear Light Removal and Installation.
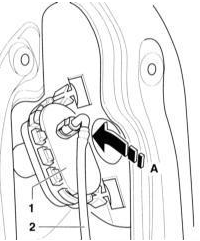
2. Disconnect the connector. Refer to Central Locking System - General Information and Vacuum Hoses.
3. Through the opening (arrow A) from the reverse side, release the lock of the actuating element –1– and remove it. INSTALLATION
PROCEDURE
1. Install the actuating element and secure it.
2. Insert the angled connector into the actuating element.
Test yourself
A quick Audi A3 quiz: every answer comes with an explanation and a link to the manual page.