Removal and Installation of Front Door and Adjusting Element Carrier
 Front Door 1 – carrier 2 – bolt, 30 N·m. M8 x 26 3 – bolt, 30 N·m. M8 x 32 4 – adjusting wedge. Must always be installed 5 – door. The door can also be removed without removing the adjusting element carrier 6 – bolt, 30 N·m 7 – adjusting wedge. Must always be installed 8 – side stop cover 9 – drive cable 10 – bolt, 30 N·m. M8 x 26 11 – stop rod
REMOVAL
CAUTION
The door can also be removed without removing the adjusting element carrier. In this case, it is not necessary to remove the carrier.PROCEDURE
1. Remove the door trim panel. Refer to Removal and Installation of Door Trim Panel.
2. Remove the A-pillar trim panel (lower part). Refer to Removal and Installation of A-Pillar Trim Panel.
3. Disconnect the electrical wires and the central locking vacuum hose from carrier –1–.
4. Disconnect cable –9– from the carrier.
5. Unscrew bolts (2, 3, 6 and 10). At the same time, remove adjusting wedges –4– and –7–.
6. Lift the adjusting element carrier up and out.
7. Remove the cover between the door and the A-pillar.
8. Remove the bushing at the A-pillar.
9. Remove the electrical wires and the central locking vacuum hose from the A-pillar.
10. Disconnect the electrical wires and vacuum hose at the A-pillar. Disconnect the central locking hose plug. Refer to Central Locking – General Information and Vacuum Hoses.
11. Make sure the connector does not slip into the A-pillar. Secure it with a clip.
12. Ask an assistant to support the door.
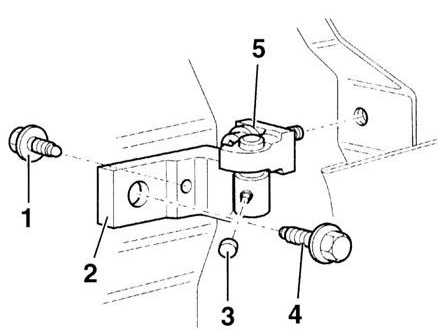 1 – bolt, installed from inside, 30 N·m 2 – upper door hinge 3 – cover, 23 N·m 4 – bolt, 30 N·m 5 – Torx screw, 30 N·m
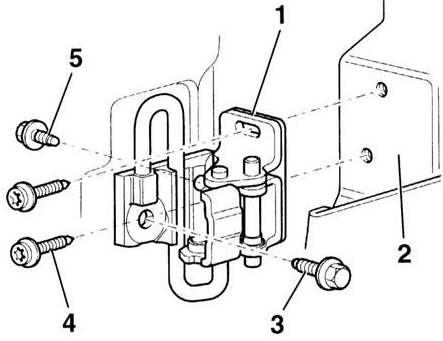 1 – lower hinge 2 – front door 3 – bolt, 30 N·m 4 – Torx screw, 30 N·m 5 – bolt, 30 N·m
13. Remove the Torx T45 screws from the door side at the upper and lower hinges.
14. Remove the door with the help of an assistant.
INSTALLATION
PROCEDURE
1. With the help of an assistant, install the door onto the hinges and secure with Torx T
45 screws. Tightening torque 30 N·m.
2. Insert the electrical wires and the central locking vacuum hose into the A-pillar connector.
3. Insert the electrical wires and vacuum hose into the A-pillar.
4. Secure the bushings in the A-pillar.
5. Insert the cover between the door and the A-pillar.
6. Insert the carrier into the door from above.
7. Secure the carrier with bolts. Do not forget the adjusting wedges of bolts –3– and –6–, refer to the illustration. Tightening sequence: (2, 10, 6, 3). Tightening torque 30 N·m. Wedge adjustment is described in Door Adjustment.
8. Connect cable –9– to the carrier.
9. Connect the electrical wires and vacuum hose of the central locking system, lay them out and secure them. Refer to subsection Central Locking System – General Information and Vacuum Hoses.
10. Adjust the door.
11. Install the A-pillar trim. Refer to subsection Removing and Installing A-Pillar Trim.
12. Install the door trim panel. Refer to subsection Removing and Installing Door Trim Panel.
Test yourself
A quick Audi A3 quiz: every answer comes with an explanation and a link to the manual page.