Hood Release Cable Removal and Installation
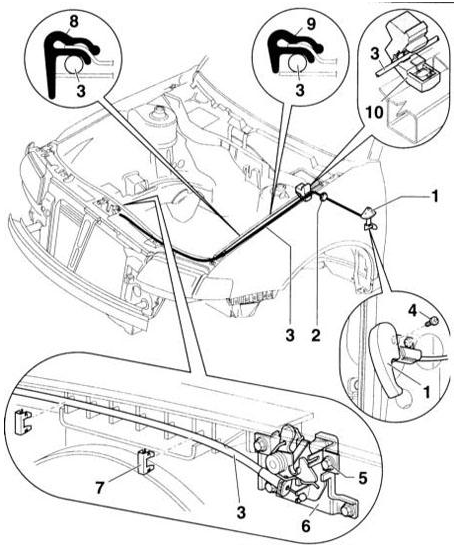 Hood Release Cable 1 – hood latch release Removal - Unscrew the mounting screws -4-. - Disconnect cable -3- - remove hood latch release 2 – bushing 3 – cable 4 – self-tapping screw, 1.5 N·m 5 – bolt, 20 N·m 6 – hood latch 7 – clips 8 – front clip 9 – rear clip 10 – seal The cable must pass through the seal as shown in the illustration.
REMOVAL
PROCEDURE
1. Remove the hood latch release. Refer to above.
2. Remove brackets –7– from the latch holder.
3. Remove clips –8– and –9– from the fender.
4. Remove seal –10–.
5. Disconnect the cable from the hood latch –6– and route it under the fender.
6. Unscrew the 2 mounting screws of the cable bracket inside the vehicle, near the footwell, and disconnect the cable from the handle.
7. Pull the cable through bushing –2– into the passenger compartment. INSTALLATION
PROCEDURE
1. Route the new cable from inside through bushing –2– into the engine compartment.
2. Connect the cable to the handle and secure it with two screws near the driver's footwell.
3. Connect the cable to the hood latch.
4. Route the cable as shown in the illustration.
5. Connect the cable to the latch release.
6. Secure the hood latch release –1– with self-tapping screw –4–.
7. Secure the cable with clips –8– and –9– under the fender.
8. Install clips –7– on the latch holder.
Test yourself
A quick Audi A3 quiz: every answer comes with an explanation and a link to the manual page.