Removal and Installation of Hood Latch Panel
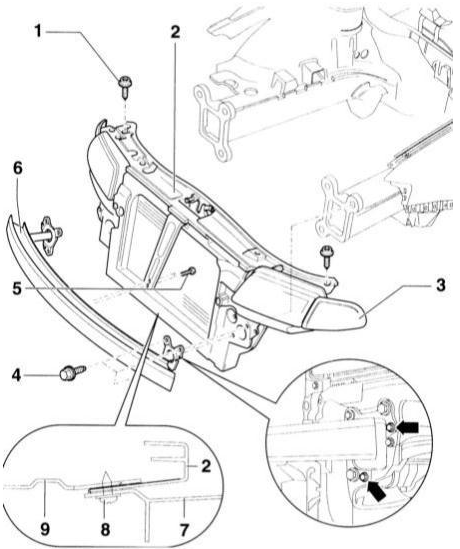 Hood Latch Panel 1 - Torx screw, 25 Nm 2 - latch carrier 3 - turn signal 4 - hex bolt, 35 Nm 5 - Torx screw, 6 Nm 6 - latch carrier 7 - bumper cover 8 - self-tapping screw, 8 Nm 9 - sound insulation
CAUTION
The latch carrier can be removed with the headlights and radiator installed. This section describes removal and installation with the radiator and headlights.REMOVAL
PROCEDURE
1. Drain the coolant. Refer to Coolant Replacement.
2. Disconnect the hoses from the radiator. Refer to Radiator and Fan Removal and Installation.
3. Remove the bumper cover -7-. Refer to Bumper Removal and Installation.
4. Disconnect the headlight electrical wires.
5. Remove the turn signal lights. Refer to Front Turn Signal Light Removal and Installation.
6. Remove the hood latch. Refer to Hood Latch Removal and Installation.
7. Unscrew mounting bolts -1- and -4-. Do not loosen the bumper locking screws (arrows).
8. With an assistant, remove the latch carrier -2- forward. INSTALLATION
PROCEDURE
1. With an assistant, install the latch carrier and secure it with screws -1- and -4-.
2. Install the hood latch. Refer to Hood Latch Removal and Installation.
3. Install the turn signal lights. Refer to Front Turn Signal Light Removal and Installation.
4. Connect the headlight electrical wires.
5. Install the bumper cover. Refer to Bumper Removal and Installation.
6. Connect the coolant hoses to the radiator and secure them with clamps. Refer to Radiator and Fan Removal and Installation.
7. Fill the system with coolant. Refer to Coolant Replacement.
8. Check the headlight adjustment and readjust if necessary.
Test yourself
A quick Audi A3 quiz: every answer comes with an explanation and a link to the manual page.