Removal and Installation of Bumpers
 Front Bumper Removal Components 1 - bumper cover 2 - bolt, 25 Nm 3 - hex bolt, 6 Nm 4 - bumper 5 - guide element 6 - self-tapping screw, 1.5 Nm 7 - bumper buffer 8 - clip 9 - Phillips screw
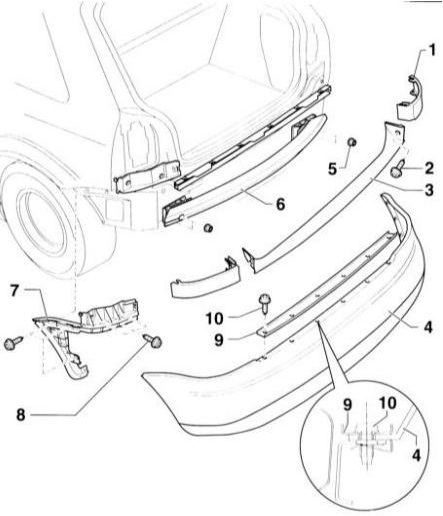 Rear Bumper Components 1 - visor 2 - self-tapping screw 3 - cover 4 - bumper cover 5 - nut, 23 Nm 6 - bumper 7 - guide element 8 - self-tapping screw, 1.5 Nm 9 - reinforcement 10 - self-tapping screw, 1 Nm
Front Bumper REMOVAL
PROCEDURE
1. Using a thin pin, press the insert (arrow in illustration) on clip -8- and remove it.
2. Unscrew three Torx screws (T25) from the wheel housing on the left and right.
3. Unscrew the Phillips screws -9- from the underside.
4. Disconnect the upper bumper cover from guide element -5-.
5. Disconnect the bumper cover at the side above the wheel housings and remove it forward from the bumper.

6. Unscrew mounting bolts -2- of bumper bracket -1- and bumper -3-.

7. Unscrew the hex socket screws -5- on both shock absorbers -1-.
8. Remove bumper -4- from the shock absorbers and pull it forward. INSTALLATION
PROCEDURE
1. Place bumper -4- onto shock absorbers -1-.
2. Install hex socket screws -5- and tighten to 23 Nm.
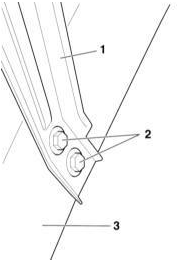
3. Tighten bumper bracket mounting bolts -2- to 6 Nm. Refer to illustration.
4. Install bumper cover -1- at the front (refer to the illustration Front Bumper Removal) and align it at the side above the wheel housings.
5. Secure the bumper cover in guide element -5-.
6. Tighten the Phillips screws from the underside.
7. Secure the bumper cover on the left and right with three Torx screws on each side to the wheel arch liners.
8. Insert clips -8- into the holes at the top of the bumper cover and press the pins (arrow) until they fully engage the clip. Refer to the detail in the illustration Front Bumper Removal.
Rear Bumper REMOVAL
PROCEDURE
1. Remove trim panels -1- on the left and right by unscrewing the self-tapping screws.
2. Remove cover -3-.
3. Unscrew the self-tapping screws of reinforcement -10- and remove reinforcement -9-.
4. Unscrew three self-tapping screws on the left and right at the wheel housings.
5. Remove bumper cover -4- from the top guide element -7-.
6. Pry the bumper cover at the side above the wheel arch liners and remove it rearward.
7. Unscrew nuts -5- and remove bumper -6-. INSTALLATION
PROCEDURE
1. Install the bumper in place and secure it with nuts -5-.
2. Align bumper cover -4- at the side above the wheel housings and insert it from the top into guide element -7-.
3. Install three self-tapping screws on the left and right into the wheel arch liners.
4. Install reinforcement -9- and secure it with self-tapping screws -10-.
5. Install cover -3-.
6. Install trim panels -1- on the left and right and secure them with self-tapping screws -2-.
Test yourself
A quick Audi A3 quiz: every answer comes with an explanation and a link to the manual page.