Removing and Installing Lower Center Console
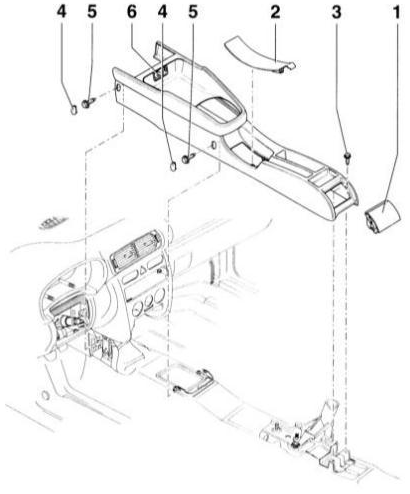 Center Console Mounting Elements 1 – rear ashtray 2 – cover in front of parking brake 3 – bolt, 4 N·m 4 – cover 5 – bolt: front bolt, 1.5 N·m; rear bolt, 4 N·m 6 – diagnostic connector
REMOVAL
PROCEDURE
1. Open the ashtray cover –1– and lift the ashtray out upward.
2. Unscrew bolts –3–.
3. Remove the cover in front of the parking brake.
4. Pry off and remove cover –4– with a screwdriver.
5. Unscrew the 4 bolts –5–.
6. Remove the armrest, if equipped. Refer to Removing and Installing Armrest.
7. Move the shift lever or selector to the rear position.
8. Disconnect the airbag diagnostic connector. Refer to Removing and Installing Safety System Diagnostic Connector.
9. Fully apply the parking brake.
10. Press the shift lever or selector boot at the bottom forward and turn it outward. Cut the clamp with side cutters and remove the boot with the lever upward.
11. Lift the center console at the rear and remove it upward. INSTALLATION
PROCEDURE
1. Move the shift lever or selector to the rear position.
2. Install the center console from above.
3. Slide the shift lever or selector boot onto the shaft and secure it with a new clamp.
4. If necessary, install the armrest. Refer to Removal and Installation of Armrest.
5. Lock the diagnostic connector in place.
6. Release the parking brake.
7. Install the 4 screws -5-. Tighten the front screw to 1.5 N·m, the rear screw to 4 N·m.
8. Install the 4 caps -4-.
9. Install the cap in front of the parking brake -2-.
10. Install the screws -3- and tighten to 4 N·m.
11. Install the ashtray.
Test yourself
A quick Audi A3 quiz: every answer comes with an explanation and a link to the manual page.