Removal and Installation of Luggage Compartment Trim
3-door models REMOVAL
PROCEDURE

1. Remove the rear side trim, refer to subsection Removal and Installation of Rear Side Trim.
2. Unscrew the mounting lug screws –3– and remove them.
3. Remove cover –1–.
4. Unscrew screws –2–.
5. Remove the rear roof trim, refer to subsection Removal and Installation of Rear Roof Trim.
6. Disconnect trim –4– at the rear and pull it forward out of the clip.
7. Disconnect the connector and remove the trim. INSTALLATION
PROCEDURE
1. Install trim –4– in place and connect the connector.
2. Insert the trim into the clip and secure it.
3. Install the roof trim, refer to subsection Removal and Installation of Rear Roof Trim.
4. Secure trim –4– with screws –2–.
5. Install and secure the cover.
6. Secure the mounting lugs –3–.
7. Install the rear side trim, refer to subsection Removal and Installation of Rear Side Trim.
5-door models REMOVAL
PROCEDURE
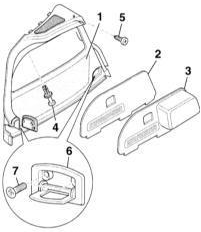
1. Remove the luggage compartment mat.
2. Unscrew 4 screws –7– and remove the mounting lugs –6–.
3. Remove the rear door sill plate, refer to subsection Removal and Installation of Door Sill Trim.
4. Remove the rear seat backrest, refer to subsection Removal and Installation of Rear Seat and Backrest.
5. Disconnect the rear wheel housing trim and remove it.
6. Remove the luggage side trim cover –2– or –3–.
7. Remove rivet –4– and unscrew screw –5–.
8. Disconnect trim –1– at the rear and remove it from the C/D-pillar trim.
9. Remove trim –1– forward from the seat back clip.
10. Disconnect the luggage light connector and remove the trim.
INSTALLATION
PROCEDURE
Installation is performed in the reverse order of removal.Test yourself
A quick Audi A3 quiz: every answer comes with an explanation and a link to the manual page.