Replacing the Engine Oil and Oil Filter
(every 4800 km [3000 miles] or every three months)
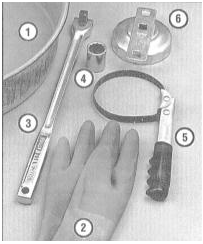
Tool set required for engine oil and oil filter replacement
1 — Drain pan — should be shallow and wide enough to minimize the chance of spilling oil on the ground.
2 — Rubber gloves — help protect hands from burns if oil unavoidably gets on them while unscrewing the oil pan drain plug.
3 — Breaker bar — sometimes the drain plug is tightened quite tightly, requiring considerable force to remove it.
4 — Socket — used together with the breaker bar or ratchet drive when removing the drain plug; must match the drain plug size.
5 — Strap wrench — allows removal of the full-flow oil filter when access to it is limited.
6 — Special cap wrench — fits over the end of the filter and can then be turned with a breaker bar or ratchet drive; must match the filter body size.
Regular and timely engine oil changes are one of the main preventive maintenance procedures within the capabilities of an average home mechanic. Over time, engine oil ages, becoming thinner and contaminated, which leads to premature wear of internal engine components. Prepare all required tools and materials. Also have a sufficient supply of old newspapers or rags to collect spilled oil.
PROCEDURE
1. Make sure all materials and tools required to change the oil and oil filter are at hand. Also prepare a sufficient number of rags and old newspapers to collect any spilled oil.
2. To ensure free access to the oil pan and oil filter, raise the vehicle on a hoist, or jack it up and place it on support stands.
Never perform any work under a vehicle supported only by the bumper or held up only by a jack!
3. Get under the vehicle and locate the oil pan drain plug and oil filter. Keep in mind that the engine and exhaust system components will remain quite hot throughout this procedure; plan your hand movements carefully to avoid accidental contact with hot surfaces.
4. Make sure the vehicle is level on the support stands/lift. Warm up the engine to normal operating temperature, as hot oil flows better and flushes sludge and deposits more effectively. Use the warm-up time to arrange all required tools and materials in a convenient order. Turn off the engine and remove the oil filler cap from the valve cover.
5. Make sure the vehicle is securely held in the raised position.
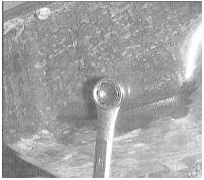
6. Carefully get under the vehicle and position the drain pan under the oil pan, keeping in mind that at first the oil will flow out of the opening with considerable force. Avoid touching hot surfaces of the engine and exhaust system components, and unscrew the drain plug from the bottom of the oil pan. Depending on the oil temperature, you may use rubber gloves during the final stage of unscrewing the plug, or you may choose not to.
7. Allow the oil to drain freely into the pan, adjusting the position of the pan as the flow weakens. Check the drained oil for metal shavings.
8. After the oil stops draining from the engine, wipe the drain plug clean with a clean rag, as fine metal shavings may stick to it and immediately contaminate fresh oil.
9. Wipe the oil pan surface around the drain opening, install the plug, and tighten it securely with a wrench (preferably a torque wrench).
10. Move the drain pan under the oil filter.
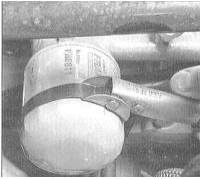
11. Using one of the special wrench types, loosen the filter. During removal the filter body may be damaged, which is of no concern if the filter is being replaced (the old filter can simply be pierced with a large screwdriver to unscrew it; be prepared to collect spilled oil). Finish unscrewing the filter from the engine by hand. Keep in mind that some oil remains in the filter, and it should be drained into the drain pan. Make sure the rubber sealing gasket came off with the filter; if not, carefully separate it from the engine block surface.
12. Thoroughly wipe the filter mounting surface on the engine block with a clean rag. Make sure the old gasket has not stayed on the engine; if necessary, use a scraper.
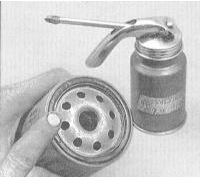
13. Make sure the new filter matches the size of the removed one. Lightly lubricate the rubber sealing gasket of the new filter with a thin film of clean engine oil. Screw the new filter onto the engine in the direction of rotation indicated by the arrow on its body. Do not use any wrench to tighten the oil filter, to avoid damaging the gasket. After the filter gasket contacts the mounting surface of the block, tighten it an additional 3/4 turn.
14. Remove all tools and materials from under the vehicle, taking care not to tip over the drain pan. Lower the vehicle to the ground.
15. Pour fresh oil into the engine oil filler opening. Use a funnel to minimize spillage. Wait a few minutes to allow the oil to drain into the oil pan, then check the oil level with the dipstick (refer to Fluid Level Checks section). If the level is above the lower mark on the dipstick, start the engine to circulate the fresh oil.
16. After running the engine for about one minute, shut it off and immediately check under the vehicle for leaks at the drain plug and the full-flow oil filter. If necessary, tighten any leaking component slightly.
17. As oil circulates through the engine, the new oil filter fills. Check the oil level again and, if necessary, add more oil until the level reaches the upper mark on the dipstick (check a few minutes after the engine is turned off so the oil can fully drain back into the oil pan).
18. During the first few trips after an oil change, check the oil level as often as possible.
19. Used engine oil must not be reused and must be taken to a designated collection point. Never pour used oil on the ground or into a drain. Pour it into a tightly sealed container and take it to a collection point as soon as possible.
Test yourself
A quick Honda Accord quiz: every answer comes with an explanation and a link to the manual page.