Fuel System Components Inspection
(every 24,000 km [15,000 miles] or every 12 months)
Remember that gasoline is an extremely flammable liquid! When servicing fuel system components, observe all applicable fire safety precautions. Do not smoke or work near open flames or unshielded work lights. Do not service the system in an area with gas-fired appliances with pilot lights (such as water heaters and clothes dryers). Remember that gasoline is a carcinogenic substance that can cause cancer. Avoid skin contact with fuel; wear protective rubber gloves. In case of accidental contact, wash hands thoroughly with warm water and soap. Collect spilled fuel immediately and do not store fuel-soaked rags near sources of open flame. Remember that the fuel injection system is always under pressure. Before disconnecting fuel lines, relieve the residual fuel pressure. Wear protective eyewear when servicing fuel system components. Always keep a Class B fire extinguisher within reach!
PROCEDURE
1. If a gasoline odor is noticed inside the vehicle while driving or after the vehicle has been parked in direct sunlight for an extended period, immediately perform a thorough inspection of all fuel system components.
2. Remove the fuel filler cap and check it for damage and signs of corrosion. A continuous line of firm contact between the sealing gasket and the filler neck must be present around the entire circumference of the gasket. If defects are found, replace the gasket/cap.
3. Check the fuel supply and return lines for cracks, cuts, and other mechanical damage. Check that the threaded fittings of the metal lines and the fuel hose clamps are securely tightened.
All models covered in this Manual are equipped with a fuel injection system. Therefore, before disconnecting fuel lines or removing any fuel system components, relieve the residual fuel pressure in the system.
4. If possible, inspect the fuel injectors for signs of fuel leakage. If necessary, replace damaged O-rings.
5. Since many fuel system components (such as the fuel tank and part of the fuel lines) are located under the vehicle, raise the vehicle off the ground using a hoist, drive it onto a ramp, or install it on support stands to inspect their condition. Make sure the vehicle is securely supported in the raised position.
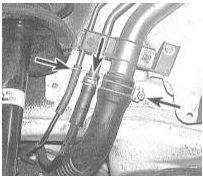
6. Inspect the fuel tank and filler neck for punctures, cracks, and other damage. Pay particular attention to the junction between the filler neck and the tank. Sometimes the filler neck rubber begins to leak fuel due to loosening of the clamps or aging of the material (see accompanying illustration). Only those problems whose diagnosis and correction are within the capability of an average do-it-yourself mechanic are listed here.
Never attempt to repair the fuel tank yourself (except for replacing its rubber components). Residual fuel vapors remaining in the tank, even after thorough ventilation, can detonate if they contact a torch flame or any other open flame source!

7. Carefully inspect all rubber hoses and metal tubes of the fuel lines running from the fuel tank (see accompanying illustration). Check the condition of the tube/hose material and the security of all threaded connections. Also check the fuel lines leading to the fuel injection system. Perform necessary repairs and replace defective components.
8. Components of the evaporative emission control system can also be a source of a gasoline odor. The system's function is to route fuel vapors from the fuel tank to the charcoal canister, where they are stored while the vehicle is parked, and from which they are drawn into the intake manifold after the engine starts for combustion in the combustion chambers.
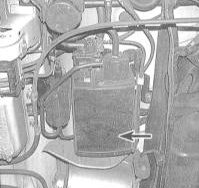
9. The most reliable symptom of a malfunction in the evaporative emission control system is a strong gasoline odor in the engine compartment. Inspect the charcoal canister located under the vehicle (at the rear) and the hoses connected to it (see accompanying illustration).
Test yourself
A quick Honda Accord quiz: every answer comes with an explanation and a link to the manual page.