Valve Clearance Inspection and Adjustment (as necessary)
INSPECTION
Valve clearance adjustment is required only after replacement or repair of valve train components.
The simplest method of checking the valves is listening to the engine with the hood open. Excessive valve train noise indicates the need for adjustment.
Valve clearance inspection and adjustment must be performed with the engine cold.
Adjustment
4-cylinder engines
PROCEDURE
1. Remove the cylinder head cover and the upper timing belt cover (see Chapter Engine).
2. Bring the No. 1 piston to TDC of the compression stroke by turning the crankshaft via the pulley so that the "UP" mark on the camshaft sprocket is at the 12 o'clock position (see Chapter Engine).
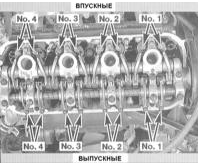
3. With the engine in the specified position, proceed to inspect and adjust the No. 1 cylinder valves. The valve layout is shown in the illustration.
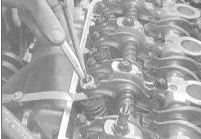
4. Start with the intake valve. Insert a feeler gauge of the specified thickness (see Specifications) between the valve stem tip and the valve rocker arm. The feeler gauge should slide through the gap with slight resistance. If necessary, loosen the locknut with an open-end wrench and loosen the adjusting screw with a screwdriver, then begin tightening the adjusting screw until the desired feel is obtained on the feeler gauge blade.
5. Hold the adjusting screw from turning with a screwdriver and tighten the locknut. Make sure the clearance does not change while tightening the nut. Then, using the same method, adjust the clearance of the second intake valve and the two exhaust valves.
6. Rotate the crankshaft 180° counterclockwise (the camshaft sprocket must rotate 90°) to bring the piston of cylinder No. 3 to TDC at the end of the compression stroke. The UP mark on the camshaft sprocket should move to the 9 o'clock position. Check and adjust the valves of cylinder No. 3.
7. Rotate the crankshaft another 180° counterclockwise (the UP mark moves down to the 6 o'clock position) and adjust the valves of cylinder No. 4.
8. Rotate the crankshaft another 180° (the UP mark should move to the 3 o'clock position) and repeat the procedure for the valves of cylinder No. 2.
9. After completing the valve adjustment, install the cylinder head covers and the timing belt covers.
V6 Engines
PROCEDURE
1. Remove the upper intake manifold plenum, the upper timing belt cover of the front cylinder bank, and both cylinder head covers (see Engine chapter).
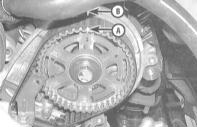
2. Rotate the crankshaft to bring the piston of cylinder No. 1 to TDC (see Engine chapter). The corresponding mark on the camshaft sprocket must align with the pointer on the rear timing belt cover.
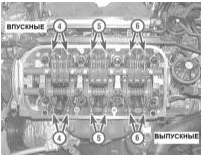
3. With the engine in the specified position, adjust the valves of cylinder No. 1.
Each cylinder has 4 valves (2 intake and 2 exhaust). The procedure is the same as described above in paragraphs 3 and 4 of this Section.
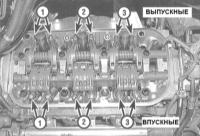
4. Rotate the crankshaft pulley clockwise until the TDC mark of cylinder No. 4 aligns with the pointer, and adjust its valves. Continue in the same manner, moving from cylinder to cylinder in firing order, to adjust the valves of all remaining cylinders.
Always rotate the crankshaft clockwise.
5. Install the cylinder head covers, the upper timing belt cover, and the upper intake manifold plenum.
Test yourself
A quick Honda Accord quiz: every answer comes with an explanation and a link to the manual page.