Automatic Transmission (AT/CVT) Fluid Replacement
(every 48,000 km [30,000 miles] or every 24 months)
PROCEDURE
1. Replace the ATF regularly, in accordance with the vehicle maintenance schedule.
2. Prepare fresh transmission fluid of the appropriate type.
3. Other required tools and materials include: safety stands for supporting the vehicle in the raised position, a 3/8-inch ratchet drive (with extension) with socket, a drain pan with a capacity of at least 5 L, and a supply of rags and/or old newspapers.
4. The fluid must be drained after being warmed to normal operating temperature during a short drive. Hot ATF has lower viscosity and flushes sludge and other deposits better.
ATF temperature can reach 180°C! Use caution and wear rubber gloves.
5. After a short drive and once the ATF has reached normal operating temperature, park the vehicle on a level, hard surface, raise it with a jack, and support it on safety stands, providing free access to the transmission oil pan drain plug.
6. Place the drain pan and all necessary equipment under the transmission oil pan. Avoid touching the hot engine and exhaust system components located under the vehicle.
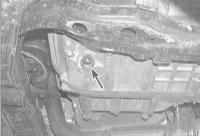
7. Place a suitable drain pan under the transmission. Remove the drain plug (on 4-cylinder engines it is located on the lower right side of the transaxle case, on V6 engines on the lower left side). Use a ratchet and extension to loosen the plug. Note that ATF will initially flow out under pressure. As the fluid level drops, the flow will gradually decrease, so be ready to reposition the drain pan as needed. When fluid stops flowing completely, wipe the drain plug clean, install it in its original position and tighten it securely.
8. Lower the vehicle to the ground.
9. With the engine off, remove the dipstick (4-cylinder engines) or remove the fill plug marked ATF (V6 engines). Through the opening, add the required amount of fresh fluid of the specified type (see Specifications). To minimize ATF loss, use a funnel. Add fluid in small portions, checking the level periodically with the dipstick (see Automatic Transmission ATF Level Check). Pause between additions to allow the fluid to drain to the bottom of the pan.
10. Install the dipstick or reinstall the fill plug.
11. Start the engine, then slowly move the selector lever through all positions, ending in the "P" position, and apply the parking brake.
12. Stop the engine and check the ATF level. If necessary, adjust the level (the fluid level should be approximately in the middle of the crosshatched area on the dipstick blade).
Test yourself
A quick Honda Accord quiz: every answer comes with an explanation and a link to the manual page.