Spark Plug Inspection and Replacement
(every 48,000 km [30,000 miles] or 24 months)
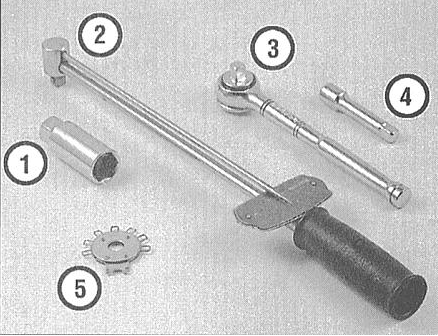
Tools Required for Spark Plug Replacement
1 — Spark plug socket - Equipped with a special elastic insert to prevent accidental damage to the porcelain insulator when removing the spark plug.
2 — Torque wrench - Not a mandatory tool, but ensures reliable confirmation that the spark plugs are tightened to the correct torque.
3 — Ratchet handle - Used together with the spark plug socket and torque wrench.
4 — Extension - Depending on the model and the auxiliary units fitted, access to the spark plugs may be restricted to varying degrees, so extensions of the appropriate shape and design will greatly simplify the procedure.
5 — Spark plug gap tool - Several types of this tool are available. Make sure the tool includes a gauge wire matching the spark plug gap specified for your vehicle.
If the original spark plugs will be reinstalled in the engine after inspection, they must be installed strictly in their original cylinders. Mark them accordingly.
PROCEDURE
1. When inspecting or replacing the spark plugs, also check the condition of the secondary ignition wires connected to them.
2. In most cases, replacing spark plugs requires a special spark plug socket (with an elastic insert inside), a ratchet handle, a set of socket extensions, and a tool for checking and adjusting the spark plug gap. A special tool is also available for safely disconnecting the secondary ignition wire boots from the spark plug terminals, although its use is not strictly required. Using a torque wrench ensures the correct spark plug tightening torque.
3. It is best to always keep a set of replacement spark plugs with the correct gap in the vehicle. When buying new spark plugs, make sure they meet the engine specifications for your vehicle. The required information is given in the Specifications for this Section and on the VECI label located under the hood (if there are discrepancies, the VECI label takes priority).
4. Remove the spark plugs only after the engine has completely cooled down. To avoid wasting time, use this pause to check the condition of the replacement spark plug set.
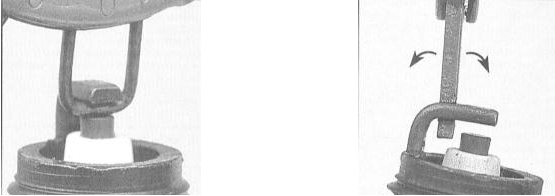
5. Check the spark plug gap by inserting the appropriate gauge wire of the gap tool. It must match the specification on the VECI label. The gauge wire should slide between the side electrode and the center electrode with slight resistance. Adjust the gap using the special tool, usually included with the gap gauge, by carefully bending the side electrode. If the side electrode is not positioned exactly over the center electrode, correct its position accordingly. Make sure there are no cracks or other damage to the porcelain insulator of the spark plug. Any insulator damage is unacceptable.
6. With the engine cold, disconnect the secondary ignition wire from the No. 1 cylinder spark plug (see Section Inspection and Replacement of Secondary Ignition Wires, Distributor Cap and Rotor). Pull only on the boot, never on the wire! It is advisable to use a special tool.
7. If compressed air is available, use it to remove debris from the spark plug wells of the engine (an ordinary bicycle pump will also work).
When using compressed air, always wear safety goggles!

8. On some of the models in question, the spark plugs are recessed deep into the spark plug wells, so a socket extension will be required to remove them. Fit the socket onto the spark plug, connect the drive, and carefully turn the handle counterclockwise to unscrew the spark plug (see accompanying illustration).
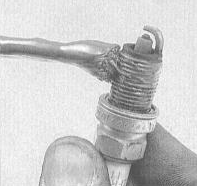
9. Compare the removed spark plug with the condition chart provided in the photo insert, which allows a qualitative assessment of the overall engine condition. Before installing new spark plugs, lightly apply anti-seize compound to their threads (see accompanying illustration).
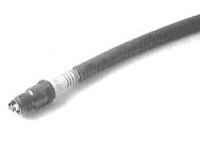
10. Start one of the new spark plugs into its bore in the engine by hand. Make sure the plug is not cross-threaded, then tighten it to the specified torque (using a torque wrench if available). To make starting the plug easier, slide a short section of flexible fuel hose over its terminal end (see accompanying illustration). This prevents thread damage, since if the plug starts to bind, the hose will simply slip.
11. Before connecting the secondary ignition wires to the spark plugs, perform the procedures in the Section Inspection and Replacement of Secondary Ignition Wires, Distributor Cap and Rotor.
12. Connect the secondary ignition wire by twisting and pushing its boot until it seats firmly on the spark plug terminal.
13. Repeat the procedure for the remaining spark plugs, working on one plug at a time to avoid mixing up the secondary ignition wire firing order.

Carbon Fouling
Symptoms: Soot indicates an over-rich air-fuel mixture or weak spark intensity. It causes misfiring, hard starting, and unstable engine operation.
Recommendations: Check whether the air cleaner is clogged, whether the fuel level in the float chamber is too high, whether the choke valve is stuck, and whether the contacts are excessively worn. Try using spark plugs with a longer insulator, which improves resistance to fouling.
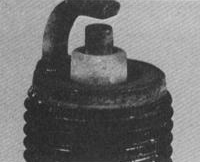
Normal Condition of Spark Plug
Symptoms: Grayish-brown color and slight electrode wear. The heat range of the spark plugs matches the engine type and its general condition.
Recommendations: When replacing spark plugs, install spark plugs of the same type.
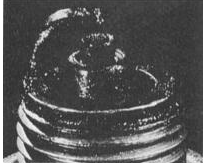
Oil Fouling
Symptoms: Oil fouling of the spark plug is caused by wear of the valve stem oil seals. Oil enters the combustion chamber through worn valve guides or piston rings. Causes misfires, makes starting difficult and leads to unstable engine operation.
Recommendations: Perform mechanical repair work and replace the spark plugs.

Ash Deposits
Symptoms: Soft brownish deposits on one or both electrodes of the spark plug. The deposits are formed from oil and/or fuel additives used. Excessive buildup may insulate the electrodes and cause misfires and unstable engine operation during acceleration.
Recommendations: If deposits build up quickly, replace the valve stem oil seals to prevent oil from entering the combustion chambers. Try changing the fuel brand.
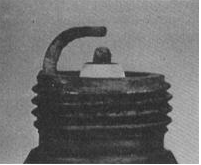
Overheating
Symptoms: Porous, white insulator, electrode erosion and absence of any deposits. Shortens the service life of the spark plug.
Recommendations: Check whether the heat range of the installed spark plugs meets the Specifications, whether ignition timing is set correctly, whether the air-fuel mixture is too lean, whether there are vacuum leaks in the intake manifold and whether the valves are sticking. Also check the coolant level and whether the radiator is clogged.
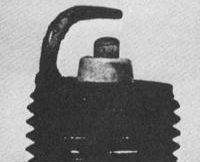
Wear
Symptoms: Rounded electrodes with a small buildup of deposits on the firing end. Normal color. Causes difficult engine starting in cold, humid weather and increased fuel consumption.
Recommendations: Replace the spark plugs with new ones of the same type.
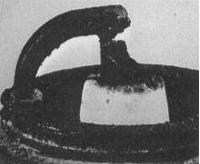
Pre-ignition
Symptoms: Electrodes are melted. The insulator is white but may be contaminated due to misfires or foreign particles entering the combustion chambers. May lead to engine failure.
Recommendations: Check the heat range of the installed spark plugs, ignition timing, mixture quality (whether it is too lean), whether the cooling system is clogged and whether the lubrication system is functioning normally.
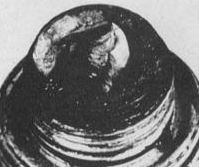
Detonation
Symptoms: The insulators may be chipped or cracked. Improper spark plug gap adjustment technique may also damage the insulator. May cause piston damage.

Glazing
Symptoms: The insulator has a yellowish color and glossy appearance. Indicates a sudden rise in temperature in the combustion chambers during rapid acceleration. Normal deposits melt and take on the appearance of a varnish coating. Causes misfires at high vehicle speeds.
Recommendations: Replace the spark plugs with colder ones while maintaining the driving style.
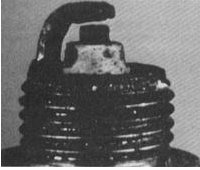
Splashed Deposits
Symptoms: After misfires over a long period, deposits may loosen while the combustion chamber remains at operating temperature. At high speeds, deposit flakes break off the piston and stick to the hot insulator, causing misfires.
Recommendations: Replace the spark plugs, or clean and reinstall the old ones.
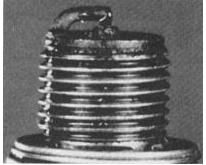
Electrode Bridging
Symptoms: Combustion waste products enter the electrode gap. Solid deposits accumulate, forming a bridge between the electrodes. Causes ignition failure in the cylinder.
Recommendations: Remove deposits from the electrode gap.

Mechanical Damage
Symptoms: May be caused by foreign material entering the combustion chamber or by the piston striking a spark plug that is too long. Leads to cylinder malfunction and piston damage.
Recommendations: Remove foreign particles from the engine and/or replace the spark plug.
Test yourself
A quick Honda Accord quiz: every answer comes with an explanation and a link to the manual page.