Checking Indicators and Warning Lights
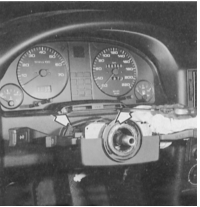
The instrument cluster mounting screws (arrows) become accessible after removing the steering column trim.
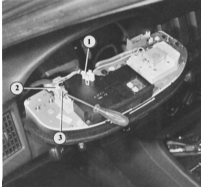
Connector (2) can only be disconnected after the plastic clip (3) is released. Another connector lock can be seen in the example of the connector marked (1). Here, the two plastic clips must be squeezed.
Sit in the driver's seat and check the following one by one:
PROCEDURE
Does the clock work (digital or analog)?
Turn the ignition on. The battery charge indicator, ABS indicator (briefly), airbag indicator (goes out after approx. 10 seconds) and parking brake indicator should illuminate with the parking brake applied.
Model without self-test system: in the illuminated field at the top between the round gauges, the coolant temperature indicator, brake signal indicator and oil pressure indicator should flash.
On vehicles equipped with a self-test system, the message "Bremslicht" (brake light) appears in the illuminated field between the round gauges when the ignition is switched on. After briefly pressing the brake pedal, the "OK" symbol should appear.
The fuel gauge and coolant temperature gauge needles move across their scales with a slight delay (only with the engine warmed up).
Turn on the turn signals: depending on the selected direction, one of the green turn signal indicators should flash rhythmically. Press the hazard warning switch: both turn signal indicators and the hazard warning control lamp (located in the switch) flash.
Pull the turn signal lever toward the steering wheel: the high beam indicator should illuminate.
Start the engine – does the oil pressure gauge work?
During a test drive, check the readings of the speedometer and coolant temperature gauge.
Removing the Instrument Panel Cluster Cover
PROCEDURE
Remove the steering wheel (refer to Suspension and Steering).
Remove the upper part of the trim panel behind the steering wheel that houses the lever switches. To do this, unscrew the two Phillips-head screws from below on the right and left sides of the lower trim, and remove the upper part by pulling it rearward.
Loosen the two Phillips-head screws at the bottom of the instrument cluster.
Carefully pull the cluster out of the instrument panel.
Test yourself
A quick Audi 80 quiz: every answer comes with an explanation and a link to the manual page.