Central Locking System
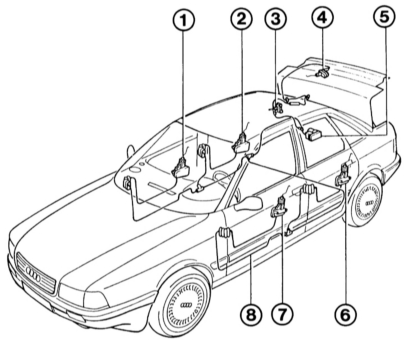
Central Locking System Hose Components and Routing
1 – locking element, front passenger door;
2 – locking element, rear right door;
3 – locking element, fuel filler flap;
4 – locking element, luggage compartment lid;
5 – pump;
6 – locking element, rear left door;
7 – locking element, driver's door;
8 – one of the vacuum lines.
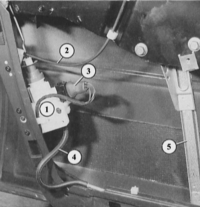
The illustration shows the locking element (1) of the central locking system in the driver's door with the connector plug (3) and the pressure/vacuum hose (4). The door unlocking cable (2) and the window regulator guide rail (5) are also shown.
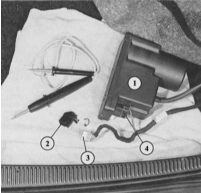
The central locking pump (1) is located under the right trim panel in the trunk or luggage compartment of sedans and estate models. The illustration shows it removed and resting on the luggage compartment floor, with the wiring harness connector to the locking elements (3) already released from its housing (2) (so the contacts are open). The power supply connector to the pump (4) remains installed.
All doors, as well as the luggage compartment lid and the fuel filler flap, can be locked or unlocked by turning the key in the driver's door, the front passenger door, or the luggage compartment lid. The main component of the system is the pump, driven by an electric motor. When the key is turned toward "Open," the pump builds up pressure, causing the various switching elements to release the corresponding lock. Conversely, when locking, a vacuum is created and the switching elements lock the lock.
Note: feature of the luggage compartment lid lock: with the key in the vertical position, the luggage compartment is always locked, regardless of the central locking system. This prevents theft of luggage, for example, when stopped at a traffic light. In the horizontal position, the luggage compartment lid lock responds together with the entire central locking system.
Central Locking System Check
Unlock, then lock with the key the driver's door, front passenger door and luggage compartment lid.
PROCEDURE
The central locking system must activate in all three doors.
After approximately 2 seconds, all locks should be locked.
If the pump runs longer than 5 seconds, this means the system is leaking. In this case the pump must run no longer than 35 seconds, then it must switch off.
Note: if the central locking system has failed, the doors and luggage compartment lid can be unlocked and locked in the normal way. The doors can also be locked with the buttons.
Electrical Troubleshooting
If the pump does not operate when turning the key in the driver's door, the front passenger door, or the luggage compartment lid:
PROCEDURE
Check the fuse (Body Electrical System chapter).
Remove the trim in the rear right side of the luggage compartment.
Disconnect the multi-pin connector from the pump.
Remove the housing of the multi-pin connector.
Check the driver's door locking element: connect a test lamp in the connector between the green-blue wire terminal and ground (vehicle body).
The test lamp must stay on continuously when the driver's door is unlocked with the key. In this case, the unlocking contact of the locking element is good.
If the lamp does not light, the driver's door unlocking contact is faulty or the electrical circuit is interrupted.
Now reconnect the test lamp: the wire that went to ground should be moved to the positive battery terminal. The other contact remains in the connector (green-blue wire terminal).
Lock the driver's door with the key.
If the test lamp now stays on continuously, the locking contact of the locking element is good.
If the lamp does not light but the wires are intact, the locking element is faulty.
Check the locking element of the front passenger door: connect a test lamp in the disconnected pump connector between the contact of the yellow-blue wire and ground (vehicle body).
The test lamp should light continuously when the front passenger door is unlocked with the key. In this case, the unlocking contact of the locking element is OK.
If the lamp does not light, the unlocking contact of the front passenger door is faulty or the electrical circuit is interrupted.
Now move the test lamp: the wire that was connected to ground should be connected to the positive battery terminal. The other contact remains in the connector (contact of the yellow-blue wire).
Lock the front passenger door with the key.
If the test lamp now stays on continuously, the locking contact of the locking element is good.
If the lamp does not light and the wires are intact, this means the locking element is faulty.
Check the locking element of the luggage compartment lid: connect a test lamp in the disconnected pump connector between the contact of the brown-green wire and the positive battery terminal.
The test lamp should light continuously when the luggage compartment lid is unlocked with the key. In this case, the unlocking contact of the locking element is OK.
If the lamp does not light, the unlocking contact of the luggage compartment lid is faulty or the electrical circuit is interrupted.
Now move the test lamp: the wire that was connected to the brown-green wire contact should be moved to the brown-white wire. The other contact remains connected to the positive battery terminal.
Lock the luggage compartment lid with the key.
If the test lamp lights continuously while the key is in the locking position, the locking contact of the locking element is OK.
If the lamp does not light and the wires are intact, this means the locking element is faulty.
Pump check: if the pump is controlled by the locking elements (see the description in the previous paragraphs), then the fault is only in the power supply (through the thin black-blue and thick red-black wires) or in the poor ground connection (body) (thick brown wire).
If everything else is OK, the pump itself is faulty. Replace.
Pneumatic System Troubleshooting
To check for a leaking central locking system (symptom: pump runs too long), check the system step by step: location of components and hoses.
PROCEDURE
Pump: pinch the hose with pliers directly at the compressor to seal it. Open and close one of the locks.
If the pump runs for longer than 3, maximum 7 s when the central locking system is actuated, the pump is leaking. Replace.
Locking elements of doors and trunk: pinch off all lines one by one directly at the locking elements. To do this, remove the corresponding trim panels (see Body chapter). Use one lock each time.
The pump must not run for longer than 3, maximum 7 s when the central locking system is actuated.
After pinching the defective (leaking) hose, the pump operates normally, i.e., less than 3 s. Replace the faulty part.
Test yourself
A quick Audi 80 quiz: every answer comes with an explanation and a link to the manual page.