Stop Light Control Relay Malfunction (C1380)
DESCRIPTION
When the Dynamic Radar Cruise Control system*1, Pre-Collision System*1 or Brake Hold system is operating, the Skid Control ECU outputs the stop light control signal (STPO) to illuminate the stop lights.
*1: with pre-collision safety system
DTC No. | Detection Item | DTC Detection Condition | Suspected Area |
|---|---|---|---|
C1380 |
Stop light relay control malfunction |
One of the following conditions is met:
|
|
Vehicle Operating Conditions |
|||
|---|---|---|---|
Sequence 1 | Sequence 2 |
||
Diagnostic Condition |
- |
- |
- |
Malfunction Status |
When the +BS terminal voltage is 10 V or higher and the stop light control relay drive output (STPO) is on, no signal is transmitted to the STP2 terminal. |
○ |
- |
When the +BS terminal voltage is 10 V or higher and the stop light control relay drive output (STPO) is off, the STP terminal signal differs from the STP2 terminal input signal. |
- |
○ |
|
Detection Duration |
5 seconds minimum |
5 seconds minimum |
|
Number of Trips |
1 trip(s) |
1 trip(s) |
|
HINT:
The DTC is output when the conditions for any one of the sequences in the table above are met.
WIRING DIAGRAM
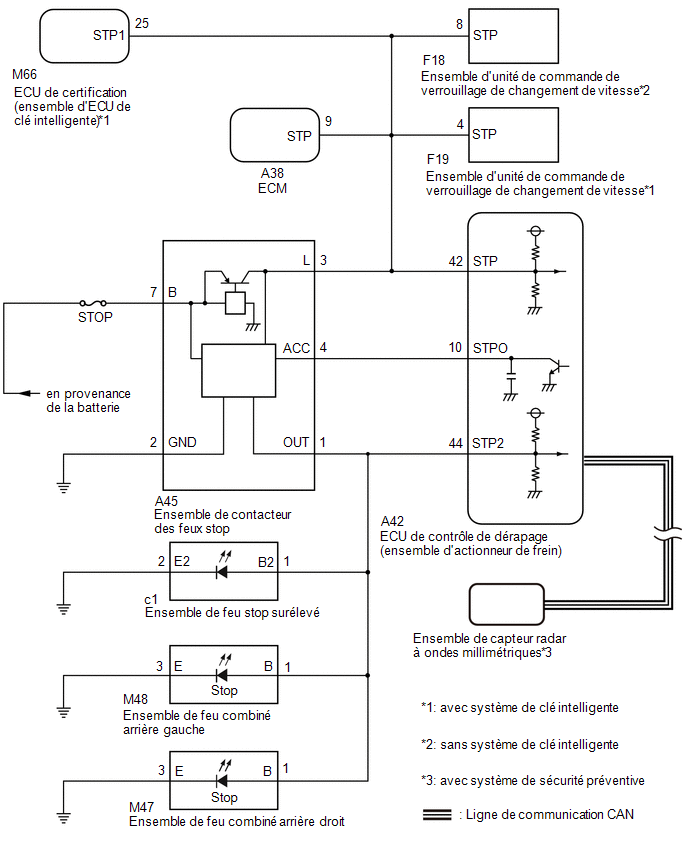
PRECAUTION / NOTICE / HINT
NOTICE:
- When replacing the Skid Control ECU (Brake Actuator Assembly), perform system variant coding.
Click here

- Check the fuses for the circuits related to this system before performing the following procedure.
PROCEDURE
CHECK WIRE HARNESS AND CONNECTOR (STP, STPO AND STP2 TERMINALS)
(a) Turn the ignition switch OFF.
(b) Disconnect the Skid Control ECU (Brake Actuator Assembly) connector. |
|
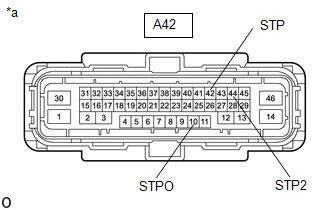
(c) Measure the voltage according to the value(s) shown in the table below.
Standard voltage:
Tester Connection | Condition | Specified Condition |
|---|---|---|
A42-42 (STP) - Body ground |
Brake pedal depressed |
11 à 14 V |
Brake pedal released |
Below 1.5 V |
|
A42-10 (STPO) - Body ground |
Always |
11 à 14 V |
A42-44 (STP2) - Body ground |
Brake pedal depressed |
11 à 14 V |
Brake pedal released |
Below 1.5 V |
Result:
Result | Proceed to |
|---|---|
Voltage of all terminals is normal |
A |
Only the STP terminal voltage is abnormal |
B |
Only the STPO terminal voltage is abnormal |
C |
Only the STP2 terminal voltage is abnormal |
D |
The STPO and STP2 terminal voltages are abnormal |
E |
| B |  |
GO TO STEP 5 |
| C | |
GO TO STEP 13 |
| D | |
GO TO STEP 14 |
| E | |
GO TO STEP 18 |
|

PERFORM ACTIVE TEST USING THE TECHSTREAM (STOP LIGHT RELAY)
(a) Select the following menu items: Chassis / ABS/VSC/TRAC/EPB / Active Test.
(b) Perform the Active Test by following the instructions displayed on the Techstream screen.
Chassis > ABS/VSC/TRAC/EPB > Active TestTester display | Item | Control Range | Diagnostic Note |
|---|---|---|---|
Stop Light Relay |
Stop light relay (stop light switch assembly) |
ON or OFF |
Stop lights illuminate |
Stop Light Relay
OK:
The stop light turns on and off in response to Techstream operation.
| NG | |
GO TO STEP 4 |
|
CHECK WHETHER DTCs ARE OUTPUT
(a) Clear the DTCs.
Click here
(b) Select the following menu items: Chassis / ABS/VSC/TRAC/EPB / Active Test.
(c) Perform the Active Test by following the instructions displayed on the Techstream screen.
Chassis > ABS/VSC/TRAC/EPB > Active TestTester display | Item | Control Range | Diagnostic Note |
|---|---|---|---|
Stop Light Relay |
Stop light relay (stop light switch assembly) |
ON or OFF |
Stop lights illuminate |
Stop Light Relay
(d) Check the DTCs.
Click here
Result:
Result | Proceed to |
|---|---|
DTC C1380 is output. |
A |
DTC C1380 is not output. |
B |
| A | |
REPLACE BRAKE ACTUATOR ASSEMBLY |
| B | |
USE SIMULATION METHOD TO CHECK |
CHECK BRAKE ACTUATOR ASSEMBLY
(a) Select the following menu items: Chassis / ABS/VSC/TRAC/EPB / Active Test.
(b) Perform the Active Test by following the instructions displayed on the Techstream screen.
Chassis > ABS/VSC/TRAC/EPB > Active TestTester display | Item | Control Range | Diagnostic Note |
|---|---|---|---|
Stop Light Relay |
Stop light relay (stop light switch assembly) |
ON or OFF |
Stop lights illuminate |
Stop Light Relay
(c) Measure the voltage according to the value(s) shown in the table below. Standard voltage:
|
|
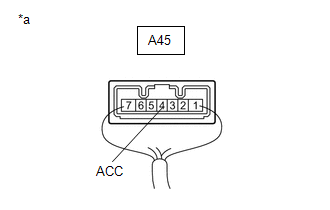
| OK | |
REPLACE STOP LIGHT SWITCH ASSEMBLY |
| NG | |
REPLACE BRAKE ACTUATOR ASSEMBLY |
CHECK WIRE HARNESS AND CONNECTOR (BRAKE ACTUATOR ASSEMBLY - ECM)
(a) Make sure there is no looseness in the lock and connector connection. OK: The connector is correctly connected. |
|
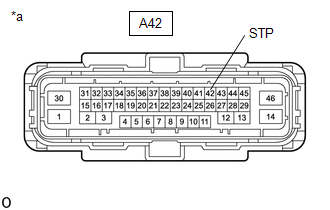
(b) Disconnect the A38 ECM connector.
(c) Check the connector housing and terminals for deformation and corrosion.
OK:
No deformation or corrosion.
(d) Measure the voltage according to the value(s) specified in the table below.
Standard voltage:
Tester Connection | Condition | Specified Condition |
|---|---|---|
A42-42 (STP) - Body ground |
Stop Light Switch Assembly in ON position (brake pedal depressed) |
11 à 14 V* |
A42-42 (STP) - Body ground |
Stop Light Switch Assembly in OFF position (brake pedal released) |
Below 1.5 V |
HINT:
*: The standard value varies depending on the voltage at terminal +BS. The standard voltage is 85% of the voltage at terminal +BS.
Result:
Result | Proceed to |
|---|---|
OK |
A |
NG (with smart key system) |
B |
NG (without smart key system) |
C |
| A | |
REPLACE ECM |
| C | |
GO TO STEP 10 |
|
CHECK HARNESS AND CONNECTOR (BRAKE ACTUATOR ASSEMBLY - SMART KEY ECU ASSEMBLY)
(a) Make sure there is no looseness in the lock and connector connection. OK: The connector is correctly connected. |
|
(b) Disconnect connector M66 from the certification ECU (smart key ECU assembly).
(c) Check the connector housing and terminals for deformation and corrosion.
OK:
No deformation or corrosion.
(d) Measure the voltage according to the value(s) specified in the table below.
Standard voltage:
Tester Connection | Condition | Specified Condition |
|---|---|---|
A42-42 (STP) - Body ground |
Stop Light Switch Assembly in ON position (brake pedal depressed) |
11 à 14 V* |
A42-42 (STP) - Body ground |
Stop Light Switch Assembly in OFF position (brake pedal released) |
Below 1.5 V |
HINT:
*: The standard value varies depending on the voltage at terminal +BS. The standard voltage is 85% of the voltage at terminal +BS.
| OK | |
REPLACE SMART KEY ECU ASSEMBLY |
|
CHECK HARNESS AND CONNECTOR (BRAKE ACTUATOR ASSEMBLY - SHIFT LOCK CONTROL ECU ASSEMBLY)
(a) Make sure there is no looseness in the lock and connector connection. OK: The connector is correctly connected. |
|
(b) Disconnect connector F19 from the shift lock control ECU (shift lock control ECU assembly).
(c) Check the connector housing and terminals for deformation and corrosion.
OK:
No deformation or corrosion.
(d) Measure the voltage according to the value(s) specified in the table below.
Standard voltage:
Tester Connection | Condition | Specified Condition |
|---|---|---|
A42-42 (STP) - Body ground |
Stop Light Switch Assembly in ON position (brake pedal depressed) |
11 à 14 V* |
A42-42 (STP) - Body ground |
Stop Light Switch Assembly in OFF position (brake pedal released) |
Below 1.5 V |
HINT:
*: The standard value varies depending on the voltage at terminal +BS. The standard voltage is 85% of the voltage at terminal +BS.
| OK | |
REPLACE SHIFT LOCK CONTROL ECU ASSEMBLY |
|
CHECK HARNESS AND CONNECTOR (BRAKE ACTUATOR ASSEMBLY - STOP LIGHT SWITCH ASSEMBLY)
(a) Make sure there is no looseness in the lock and connector connection. OK: The connector is correctly connected. |
|
(b) Disconnect connector A45 from the stop light switch assembly.
(c) Check the connector housing and terminals for deformation and corrosion.
OK:
No deformation or corrosion.
(d) Measure the voltage according to the value(s) specified in the table below.
Standard voltage:
Tester Connection | Condition | Specified Condition |
|---|---|---|
A42-42 (STP) - Body ground |
Always |
Below 1.5 V |
| NG | |
REPAIR OR REPLACE HARNESS OR CONNECTOR |
|
CHECK HARNESS AND CONNECTOR (BRAKE ACTUATOR ASSEMBLY - STOP LIGHT SWITCH ASSEMBLY)
(a) Measure the resistance according to the value(s) in the table below.
Standard resistance:
Tester Connection | Condition | Specified Condition |
|---|---|---|
A42-42 (STP) - A45-3 (L) |
Always |
Below 1 Ω |
A42-42 (STP) or A45-3 (L) - Body ground |
Always |
10 kΩ minimum |
| OK | |
REPLACE STOP LIGHT SWITCH ASSEMBLY |
| NG | |
REPAIR OR REPLACE HARNESS OR CONNECTOR |
CHECK HARNESS AND CONNECTOR (BRAKE ACTUATOR ASSEMBLY - SHIFT LOCK CONTROL ECU ASSEMBLY)
(a) Make sure there is no looseness in the lock and connector connection. OK: The connector is correctly connected. |
|
(b) Disconnect connector F18 from the shift lock control ECU (shift lock control ECU assembly).
(c) Check the connector housing and terminals for deformation and corrosion.
OK:
No deformation or corrosion.
(d) Measure the voltage according to the value(s) specified in the table below.
Standard voltage:
Tester Connection | Condition | Specified Condition |
|---|---|---|
A42-42 (STP) - Body ground |
Stop Light Switch Assembly in ON position (brake pedal depressed) |
11 à 14 V* |
A42-42 (STP) - Body ground |
Stop Light Switch Assembly in OFF position (brake pedal released) |
Below 1.5 V |
HINT:
*: The standard value varies depending on the voltage at terminal +BS. The standard voltage is 85% of the voltage at terminal +BS.
| OK | |
REPLACE SHIFT LOCK CONTROL ECU ASSEMBLY |
|
CHECK HARNESS AND CONNECTOR (BRAKE ACTUATOR ASSEMBLY - STOP LIGHT SWITCH ASSEMBLY)
(a) Make sure there is no looseness in the lock and connector connection. OK: The connector is correctly connected. |
|
(b) Disconnect connector A45 from the stop light switch assembly.
(c) Check the connector housing and terminals for deformation and corrosion.
OK:
No deformation or corrosion.
(d) Measure the voltage according to the value(s) specified in the table below.
Standard voltage:
Tester Connection | Condition | Specified Condition |
|---|---|---|
A42-42 (STP) - Body ground |
Always |
Below 1.5 V |
| NG | |
REPAIR OR REPLACE HARNESS OR CONNECTOR |
|
CHECK HARNESS AND CONNECTOR (BRAKE ACTUATOR ASSEMBLY - STOP LIGHT SWITCH ASSEMBLY)
(a) Measure the resistance according to the value(s) in the table below.
Standard resistance:
Tester Connection | Condition | Specified Condition |
|---|---|---|
A42-42 (STP) - A45-3 (L) |
Always |
Below 1 Ω |
A42-42 (STP) or A45-3 (L) - Body ground |
Always |
10 kΩ minimum |
| OK | |
REPLACE STOP LIGHT SWITCH ASSEMBLY |
| NG | |
REPAIR OR REPLACE HARNESS OR CONNECTOR |
CHECK HARNESS AND CONNECTOR (BRAKE ACTUATOR ASSEMBLY - STOP LIGHT SWITCH ASSEMBLY)
(a) Turn the ignition switch OFF.
(b) Disconnect the A42 connector from the Skid Control ECU (Brake Actuator Assembly).
(c) Disconnect connector A45 from the stop light switch assembly.
(d) Measure the resistance according to the value(s) in the table below.
Standard resistance:
Tester Connection | Condition | Specified Condition |
|---|---|---|
A42-10 (STPO) - A45-4 (ACC) |
Always |
Below 1 Ω |
| OK | |
REPLACE STOP LIGHT SWITCH ASSEMBLY |
| NG | |
REPAIR OR REPLACE HARNESS OR CONNECTOR |
CHECK HARNESS AND CONNECTOR (BRAKE ACTUATOR ASSEMBLY - LH REAR COMBINATION LIGHT ASSEMBLY)
(a) Turn the ignition switch OFF. |
|
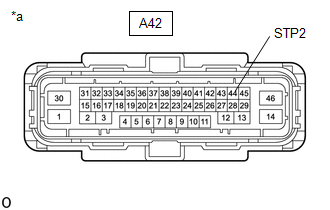
(b) Disconnect the A42 connector from the Skid Control ECU (Brake Actuator Assembly).
(c) Disconnect connector M48 from the LH rear combination light assembly.
(d) Measure the voltage according to the value(s) specified in the table below.
Standard voltage:
Tester Connection | Condition | Specified Condition |
|---|---|---|
A42-44 (STP2) - Body ground |
Brake pedal depressed |
11 à 14 V |
A42-44 (STP2) - Body ground |
Brake pedal released |
Below 1.5 V |
Result:
Result | Proceed to |
|---|---|
OK (for LED type) |
A |
OK (for bulb type) |
B |
NG |
C |
| A | |
REPLACE LH REAR COMBINATION LIGHT ASSEMBLY |
| B | |
REPLACE LH REAR COMBINATION LIGHT ASSEMBLY |
|
CHECK HARNESS AND CONNECTOR (BRAKE ACTUATOR ASSEMBLY - RH REAR COMBINATION LIGHT ASSEMBLY)
(a) Turn the ignition switch OFF. |
|
(b) Disconnect the A42 connector from the Skid Control ECU (Brake Actuator Assembly).
(c) Disconnect connector M48 from the LH rear combination light assembly.
(d) Disconnect connector M47 from the RH rear combination light assembly.
(e) Measure the voltage according to the value(s) in the table below.
Standard voltage:
Tester Connection | Condition | Specified Condition |
|---|---|---|
A42-44 (STP2) - Body ground |
Brake pedal depressed |
11 à 14 V |
A42-44 (STP2) - Body ground |
Brake pedal released |
Below 1.5 V |
Result:
Result | Proceed to |
|---|---|
OK (for LED type) |
A |
OK (for bulb type) |
B |
NG |
C |
| A | |
REPLACE RH REAR COMBINATION LIGHT ASSEMBLY |
| B | |
REPLACE RH REAR COMBINATION LIGHT ASSEMBLY |
|
CHECK HARNESS AND CONNECTOR (BRAKE ACTUATOR ASSEMBLY - HIGH MOUNTED STOP LIGHT ASSEMBLY)
(a) Turn the ignition switch OFF. |
|
(b) Disconnect the A42 connector from the Skid Control ECU (Brake Actuator Assembly).
(c) Disconnect connector M48 from the LH rear combination light assembly.
(d) Disconnect connector M47 from the RH rear combination light assembly.
(e) Disconnect connector C1 from the high mounted stop light assembly.
(f) Measure the voltage according to the value(s) specified in the table below.
Standard voltage:
Tester Connection | Condition | Specified Condition |
|---|---|---|
A42-44 (STP2) - Body ground |
Brake pedal depressed |
11 à 14 V |
A42-44 (STP2) - Body ground |
Brake pedal released |
Below 1.5 V |
| OK | |
REPLACE HIGH MOUNTED STOP LIGHT ASSEMBLY |
|
CHECK HARNESS AND CONNECTOR (BRAKE ACTUATOR ASSEMBLY - STOP LIGHT SWITCH ASSEMBLY)
(a) Turn the ignition switch OFF.
(b) Disconnect the A42 connector from the Skid Control ECU (Brake Actuator Assembly).
(c) Disconnect connector M48 from the LH rear combination light assembly.
(d) Disconnect connector M47 from the RH rear combination light assembly.
(e) Disconnect connector C1 from the high mounted stop light assembly.
(f) Disconnect connector A45 from the stop light switch assembly.
(g) Measure the resistance according to the value(s) specified in the table below.
Standard resistance:
Tester Connection | Condition | Specified Condition |
|---|---|---|
A45-1 (OUT) - A42-44 (STP2) |
Always |
Below 1 Ω |
A45-1 (OUT) or A42-44 (STP2) - Body ground |
Always |
10 kΩ minimum |
| OK | |
REPLACE STOP LIGHT SWITCH ASSEMBLY |
| NG | |
REPAIR OR REPLACE HARNESS OR CONNECTOR |
CHECK STOP LIGHT SWITCH ASSEMBLY POWER SUPPLY CIRCUIT
(a) Turn the ignition switch OFF.
(b) Disconnect the connector from the stop light switch assembly. |
|
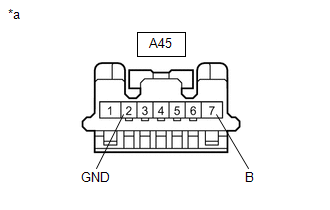
(c) Measure the resistance according to the value(s) in the table below.
Standard resistance:
Tester Connection | Condition | Specified Condition |
|---|---|---|
A45-2 (GND) - Body ground |
Always |
Below 1 Ω |
(d) Measure the voltage according to the value(s) specified in the table below.
Standard voltage:
Tester Connection | Condition | Specified Condition |
|---|---|---|
A45-7 (B) - Body ground |
Always |
11 à 14 V |
| NG | |
REPAIR OR REPLACE HARNESS OR CONNECTOR |
|
CHECK HARNESS AND CONNECTOR (BRAKE ACTUATOR ASSEMBLY - STOP LIGHT SWITCH ASSEMBLY)
(a) Turn the ignition switch OFF.
(b) Disconnect the A42 connector from the Skid Control ECU (Brake Actuator Assembly).
(c) Disconnect connector A45 from the stop light switch assembly.
(d) Measure the resistance according to the value(s) in the table below.
Standard resistance:
Tester Connection | Condition | Specified Condition |
|---|---|---|
A42-10 (STPO) - A45-4 (ACC) |
Always |
Below 1 Ω |
| OK | |
REPLACE STOP LIGHT SWITCH ASSEMBLY |
| NG | |
REPAIR OR REPLACE HARNESS OR CONNECTOR |