Tips for using the kit. What to do if a tire has a hole. First step: Inflate the tire with sealant and air. Second step: Check the tire pressure.
This section provides detailed instructions for using the tire sealant kit on the Ford Mustang VI Gen, including the correct procedure for inflating and checking pressure. The instructions contain numerous precautions, from safely positioning the vehicle to handling the compressor and the latex in the sealant. The clearly structured steps, supported by illustrations, are particularly noteworthy. The instructions help not only with the repair but also promote understanding of responsible vehicle care. This way, Mustang drivers stay mobile and protected even in an emergency.
Tips for using the kit
Follow these steps to ensure safe use of the kit:
- Read all instructions and safety information completely.
- Before using the kit, be sure to park your vehicle safely away from the road and moving traffic. Turn on the hazard warning lights.
- Always apply the parking brake to ensure the vehicle cannot move unexpectedly.
- Do not remove foreign objects such as nails or screws from the tire.
- When using the kit, keep the engine running (only if the vehicle is outdoors or in a well-ventilated area) so that the compressor does not drain the vehicle battery.
- Do not run the compressor continuously for more than 15 minutes. This protects the compressor from overheating.
- Never leave the kit unattended while it is in use.
- The sealant contains latex.
 * If you only want to inflate a tire or other items, the selector switch must be set to "Air".
What to do if a tire has a hole
You can repair a hole in the tread of a tire with the kit in two steps.
- In the first step, inflate the tire with sealant and air.
First step: Inflating the tire with sealant and air
WARNINGS
Do not stand directly over the kit while it inflates the tire. If you notice unusual bulges or deformation on the tire sidewall during inflation, stop the repair attempt and call for roadside assistance.
If the tire is not inflated to the recommended tire pressure within 15 minutes, stop the repair attempt and call for roadside assistance.
Keep the engine running while using the kit only if the vehicle is outdoors or in a well-ventilated area.
Preparation: Park the vehicle in a safe, level and protected area, at a sufficient distance from moving traffic.
Switch on the hazard warning lights.
Apply the parking brake and switch off the engine. Check the flat tire for visible damage.
The sealant contains latex. Take suitable precautions to avoid allergic reactions.
Do not remove foreign objects that have pierced the tire. If there is a hole in the tire sidewall, stop the repair attempt and call for roadside assistance.
- Remove the valve cap from the tire valve.
- Unpack the dual-purpose hose (black tube) located at the rear of the compressor housing.
- Attach the hose to the tire valve by turning the adapter counterclockwise.

4. Plug the power cord into the 12-volt power outlet in the vehicle.
5. Remove the warning label from the housing and attach it centered on the top of the dashboard.
6. Start the vehicle and keep the engine running so that the compressor does not drain the vehicle battery.
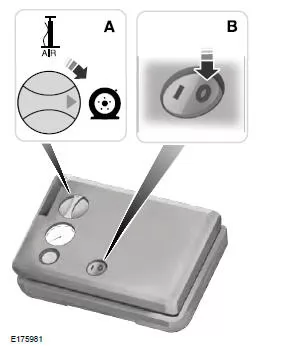
7. Turn the selector switch (A) counterclockwise to the "Sealant" position. Switch on the kit by pressing the on/off button (B).
8. Inflate the tire to the pressure specified on the tire label on the driver's door or door pillar. The first reading on the air pressure gauge may show a higher value than the pressure on the label while the sealant is being pumped into the tire. This is normal and nothing to be concerned about. The pressure gauge reading shows the tire inflation pressure after about 30 seconds of operation. You must check the final tire pressure with the compressor SWITCHED OFF to obtain an accurate reading.
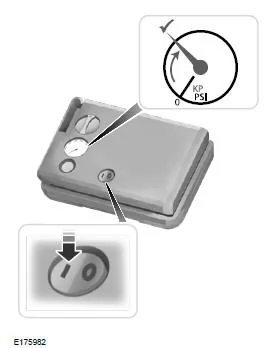
9. When the recommended tire pressure is reached, switch off the kit, unplug the power cord and disconnect the hose from the tire valve.
Refit the valve cap on the tire valve and store the kit again in its designated storage compartment.
10. Drive the vehicle immediately and carefully for 4 miles (6 kilometers) to distribute the sealant evenly inside the tire.
Do not drive faster than 80 km/h.
11. After 4 miles (6 kilometers), stop and check the tire pressure. See second step: Checking the tire pressure.
Note: If you notice unusual vibration, handling problems or noises while driving, reduce your speed until you can pull safely to the roadside, and call for roadside assistance. Note: Do not continue with the second step of this procedure.
Second step: Checking the tire pressure
WARNINGS
If you continue with the section "First step: Inflating the tire with sealant and air" and have injected sealant into the tire and the pressure is below 1.4 bar, proceed to the next step.
The power plug may be hot after use. Be careful when removing it.
Check the air pressure of your tires as follows:
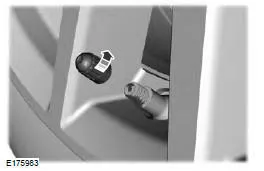
- Remove the valve cap from the tire valve.
- Screw the air compressor hose firmly onto the valve stem by turning it clockwise.
- Press the selector switch and turn it counterclockwise to the "Air" position.
- If necessary, switch on the compressor and adjust the tire pressure to the recommended value shown on the tire label on the driver's door or door pillar. Check the tire pressure with the compressor switched OFF to obtain an accurate reading.
- Remove the hoses, refit the valve cap on the tire valve, and return the kit to its storage compartment.
These tips for using the tire repair kit on the Ford Mustang (VI Gen, 2014–2023) help you act quickly and safely in a tire emergency. The 2014–2023 Ford Mustang includes a kit designed specifically for emergencies, which helps the driver seal small punctures. The clear steps for inflating and checking tire pressure make the kit easy to use.
Special notes on the safe use of the compressor and sealant help prevent injury and damage to the vehicle. The Ford Mustang VI Generation shows its well-thought-out design here, providing reliable service even in emergency situations.
This system makes the Ford Mustang (VI Gen, 2014–2023) a vehicle that combines sporty performance with practical everyday usability.
Test yourself
A quick Ford Mustang quiz: every answer comes with an explanation and a link to the manual page.