<br> Repair of the Heater Conductive Strips
GENERAL INFORMATION
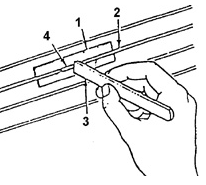 2. DAMAGED STRIP
3. WOODEN SPATULA
4. REPAIR COMPOUND
1. Disconnect the supply wire from the rear window heater.
2. Check the heater conductive strips.
PROCEDURE.
3. Mark the damaged locations of the strips with a glass marker or chalk (on the outside of the rear window).
Remove the damaged section of the strip for a length of approximately 6 mm on each side of the
break. Wipe the damaged area with a clean cloth moistened with alcohol.
Warning.
4. Apply repair adhesive tape or two pieces of regular adhesive tape above and below the strip being repaired. The adhesive tape is required to
limit the width of the repair area.
When using special repair tape, make sure the width of the slot in it matches the width of the conductive strip being repaired. Remove the lid of the box containing the materials for repairing
conductive strips.
5. Thoroughly mix the hardener with the silver-colored base compound. If the hardener has crystallized, immerse its package in hot water and wait until the hardener becomes liquid again.
6. At room temperature, apply the repair compound to the damaged area using a small wooden stick or spatula.
7. Carefully remove the protective adhesive tape.
Curing of the repair compound must take place with heat. To avoid
damage to the interior trim from the heat source, install protective shields.
Heat the damaged area for 1–2 minutes. The heating element must be positioned at a distance of 25 mm from the damaged area. The minimum required heating temperature is 149 °C.
8. Inspect the repaired area of the conductive strip. If the strip has discolored,
Warning.
apply tinting compound to it with a brush. After drying for 30 s, wipe off excess tinting compound with a clean lint-free cloth. Turn on and check the operation of the rear window heater.
Full curing of the repair compound takes at least 24 hours. During
this time, avoid mechanical stress on the
repaired area of the strip.
Repair of the Supply Wire
Daewoo Nexia: Repair of the Supply Wire
The heater supply wire can be reattached to the bus bar by soldering. For soldering, use solder containing 3%
Warning.
silver and rosin paste as flux.
1. Before soldering, clean the repaired area of the strip.
2. Using a brush, apply a small amount of rosin paste to the wire and bus bar contact points.
Test yourself
A quick Daewoo Nexia quiz: every answer comes with an explanation and a link to the manual page.