Windshield - Partial Replacement of Adhesive Molding

Pivot Pin and Windshield Stopper
1. WINDSHIELD STOPPER
2. PIVOT PIN
Remove or disconnect
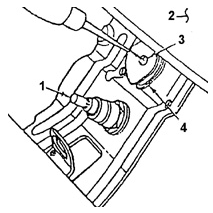
Pivot Pin Removal
1. WIPER ARM SPINDLE
2. WINDSHIELD GLASS
3. PIVOT PIN
4. WINDSHIELD STOPPER
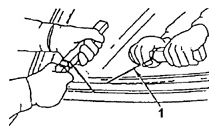
Windshield Removal
1. CUTTING WIRE
PROCEDURE.
1. Remove the wiper arms and the outer ventilation grille..
1a. Remove the plastic caps from the wiper arm spindles..
1b. Remove the nuts and detach the wiper arms from the serrated wiper
spindles..
1c. Remove the three screws and the ventilation grille..
2. Lower pivot pins and windshield stoppers (one on each side of the vehicle)..
3. Inside rearview mirror..
4. Seal and cord from the front pillar..
5. Right and left windshield decorative moldings. Using a knife to
remove the seal, cut the sides and top of the seal as close as possible to
the glass edge. Insert the cutting wire from the outside between the glass and body and, with the help of
a second mechanic, cut the adhesive layer along the lower edge of the glass..
6. Remove the windshield from the vehicle..
7. Lower windshield decorative strip..
Clean.
PROCEDURE.
1. Clean the window opening of all residual materials..
2. Clean the glass along the perimeter edge for subsequent application of preparatory coats.
3. Wipe the windshield with a clean cloth dampened with alcohol..
Install or connect

Applying Primer to the Windshield
1. NEW BRUSH
2. APPLICATION COMPOUND
PRIMER COAT
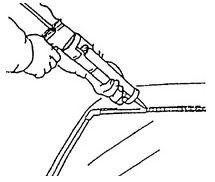
Applying Sealant. Bead thickness of adhesive compound – 5 mm.
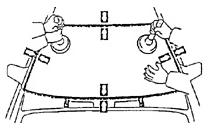
Windshield Installation
1. REAR WINDOW GLASS
2. REAR WINDOW STOPPER
PROCEDURE.
1. Install the lower windshield stopper with the flat side facing up. Install the pivot pin..
2. Using a new brush, apply preparatory coats along the glass edge using the appropriate compounds from the repair kit. First apply
a primer coat of clear compound, then a black compound..
Apply primer coats along the glass edge perimeter. Apply primer along the perimeter edge of the glass in a 6 mm wide strip..
3. Top, side and bottom moldings along the windshield edge..
4. Apply urethane adhesive compound in a 5 mm thick bead around the perimeter of the window opening (see figure: Applying Sealant)..
5. With the help of a second mechanic, install the windshield on the vehicle..
Center the glass in the body opening. Use suction cups to facilitate windshield installation (Fig. Windshield Installation)..
6. Turn the windshield stoppers clockwise so that the flat portions of the stoppers are in the lower position..
7. Check the windshield seal for leaks by spraying it with water. If a leak is found, dry the glass and apply additional sealant. If the leak cannot be eliminated, remove the glass and
repeat the entire installation procedure..
8. Wiper arms and cowl vent grille..
8a. Install the cowl vent grille in place and secure it with three screws..
8b. Install the wiper arms onto the splined shafts..
8c. Install and tighten the wiper arm nuts..
9. Install the inside rear view mirror..
10. Install the weatherstrip and cord onto the front pillar..
11. Install the right and left windshield trim moldings.
Test yourself
A quick Daewoo Nexia quiz: every answer comes with an explanation and a link to the manual page.