Instrument Cluster - Indicators
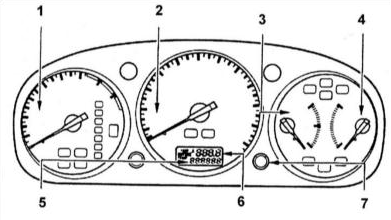
Instrument cluster indicator location diagram
1 — Tachometer
2 — Speedometer
3 — Fuel level gauge
4 — Engine coolant temperature gauge
5 — Odometer (total mileage)
6 — Trip odometer / outside air temperature display
7 — Trip odometer reset button
The instrument cluster gauge layout is shown in the illustration.
Tachometer
The tachometer shows the engine crankshaft rotational speed in revolutions per minute. To prevent engine damage, do not exceed the maximum permissible crankshaft speed (the tachometer needle must never enter the red zone of the scale).
Speedometer
The speedometer shows the vehicle speed. The unit of measurement is usually km/h; in some cases the gauge dial may have two scales: km/h and mph. Some vehicles may be equipped with a warning buzzer that sounds when the safe driving speed is exceeded (120 km/h).
Fuel level gauge
The gauge shows the current amount of fuel in the tank. Gauge accuracy is at its best when the vehicle is on level ground. Gauge error increases when driving on winding or hilly roads. When the ignition is switched off, the gauge needle returns to zero. Immediately after turning the ignition key to the "ON" (II) position, the needle moves to the position corresponding to the actual amount of fuel in the tank.
Engine coolant temperature gauge
The gauge shows the engine coolant temperature. Under normal operating conditions, the normal engine operating temperature corresponds to the middle position of the needle. Under severe operating conditions, for example in very hot weather or during prolonged climbing, the needle may rise to the upper red mark on the scale. If the engine temperature rises so that the needle enters the red range of the gauge (H), stop the vehicle immediately, pull over to the side of the road, park the vehicle, and inspect the cooling system to determine the cause of engine overheating.
Odometer
The odometer shows the total distance traveled by the vehicle in kilometers or miles, depending on the version.
Trip odometer / outside air temperature display
The trip odometer records the distance traveled since the last reset (in kilometers or miles, depending on the version). The trip odometer is reset using the button built into the instrument panel to the right of the speedometer. On some models, the odometer display can also be used to show the outside air temperature. The gauge display is switched using the button mentioned above. When the ignition is turned on, the display shows the last selected readings.
Some Honda Accord models are equipped with two trip odometers, which are switched by repeatedly pressing the same button. To reset either trip odometer, display it on the gauge screen, then press and hold the reset button until the value "0" appears on the display.
The gauge readings are also reset when the battery is disconnected.
Main exterior lighting control switch
The main lighting control switch is a lever mounted on the left side of the steering column, directly below the steering wheel.
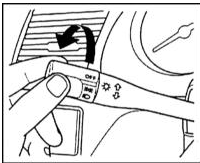
To turn on the exterior lights, rotate the end knob of the main switch lever to the first detent position, indicated by the symbol. This will switch on the front and rear parking lights, the license plate lights, and the instrument panel lighting. To turn on the low beam headlights, rotate the end knob of the main switch to the second detent position, indicated by the symbol.
To prevent battery discharge, a warning buzzer is provided. It sounds when the driver's door is opened if the lights are left on and the ignition key is in the "ACC" (I) or "LOCK" (0) position.
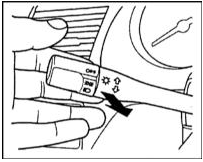
To briefly switch the headlights between low beam and high beam, pull the switch lever toward you and release it. To turn on the high beam continuously, pull the lever toward you until it clicks, then release it.
The momentary high beam function works regardless of the position of the end knob of the main light switch.
5 Some vehicles covered in this Manual are equipped with an automatic daytime running light (DRL) system. The daytime running lights turn on and off automatically when the ignition key is turned to the "ON" (II) position. They can be turned off by rotating the end knob of the main light switch to the first or second detent position.

Turn signal activation
The turn signals are activated using the lever of the main lighting switch. Move the lever up or down depending on the chosen direction of turn. When the lever is moved to the fully up or down position (until it clicks), the corresponding turn signals will continue to operate until the steering wheel is returned to the straight-ahead position.
For a brief activation, for example when changing lanes, lightly pull the lever up or down, respectively.
Test yourself
A quick Honda Accord quiz: every answer comes with an explanation and a link to the manual page.