ACC Monitor Malfunction (B2274). Detecting Vehicle Submersion (B2277). Engine/Power Switch Malfunction (B2278)
ACC Monitor Malfunction (B2274)
DESCRIPTION
This DTC is stored when a malfunction in the ACC output circuit is detected. The ACC output circuit is the circuit between terminal ACCD of the certification ECU (smart key ECU assembly) and the ACC relay.
DTC No. | Detection Item | DTC Detection Condition | Trouble Area | Note |
|---|---|---|---|---|
B2274 |
ACC Monitor Malfunction |
The ACC relay circuit of the certification ECU (smart key ECU assembly) is malfunctioning. (1-trip detection logic*) HINT: When the voltage at terminal ACCD is not at the standard, the system is determined to be malfunctioning. |
|
|
- *: Only detected while a malfunction is present.
Vehicle Condition when Malfunction Detected | Fail-safe Function when Malfunction Detected |
|---|---|
HINT: The engine switch can be turned on (IG) and the engine can be started. |
- |
DTC No. | Data List and Active Test |
|---|---|
B2274 |
Power Source Control
|
WIRING DIAGRAM
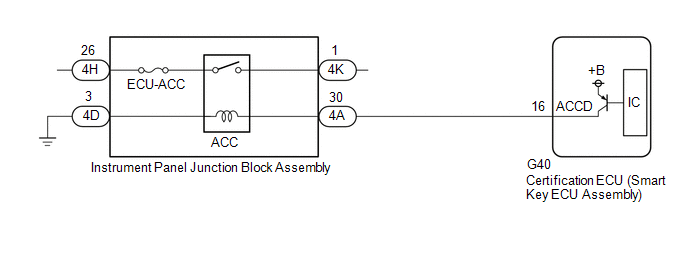
NOTICE:
- When using the Techstream with the engine switch off, connect the Techstream to the DLC3 and turn a courtesy light switch on and off at intervals of 1.5 seconds or less until communication between the Techstream and the vehicle begins. Then select the vehicle type under manual mode and enter the following menus: Body Electrical / Smart Key. While using the Techstream, periodically turn a courtesy light switch on and off at intervals of 1.5 seconds or less to maintain communication between the Techstream and the vehicle.
- The smart key system (for Start Function, Gasoline Model) uses the LIN communication system and CAN communication system. Inspect the communication function by following How to Proceed with Troubleshooting. Troubleshoot the smart key system (for Start Function, Gasoline Model) after confirming that the communication systems are functioning properly.
Click here

- Inspect the fuses of circuits related to this system before performing the following procedure.
- Before replacing the certification ECU (smart key ECU assembly), refer to Registration.
Click here
- After repair, confirm that no DTCs are output by performing "DTC Output Confirmation Operation".
PROCEDURE
CHECK HARNESS AND CONNECTOR (INSTRUMENT PANEL JUNCTION BLOCK ASSEMBLY - CERTIFICATION ECU (SMART KEY ECU ASSEMBLY), BATTERY AND BODY GROUND)
(a) Disconnect the G40 certification ECU (smart key ECU assembly) connector.
(b) Disconnect the 4A, 4D and 4K instrument panel junction block assembly connectors.
(c) Measure the resistance according to the value(s) in the table below.
Standard Resistance:
Tester Connection | Condition | Specified Condition |
|---|---|---|
G40-16 (ACCD) - 4A-30 |
Always |
Below 1 Ω |
4D-3 - Body ground |
Always |
Below 1 Ω |
G40-16 (ACCD) or 4A-30 - Other terminals and body ground |
Always |
10 kΩ or higher |
(d) Measure the voltage according to the value(s) in the table below.
Standard Voltage:
Tester Connection | Condition | Specified Condition |
|---|---|---|
4K-1 - Body ground |
Always |
11 to 14 V |
| NG |  |
REPAIR OR REPLACE HARNESS OR CONNECTOR |
|

CHECK INSTRUMENT PANEL JUNCTION BLOCK ASSEMBLY (ACC RELAY)
(a) Remove the instrument panel junction block assembly.
Click here
(b) Connect all of the instrument panel junction block assembly connectors.
(c) Connect the G40 certification ECU (smart key ECU assembly) connector.
(d) Measure the voltage according to the value(s) in the table below.
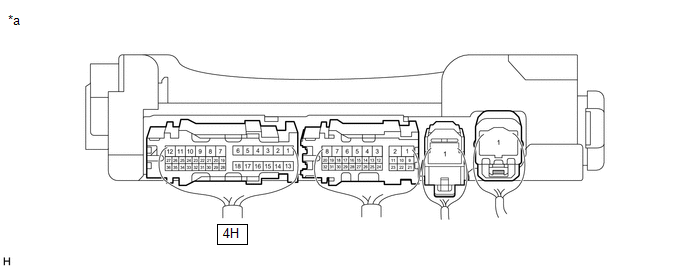
*a |
Component with harness connected (Instrument Panel Junction Block Assembly) |
- |
- |
Standard Voltage:
Tester Connection | Condition | Specified Condition |
|---|---|---|
4H-26 - Body ground |
Engine switch on (ACC) |
11 to 14 V |
| NG | |
REPLACE INSTRUMENT PANEL JUNCTION BLOCK ASSEMBLY |
|
CHECK CERTIFICATION ECU (SMART KEY ECU ASSEMBLY)
(a) Measure the voltage according to the value(s) in the table below. Standard Voltage:
|
|
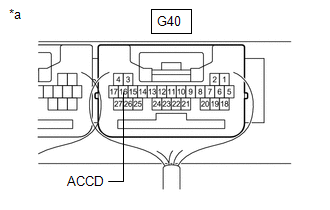
| OK | |
END (TEMPORARY CONNECTION FAILURE IS SUSPECTED) |
| NG | |
REPLACE CERTIFICATION ECU (SMART KEY ECU ASSEMBLY) |
Detecting Vehicle Submersion (B2277)
DESCRIPTION
This DTC is stored when a malfunction in the water submersion detection circuit inside the certification ECU (smart key ECU assembly) is detected.
DTC No. | Detection Item | DTC Detection Condition | Trouble Area | Note |
|---|---|---|---|---|
B2277 |
Detecting Vehicle Submersion |
Water submersion detected by the water submersion detection circuit inside the certification ECU (smart key ECU assembly). (1-trip detection logic*) |
Certification ECU (smart key ECU assembly) |
|
- *: Only detected while a malfunction is present.
Vehicle Condition when Malfunction Detected | Fail-safe Function when Malfunction Detected |
|---|---|
The engine switch cannot be turned off and the engine cannot be started. |
- |
DTC No. | Data List and Active Test |
|---|---|
B2277 |
- |
NOTICE:
- When using the Techstream with the engine switch off, connect the Techstream to the DLC3 and turn a courtesy light switch on and off at intervals of 1.5 seconds or less until communication between the Techstream and the vehicle begins. Then select the vehicle type under manual mode and enter the following menus: Body Electrical / Smart Key. While using the Techstream, periodically turn a courtesy light switch on and off at intervals of 1.5 seconds or less to maintain communication between the Techstream and the vehicle.
- The smart key system (for Start Function, Gasoline Model) uses the LIN communication system and CAN communication system. Inspect the communication function by following How to Proceed with Troubleshooting. Troubleshoot the smart key system (for Start Function, Gasoline Model) after confirming that the communication systems are functioning properly.
Click here

- Before replacing the certification ECU (smart key ECU assembly), refer to Registration.
Click here
- After repair, confirm that no DTCs are output by performing "DTC Output Confirmation Operation".
HINT:
Before proceeding with troubleshooting, check if there are any signs of water damage to the certification ECU (smart key ECU assembly). If there are any signs of water damage, replace the certification ECU (smart key ECU assembly) and take measures against the cause of the water damage.
PROCEDURE
CHECK WATER INTRUSION
(a) Check that the certification ECU (smart key ECU assembly), its ground area and wire harnesses have no signs of water intrusion.
Result | Proceed to |
|---|---|
No sign of water intrusion found |
A |
Signs of water intrusion found |
B |
| A |  |
REPLACE CERTIFICATION ECU (SMART KEY ECU ASSEMBLY) |
| B | |
TAKE MEASURES AGAINST WATER INTRUSION AND REPLACE CERTIFICATION ECU (SMART KEY ECU ASSEMBLY) |
Engine/Power Switch Malfunction (B2278)
DESCRIPTION
This DTC is stored when the SSW1 contact signal and SSW2 contact signal, which are detected when the engine switch is operated, do not match.
DTC No. | Detection Item | DTC Detection Condition | Trouble Area | Note |
|---|---|---|---|---|
B2278 |
Engine/Power Switch Malfunction |
When the engine switch is operated, the SSW1 contact signal and SSW2 contact signal do not match (1-trip detection logic*). |
|
|
- *: Only detected while a malfunction is present.
Vehicle Condition when Malfunction Detected | Fail-safe Function when Malfunction Detected |
|---|---|
If either the SSW1 contact signal or SSW2 contact signal is stuck on, the power source mode cannot be changed by pressing the engine switch. If either the SSW1 contact signal or SSW2 contact signal is stuck off, emergency stop by pressing and holding the engine switch for 2 seconds or more cannot be operated. |
- |
DTC No. | Data List and Active Test |
|---|---|
B2278 |
Power Source Control
|
WIRING DIAGRAM
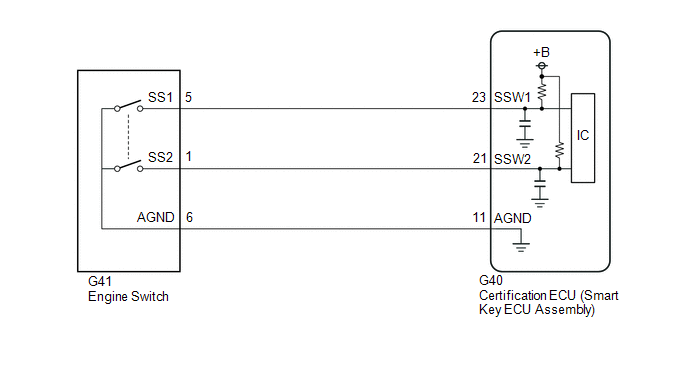
NOTICE:
- When using the Techstream with the engine switch off, connect the Techstream to the DLC3 and turn a courtesy light switch on and off at intervals of 1.5 seconds or less until communication between the Techstream and the vehicle begins. Then select the vehicle type under manual mode and enter the following menus: Body Electrical / Smart Key. While using the Techstream, periodically turn a courtesy light switch on and off at intervals of 1.5 seconds or less to maintain communication between the Techstream and the vehicle.
- The smart key system (for Start Function, Gasoline Model) uses the LIN communication system and CAN communication system. Inspect the communication function by following How to Proceed with Troubleshooting. Troubleshoot the smart key system (for Start Function, Gasoline Model) after confirming that the communication systems are functioning properly.
Click here

- Before replacing the certification ECU (smart key ECU assembly), refer to Registration.
Click here
- After repair, confirm that no DTCs are output by performing "DTC Output Confirmation Operation".
PROCEDURE
READ VALUE USING TECHSTREAM (START SWITCH1, START SWITCH2)
(a) Connect the Techstream to the DLC3.
(b) Turn the engine switch on (IG).
(c) Turn the Techstream on.
(d) Enter the following menus: Body Electrical / Power Source Control / Data List.
(e) Read the Data List according to the display on the Techstream.
Body Electrical > Power Source Control > Data ListTester Display | Measurement Item | Range | Normal Condition | Diagnostic Note |
|---|---|---|---|---|
Start Switch1 |
Engine switch 1 status |
OFF or ON |
OFF: Engine switch not pressed ON: Engine switch pressed |
|
Start Switch2 |
Engine switch 2 status |
OFF or ON |
OFF: Engine switch not pressed ON: Engine switch pressed |
|
Tester Display |
|---|
Start Switch1 |
Start Switch2 |
OK:
The Techstream display changes correctly in response to the engine switch operation.
| NG |  |
GO TO STEP 3 |
|

READ VALUE USING TECHSTREAM (START SWITCH1, START SWITCH2)
(a) Enter the following menus: Body Electrical / Power Source Control / Data List.
(b) According to the display on the Techstream, read the Data List while wiggling the wire harness.
Body Electrical > Power Source Control > Data ListTester Display | Measurement Item | Range | Normal Condition | Diagnostic Note |
|---|---|---|---|---|
Start Switch1 |
Engine switch 1 status |
OFF or ON |
OFF: Engine switch not pressed ON: Engine switch pressed |
|
Start Switch2 |
Engine switch 2 status |
OFF or ON |
OFF: Engine switch not pressed ON: Engine switch pressed |
|
Tester Display |
|---|
Start Switch1 |
Start Switch2 |
OK:
The Techstream display changes correctly in response to the engine switch operation.
| OK | |
USE SIMULATION METHOD TO CHECK |
| NG | |
REPAIR OR REPLACE HARNESS OR CONNECTOR |
CHECK HARNESS AND CONNECTOR (CERTIFICATION ECU (SMART KEY ECU ASSEMBLY) - ENGINE SWITCH)
(a) Disconnect the G40 certification ECU (smart key ECU assembly) connector.
(b) Disconnect the G41 engine switch connector.
(c) Measure the resistance according to the value(s) in the table below.
Standard Resistance:
Tester Connection | Condition | Specified Condition |
|---|---|---|
G40-23 (SSW1) - G41-5 (SS1) |
Always |
Below 1 Ω |
G40-21 (SSW2) - G41-1 (SS2) |
Always |
Below 1 Ω |
G40-11 (AGND) - G41-6 (AGND) |
Always |
Below 1 Ω |
G40-23 (SSW1) or G41-5 (SS1) - Other terminals and body ground |
Always |
10 kΩ or higher |
G40-21 (SSW2) or G41-1 (SS2) - Other terminals and body ground |
Always |
10 kΩ or higher |
G40-11 (AGND) or G41-6 (AGND) - Other terminals and body ground |
Always |
10 kΩ or higher |
| NG | |
REPAIR OR REPLACE HARNESS OR CONNECTOR |
|
INSPECT ENGINE SWITCH
(a) Remove the engine switch.
Click here
(b) Inspect the engine switch.
Click here
| OK | |
REPLACE CERTIFICATION ECU (SMART KEY ECU ASSEMBLY) |
| NG | |
REPLACE ENGINE SWITCH |