Speed Signal Circuit. Speedometer Malfunction. Steering Pad Switch Circuit
Speed Signal Circuit
DESCRIPTION
The combination meter assembly receives the vehicle speed signal from this circuit. The wheel speed sensors produce an output that varies according to the vehicle speed. The wheel speed sensor output is received by the skid control ECU (brake booster with master cylinder assembly) which uses this information to create the vehicle speed signal*. The vehicle speed signal consists of pulses sent to the combination meter assembly from the skid control ECU (brake booster with master cylinder assembly). To create this signal, 12 V is output from IG2 which is behind a resistor in the combination meter assembly. This voltage is sent to the skid control ECU (brake booster with master cylinder assembly). The pulse signal is created by switching the transistor in the skid control ECU (brake booster with master cylinder assembly) on and off, making the voltage on the wire drop to 0 V. A similar system is used for the output of this signal from the combination meter assembly via terminal +S. A voltage of 12 V is applied to terminal +S from each ECU or relay that is connected to this terminal. The transistor in the combination meter assembly is controlled by the signal from the skid control ECU (brake booster with master cylinder assembly). When this transistor is turned on, this transistor makes the voltage supplied by the various ECUs (via their respective internal resistors) drop to 0 V. Each ECU connected to terminal +S of the combination meter assembly controls its respective system based on this pulse signal.
- *: This vehicle speed signal is created by the skid control ECU (brake booster with master cylinder assembly). There is no actual component that is referred to as the vehicle speed sensor. In addition, for some systems, vehicle speed information may be received via CAN communication.
HINT:
This circuit is used for the systems connected to terminal +S. This signal is not used for combination meter assembly operation. Combination meter assembly components such as the speedometer operate using data received via CAN communication.
WIRING DIAGRAM
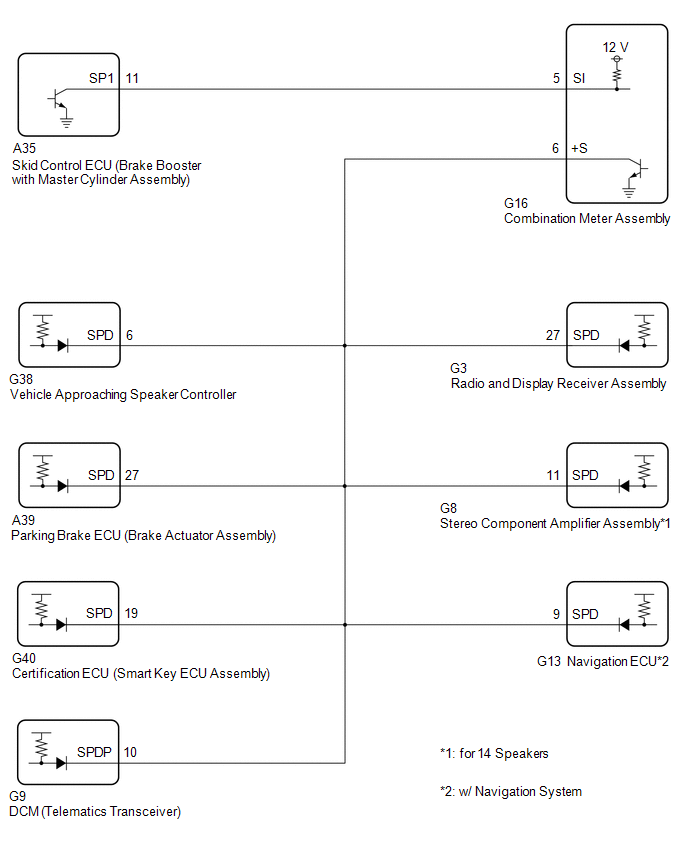
NOTICE:
When replacing the combination meter assembly, always replace it with a new one. If a combination meter assembly which was installed to another vehicle is used, the information stored in it will not match the information from the vehicle and a DTC may be stored.
PROCEDURE
INSPECT COMBINATION METER ASSEMBLY (OUTPUT VOLTAGE)
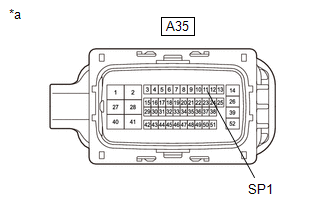
*a |
Front view of wire harness connector (to Skid Control ECU (Brake Booster with Master Cylinder Assembly)) |
(a) Disconnect the A35 skid control ECU (brake booster with master cylinder assembly) connector.
(b) Measure the voltage according to the value(s) in the table below.
Standard Voltage:
Tester Connection | Condition | Specified Condition |
|---|---|---|
A35-11 (SP1) - Body ground |
Power switch on (IG) |
11 to 14 V |
| NG |  |
GO TO STEP 5 |
|

INSPECT SKID CONTROL ECU (BRAKE BOOSTER WITH MASTER CYLINDER ASSEMBLY) (OUTPUT WAVEFORM)
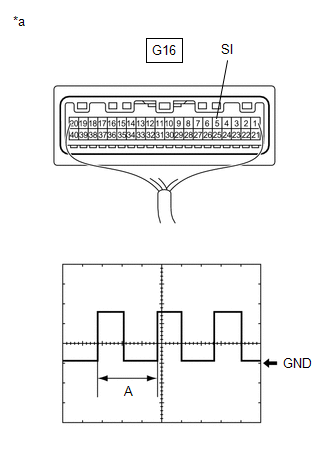
*a |
Component with harness connected (Combination Meter Assembly) |
(a) Connect the A35 skid control ECU (brake booster with master cylinder assembly) connector.
(b) Remove the combination meter assembly with the connector(s) still connected.
(c) Check the signal waveform according to the condition(s) in the table below.
Item | Condition |
|---|---|
Tester connection |
G16-5 (SI) - Body ground |
Tool setting |
5 V/DIV., 20 ms./DIV. |
Condition |
Power switch on (IG), wheel being rotated |
OK:
The waveform is similar to that shown in the illustration.
HINT:
When the system is functioning normally, one wheel revolution generates 4 pulses. As the vehicle speed increases, the width indicated by (A) in the illustration narrows.
| NG | |
REPLACE SKID CONTROL ECU (BRAKE BOOSTER WITH MASTER CYLINDER ASSEMBLY) |
|
CHECK HARNESS AND CONNECTOR (EACH ECU - COMBINATION METER ASSEMBLY)
(a) Disconnect the G16 combination meter assembly connector.
(b) Disconnect the G38 vehicle approaching speaker controller connector.
(c) Disconnect the A39 parking brake ECU (brake actuator assembly) connector.
(d) Disconnect the G40 certification ECU (smart key ECU assembly) connector.
(e) Disconnect the G9 DCM (telematics transceiver) connector.
(f) Disconnect the G3 radio and display receiver assembly connector.
(g) Disconnect the G8 stereo component amplifier assembly*1 connector.
(h) Disconnect the G13 navigation ECU*2 connector.
(i) Measure the resistance according to the value(s) in the table below.
Standard Resistance:
Tester Connection | Condition | Specified Condition |
|---|---|---|
G38-6 (SPD) - G16-6 (+S) |
Always |
Below 1 Ω |
A39-27 (SPD) - G16-6 (+S) |
Always |
Below 1 Ω |
G40-19 (SPD) - G16-6 (+S) |
Always |
Below 1 Ω |
G9-10 (SPDP) - G16-6 (+S) |
Always |
Below 1 Ω |
G3-27 (SPD) - G16-6 (+S) |
Always |
Below 1 Ω |
G8-11 (SPD)*1 - G16-6 (+S) |
Always |
Below 1 Ω |
G13-9 (SPD)*2 - G16-6 (+S) |
Always |
Below 1 Ω |
G38-6 (SPD), A39-27 (SPD), G40-19 (SPD), G9-10 (SPDP), G3-27 (SPD), G8-11 (SPD)*1, G13-9 (SPD)*2 or G16-6 (+S) - Body ground |
Always |
10 kΩ or higher |
- *1: for 14 Speakers
- *2: w/ Navigation System
| NG | |
REPAIR OR REPLACE HARNESS OR CONNECTOR |
|
CHECK COMBINATION METER ASSEMBLY (OUTPUT WAVEFORM)
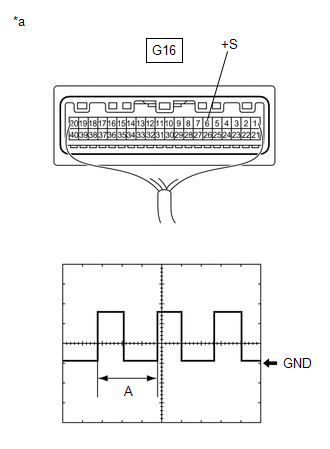
*a |
Component with harness connected (Combination Meter Assembly) |
(a) Connect the G16 combination meter assembly connector.
(b) Connect a positive (+) lead from the auxiliary battery to any of the following terminals:
- G38-6 (SPD) vehicle approaching speaker assembly connector
- A39-27 (SPD) parking brake ECU (brake actuator assembly) connector
- G40-19 (SPD) certification ECU (smart key ECU assembly) connector
- G9-10 (SPDP) DCM (telematics transceiver) connector
- G3-27 (SPD) radio and display receiver assembly connector
- G8-11 (SPD) stereo component amplifier assembly*1 connector
- G13-9 (SPD) navigation ECU*2 connector
- *1: for 14 Speakers
- *2: w/ Navigation System
(c) Check the signal waveform according to the condition(s) in the table below.
Item | Condition |
|---|---|
Tester connection |
G16-6 (+S) - Body ground |
Tool setting |
5 V/DIV., 20 ms./DIV. |
Condition |
Power switch on (IG), wheel being rotated |
OK:
The waveform is similar to that shown in the illustration.
HINT:
- When the system is functioning normally, one wheel revolution generates 4 pulses. As the vehicle speed increases, the width indicated by (A) in the illustration narrows.
- If the result is OK, an internal malfunction of a connected ECU can be suspected.
- If the result is NG, an internal malfunction of the combination meter assembly can be suspected.
| OK | |
REPLACE DEFECTIVE ECU |
| NG | |
REPLACE COMBINATION METER ASSEMBLY |
CHECK HARNESS AND CONNECTOR (SKID CONTROL ECU (BRAKE BOOSTER WITH MASTER CYLINDER ASSEMBLY) - COMBINATION METER ASSEMBLY)
(a) Disconnect the G16 combination meter assembly connector.
(b) Measure the resistance according to the value(s) in the table below.
Standard Resistance:
Tester Connection | Condition | Specified Condition |
|---|---|---|
A35-11 (SP1) - G16-5 (SI) |
Always |
Below 1 Ω |
A35-11 (SP1) or G16-5 (SI) - Body ground |
Always |
10 kΩ or higher |
| OK | |
REPLACE COMBINATION METER ASSEMBLY |
| NG | |
REPAIR OR REPLACE HARNESS OR CONNECTOR |
Speedometer Malfunction
DESCRIPTION
The combination meter assembly receives vehicle speed signals from the skid control ECU (brake booster with master cylinder assembly) via CAN communication. The speed sensor detects the wheel speed and sends the appropriate signals to the skid control ECU (brake booster with master cylinder assembly). The skid control ECU (brake booster with master cylinder assembly) supplies power to the vehicle speed sensor. The skid control ECU (brake booster with master cylinder assembly) detects vehicle speed signals based on pulses of the voltage.
HINT:
Factors that affect the indicated vehicle speed include the tire size, tire inflation, and tire wear. The speed indicated on the speedometer has an allowable margin of error.
WIRING DIAGRAM
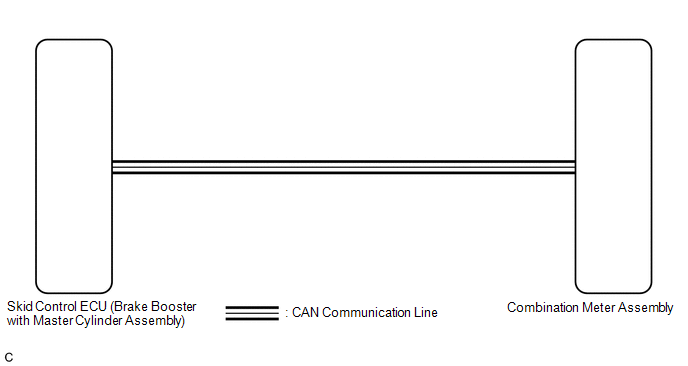
NOTICE:
- When replacing the combination meter assembly, always replace it with a new one. If a combination meter assembly which was installed to another vehicle is used, the information stored in it will not match the information from the vehicle and a DTC may be stored.
- Before starting the following inspection, inspect the speedometer and check that the tire size and air pressure are as specified.
Tire size and air pressure: Click here

Speedometer: Click here
PROCEDURE
CHECK CAN COMMUNICATION SYSTEM
(a) Check if CAN communication DTCs are output.
Click here
Result | Proceed to |
|---|---|
DTCs are not output |
A |
DTCs are output |
B |
| B |  |
GO TO CAN COMMUNICATION SYSTEM |
|

CHECK FOR DTC (ELECTRONICALLY CONTROLLED BRAKE SYSTEM)
(a) Check if electronically controlled brake system DTCs are output.
Chassis > ABS/VSC/TRAC > Trouble CodesResult | Proceed to |
|---|---|
DTCs are not output |
A |
DTCs are output |
B |
| B | |
GO TO ELECTRONICALLY CONTROLLED BRAKE SYSTEM |
|
PERFORM ACTIVE TEST USING TECHSTREAM
(a) Connect the Techstream to the DLC3.
(b) Turn the power switch on (IG).
(c) Turn the Techstream on.
(d) Enter the following menus: Body Electrical / Combination Meter / Active Test.
(e) Perform the Active Test according to the display on the Techstream.
Body Electrical > Combination Meter > Active TestTester Display | Measurement Item | Control Range | Diagnostic Note |
|---|---|---|---|
Speedometer Operation (0 km/h,0 mph) |
Speedometer (0 km/h, 0 mph) |
ON |
- |
Speedometer Operation (40 km/h,40 mph) |
Speedometer (40 km/h, 40 mph) |
ON |
The value displayed on the speedometer may deviate. Reference mph: 40 → 39.4 to 42.2 |
Speedometer Operation (80 km/h,80 mph) |
Speedometer (80 km/h, 80 mph) |
ON |
The value displayed on the speedometer may deviate. Reference mph: 80 → 80.0 to 83.2 |
Speedometer Operation (120 km/h,120 mph) |
Speedometer (120 km/h, 120 mph) |
ON |
The value displayed on the speedometer may deviate. Reference mph: 120 → 120.9 to 124.1 |
Speedometer Operation (0 km/h,0 mph)
Body Electrical > Combination Meter > Active TestSpeedometer Operation (40 km/h,40 mph)
Body Electrical > Combination Meter > Active TestSpeedometer Operation (80 km/h,80 mph)
Body Electrical > Combination Meter > Active TestSpeedometer Operation (120 km/h,120 mph)
OK:
Speedometer indication is normal.
| OK | |
REPLACE SKID CONTROL ECU (BRAKE BOOSTER WITH MASTER CYLINDER ASSEMBLY) |
| NG | |
REPLACE COMBINATION METER ASSEMBLY |
Steering Pad Switch Circuit
DESCRIPTION
The combination meter assembly and steering pad switch assembly are connected via direct line. The multi-information display in the combination meter assembly are operated using the switches of the steering pad switch assembly.
WIRING DIAGRAM
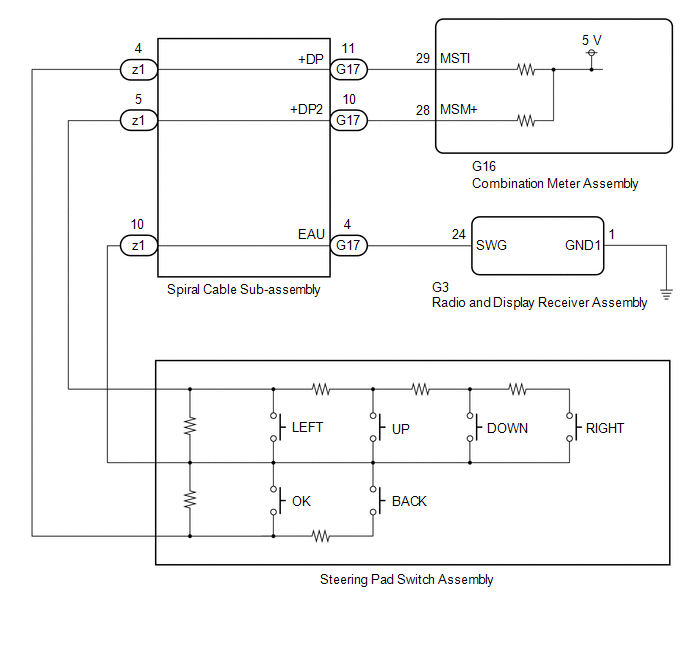
NOTICE:
When replacing the combination meter assembly, always replace it with a new one. If a combination meter assembly which was installed to another vehicle is used, the information stored in it will not match the information from the vehicle and a DTC may be stored.
PROCEDURE
INSPECT STEERING PAD SWITCH ASSEMBLY
(a) Remove the steering pad switch assembly.
Click here 
(b) Inspect the steering pad switch assembly.
Click here
| NG |  |
REPLACE STEERING PAD SWITCH ASSEMBLY |
|

INSPECT SPIRAL CABLE SUB-ASSEMBLY
(a) Remove the spiral cable sub-assembly.
Click here
(b) Inspect the spiral cable sub-assembly.
Click here
| NG | |
REPLACE SPIRAL CABLE SUB-ASSEMBLY |
|
CHECK HARNESS AND CONNECTOR (SPIRAL CABLE SUB-ASSEMBLY - COMBINATION METER ASSEMBLY)
(a) Disconnect the G16 combination meter assembly connector.
(b) Measure the resistance according to the value(s) in the table below.
Standard Resistance:
Tester Connection | Condition | Specified Condition |
|---|---|---|
G17-11 (+DP) - G16-29 (MSTI) |
Always |
Below 1 Ω |
G17-10 (+DP2) - G16-28 (MSM+) |
Always |
Below 1 Ω |
G17-11 (+DP) or G16-29 (MSTI) - Body ground |
Always |
10 kΩ or higher |
G17-10 (+DP2) or G16-28 (MSM+) - Body ground |
Always |
10 kΩ or higher |
| NG | |
REPAIR OR REPLACE HARNESS OR CONNECTOR |
|
CHECK COMBINATION METER ASSEMBLY (OUTPUT VOLTAGE)
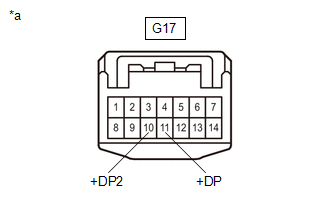
*a |
Front view of wire harness connector (to Spiral Cable Sub-assembly) |
(a) Connect the G16 combination meter assembly connector.
(b) Measure the voltage according to the value(s) in the table below.
Standard Voltage:
Tester Connection | Condition | Specified Condition |
|---|---|---|
G17-11 (+DP) - Body ground |
Power switch on (IG) |
4.8 to 5.2 V |
G17-10 (+DP2) - Body ground |
Power switch on (IG) |
4.8 to 5.2 V |
| NG | |
REPLACE COMBINATION METER ASSEMBLY |
|
CHECK HARNESS AND CONNECTOR (SPIRAL CABLE SUB-ASSEMBLY - RADIO AND DISPLAY RECEIVER ASSEMBLY)
(a) Disconnect the G3 radio and display receiver assembly connector.
(b) Measure the resistance according to the value(s) in the table below.
Standard Resistance:
Tester Connection | Condition | Specified Condition |
|---|---|---|
G17-4 (EAU) - G3-24 (SWG) |
Always |
Below 1 Ω |
| NG | |
REPAIR OR REPLACE HARNESS OR CONNECTOR |
|
CHECK HARNESS AND CONNECTOR (RADIO AND DISPLAY RECEIVER ASSEMBLY - BODY GROUND)
(a) Measure the resistance according to the value(s) in the table below.
Standard Resistance:
Tester Connection | Condition | Specified Condition |
|---|---|---|
G3-1 (GND1) - Body ground |
Always |
Below 1 Ω |
| OK | |
REPLACE RADIO AND DISPLAY RECEIVER ASSEMBLY |
| NG | |
REPAIR OR REPLACE HARNESS OR CONNECTOR |