Compressor(for A25a-fxs)
Components
COMPONENTS
ILLUSTRATION
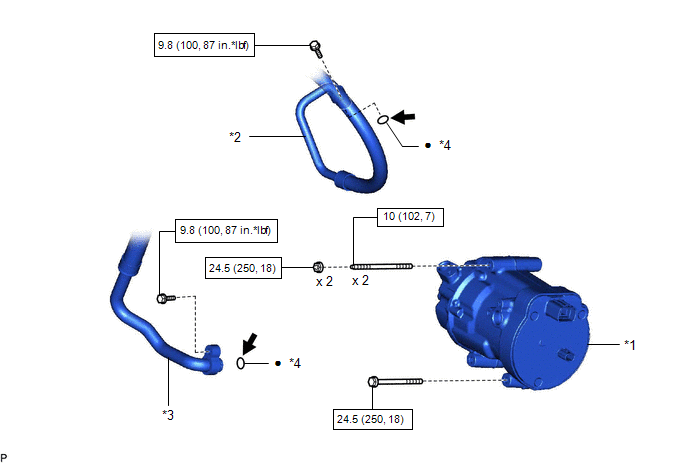
*1 |
COMPRESSOR WITH MOTOR ASSEMBLY |
*2 |
NO. 1 COOLER REFRIGERANT DISCHARGE HOSE SUB-ASSEMBLY |
*3 |
SUCTION HOSE SUB-ASSEMBLY |
*4 |
O-RING |
 |
N*m (kgf*cm, ft.*lbf): Specified torque |
● |
Non-reusable part |
 |
Compressor oil ND-OIL 11 or equivalent |
- |
- |
Installation
INSTALLATION
PROCEDURE
1. ADJUST COMPRESSOR OIL
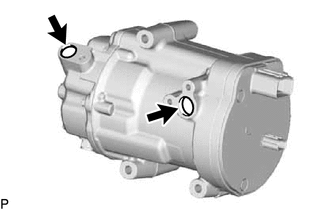
(a) When replacing the compressor with motor assembly with a new one, gradually discharge the inert gas from the service valve, and drain the following amount of oil from the new compressor with motor assembly before installation. Standard: (Oil capacity inside the new compressor with motor assembly: 120 to 135 cc (4.06 to 4.56 fl. oz)) - (Remaining oil amount in the removed compressor with motor assembly) = (Oil amount to be removed from the new compressor) NOTICE:
|
 |
2. INSTALL COMPRESSOR WITH MOTOR ASSEMBLY
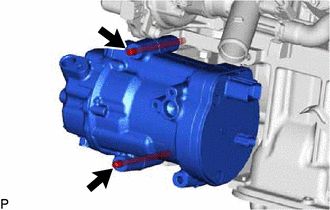
(a) Using an E8 "TORX" socket wrench, temporarily install the compressor with motor assembly with the 2 stud bolts.
Torque:
10 N·m {102 kgf·cm, 7 ft·lbf}
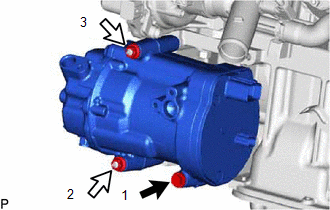
(b) Install the compressor with motor assembly with the bolt and 2 nuts.
 |
Bolt |
 |
Nut |
Torque:
24 N·m {250 kgf·cm, 18 ft·lbf}
HINT:
Tighten the bolt and nuts in the order shown in the illustration.
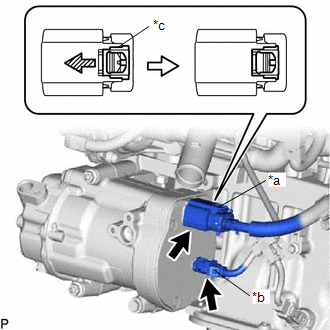
(c) Connect the connector (B).
*a |
Connector (A) |
*b |
Connector (B) |
*c |
Green-colored Lock |
 |
Slide |
(d) Remove the insulating tape from the connector (A).
(e) Connect the connector (A) and slide the green-colored lock as shown in the illustration to securely lock it.
CAUTION:
Make sure to wear insulated gloves.
NOTICE:
Make sure that the connector is connected securely.
3. CONNECT NO. 1 COOLER REFRIGERANT DISCHARGE HOSE SUB-ASSEMBLY
(a) Remove the vinyl tape from the No. 1 cooler refrigerant discharge hose sub-assembly.
(b) Sufficiently apply compressor oil to a new O-ring and the fitting surface of the compressor with motor assembly.
Compressor Oil:
ND-OIL 11 or equivalent
(c) Install the O-ring to the No. 1 cooler refrigerant discharge hose sub-assembly.
NOTICE:
Keep the O-ring and O-ring fitting surface free of foreign matter.
(d) Connect the No. 1 cooler refrigerant discharge hose sub-assembly to the compressor with motor assembly with the bolt.
Torque:
9,8 N·m {100 kgf·cm, 87 in·lbf}
4. CONNECT SUCTION HOSE SUB-ASSEMBLY
(a) Remove the vinyl tape from the suction hose sub-assembly.
(b) Sufficiently apply compressor oil to a new O-ring and the fitting surface of the compressor with motor assembly.
Compressor Oil:
ND-OIL 11 or equivalent
(c) Install the O-ring to the suction hose sub-assembly.
NOTICE:
Keep the O-ring and O-ring fitting surface free of foreign matter.
(d) Connect the suction hose sub-assembly to the compressor with motor assembly with the bolt.
Torque:
9,8 N·m {100 kgf·cm, 87 in·lbf}
5. INSTALL RADIATOR ASSEMBLY
Click here 
6. INSTALL SERVICE PLUG GRIP
Click here
7. CHARGE AIR CONDITIONING SYSTEM WITH REFRIGERANT
Click here
8. WARM UP COMPRESSOR
Click here
9. INSPECT FOR REFRIGERANT LEAK
Click here
Removal
REMOVAL
The necessary procedures (adjustment, calibration, initialization or registration) that must be performed after parts are removed and installed, or replaced during compressor with motor assembly removal/installation are shown below.
Necessary Procedure After Parts Removed/Installed/ReplacedReplaced Part or Performed Procedure | Necessary Procedures | Effect/Inoperative Function when Necessary Procedure not Performed | Link |
|---|---|---|---|
| *1: When performing learning using the Techstream. Click here *2: Applies only for when removing and installing or replacing the television camera assembly. |
|||
Disconnect cable from negative auxiliary battery terminal |
Perform steering sensor zero point calibration |
Lane departure alert system (w/ Steering Control) |
 |
Pre-collision system |
|||
Intelligent clearance sonar system*1 |
|||
Lighting system (for Gasoline Model with Cornering Light) |
|||
Memorize steering angle neutral point |
Parking assist monitor system |
|
|
Panoramic view monitor system |
|
||
Front television camera assembly, front bumper assembly or radiator grille |
|
Panoramic view monitor system |
|
Front bumper assembly |
|
|
|
|
Synchronize the vehicle information |
Lighting system (for HV Model with Cornering Light) |
|
|
Change grille shutter control mode and/or perform initialization |
Grille Shutter System |
|
CAUTION:
- Orange wire harnesses and connectors indicate high-voltage circuits. To prevent electric shock, always follow the procedure described in the repair manual.
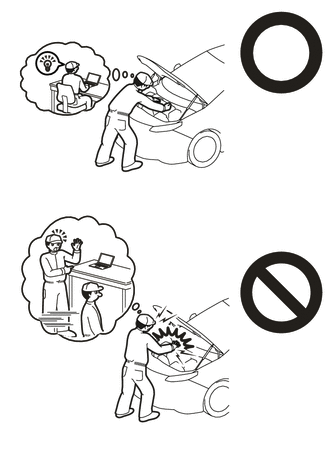
Click here
- To prevent electric shock, wear insulated gloves when working on wire harnesses and components of the high voltage system.
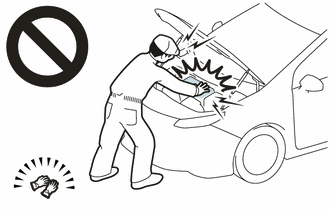
NOTICE:
After turning the power switch off, waiting time may be required before disconnecting the cable from the negative (-) auxiliary battery terminal. Therefore, make sure to read the disconnecting the cable from the negative (-) auxiliary battery terminal notices before proceeding with work.
Click here
PROCEDURE
1. RECOVER REFRIGERANT FROM REFRIGERATION SYSTEM
Click here
2. REMOVE SERVICE PLUG GRIP
Click here
3. CHECK TERMINAL VOLTAGE
(a) Disconnect the engine room main wire.
Click here
(b) Remove the connector cover assembly.
Click here
(c) Check the terminal voltage.
Click here
(d) Install the connector cover assembly.
Click here
(e) Connect the engine room main wire.
Click here
4. REMOVE RADIATOR ASSEMBLY
Click here
5. DISCONNECT SUCTION HOSE SUB-ASSEMBLY
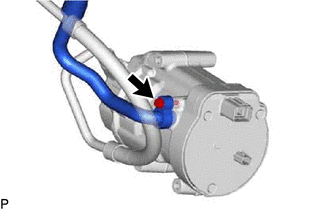
(a) Remove the bolt and disconnect the suction hose sub-assembly from the compressor with motor assembly. |
 |
(b) Remove the O-ring from the suction hose sub-assembly.
NOTICE:
Seal the openings of the disconnected parts using vinyl tape to prevent moisture and foreign matter from entering them.
6. DISCONNECT NO. 1 COOLER REFRIGERANT DISCHARGE HOSE SUB-ASSEMBLY
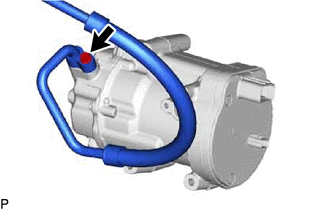
(a) Remove the bolt and disconnect the No. 1 cooler refrigerant discharge hose sub-assembly from the compressor with motor assembly. |
 |
(b) Remove the O-ring from the No. 1 cooler refrigerant discharge hose sub-assembly.
NOTICE:
Seal the openings of the disconnected parts using vinyl tape to prevent moisture and foreign matter from entering them.
7. REMOVE COMPRESSOR WITH MOTOR ASSEMBLY
(a) Using a screwdriver, slide the green-colored lock of the connector (A) as shown in the illustration to release it and disconnect the connector.
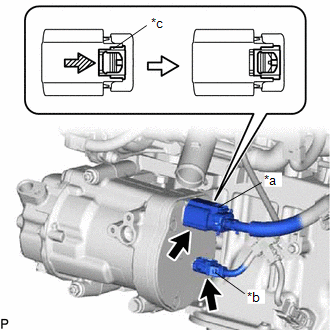
*a |
Connector (A) |
*b |
Connector (B) |
*c |
Green-colored Lock |
 |
Slide |
CAUTION:
Make sure to wear insulated gloves.
NOTICE:
Insulate the disconnected terminals and connector with insulating tape.
(b) Disconnect the connector (B).
(c) Remove the bolt and 2 nuts.
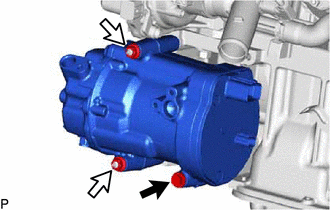
 |
Bolt |
 |
Nut |
(d) Using an E8 "TORX" socket wrench, remove the 2 stud bolts and compressor with motor assembly. |
 |