Rear Seat Outer Belt Assembly
Components
COMPONENTS
ILLUSTRATION
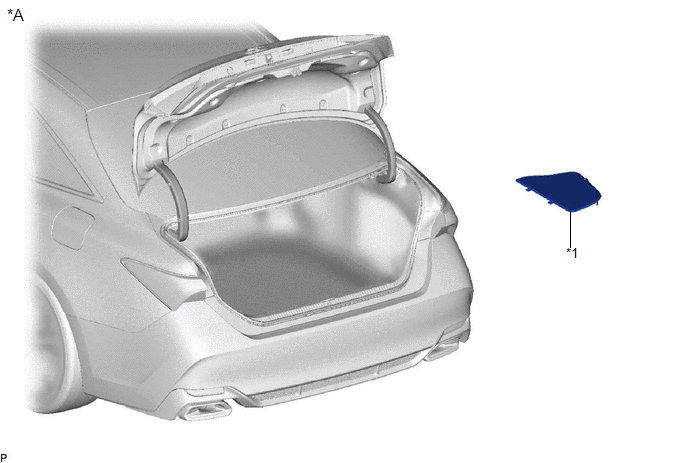
*A |
for HV Model |
- |
- |
*1 |
LUGGAGE TRIM SERVICE HOLE COVER |
- |
- |
ILLUSTRATION
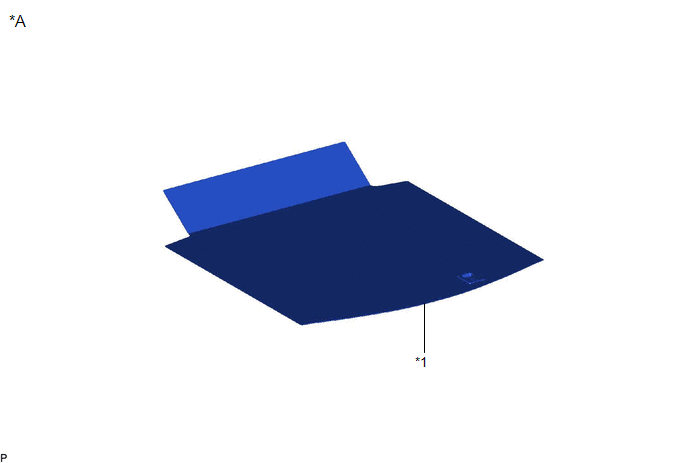
*A |
w/ Seat Heater System |
- |
- |
*1 |
SPARE WHEEL COVER ASSEMBLY |
- |
- |
ILLUSTRATION
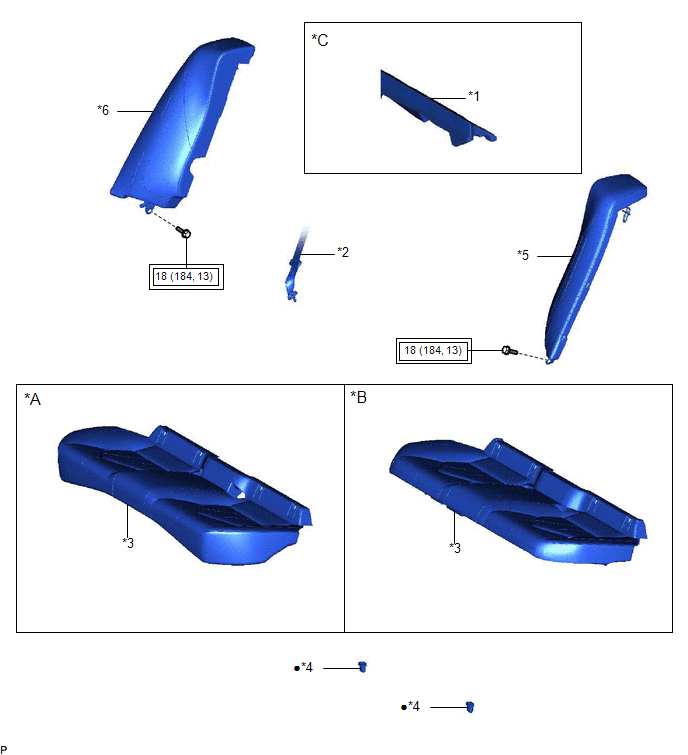
*A |
for Gasoline Model |
*B |
for HV Model |
*C |
w/ Seat Heater System |
- |
- |
*1 |
LUGGAGE COMPARTMENT INNER TRIM PAD |
*2 |
REAR CENTER SEAT OUTER BELT ASSEMBLY |
*3 |
REAR SEAT CUSHION ASSEMBLY |
*4 |
REAR SEAT CUSHION LOCK HOOK |
*5 |
REAR SIDE SEATBACK ASSEMBLY LH |
*6 |
REAR SIDE SEATBACK ASSEMBLY RH |
 |
Tightening torque for "Major areas involving basic vehicle performance such as moving/turning/stopping": N*m (kgf*cm, ft.*lbf) |
● |
Non-reusable part |
ILLUSTRATION
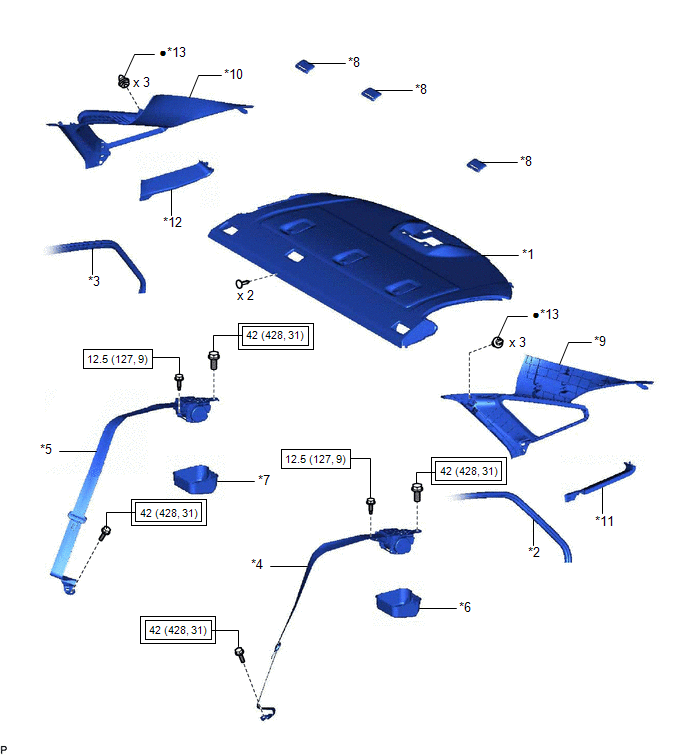
*1 |
PACKAGE TRAY TRIM PANEL ASSEMBLY |
*2 |
REAR DOOR OPENING TRIM WEATHERSTRIP LH |
*3 |
REAR DOOR OPENING TRIM WEATHERSTRIP RH |
*4 |
REAR SEAT 3 POINT TYPE BELT ASSEMBLY LH |
*5 |
REAR SEAT 3 POINT TYPE BELT ASSEMBLY RH |
*6 |
REAR SEAT BELT RETRACTOR COVER LH |
*7 |
REAR SEAT BELT RETRACTOR COVER RH |
*8 |
REAR SEAT SHOULDER BELT COVER |
*9 |
ROOF SIDE INNER GARNISH LH |
*10 |
ROOF SIDE INNER GARNISH RH |
*11 |
ROOF SIDE RAIL GARNISH ASSEMBLY LH |
*12 |
ROOF SIDE RAIL GARNISH ASSEMBLY RH |
*13 |
CLIP |
- |
- |
|
Tightening torque for "Major areas involving basic vehicle performance such as moving/turning/stopping": N*m (kgf*cm, ft.*lbf) |
 |
N*m (kgf*cm, ft.*lbf): Specified torque |
● |
Non-reusable part |
- |
- |
Disposal
DISPOSAL
CAUTION:
Before performing pre-disposal deployment of any SRS part, review and closely follow all applicable environmental and hazardous material regulations. Pre-disposal deployment may be considered hazardous material treatment.
PROCEDURE
1. PRECAUTION
CAUTION:
- Use gloves and safety glasses when handling a rear seat 3 point type belt assembly with a deployed pretensioner.
- Always wash your hands with water after completing the operation.
- Do not apply water, etc. to a rear seat 3 point type belt assembly with a deployed pretensioner.
- When deploying a seat belt pretensioner, always use the specified SST (SRS airbag activation tool). Perform the operation in a place away from electrical noise.
- Never dispose of a rear seat 3 point type belt assembly with a pretensioner that has not been deployed.
- The rear seat 3 point type belt assembly produces an exploding sound when the pretensioner is deployed, so perform the operation outdoors where it will not disturb nearby residents.
- When deploying a seat belt pretensioner, perform the operation at least 10 m (32.8 ft.) away from the vehicle.
HINT:
When scrapping a vehicle equipped with a seat belt pretensioner or disposing of a rear seat 3 point type belt assembly with a seat belt pretensioner, always deploy the seat belt pretensioner first in accordance with the procedure described below. If any abnormality occurs during deployment of the seat belt pretensioner, contact the SERVICE DEPARTMENT of the distributor.
2. DISPOSE OF REAR SEAT 3 POINT TYPE BELT ASSEMBLY (When Installed to Vehicle)
NOTICE:
- When disposing of a rear seat 3 point type belt assembly with a pretensioner, never deploy the pretensioner in the customer's vehicle.
- Be sure to observe the following procedure when deploying a seat belt pretensioner.
HINT:
Prepare a 12 V battery as the power source to deploy the seat belt pretensioner.
(a) Check the function of SST.
SST: 09082-00700
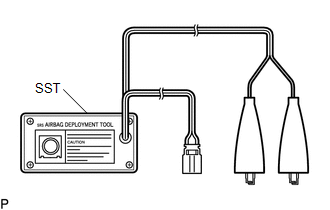
CAUTION:
When deploying a seat belt pretensioner, always use the specified SST.
(1) Connect the red clip of SST to the positive (+) battery terminal and the black clip to the negative (-) battery terminal. HINT: At this time, do not connect the yellow connector. It will be connected to the seat belt pretensioner in a later step. |
|
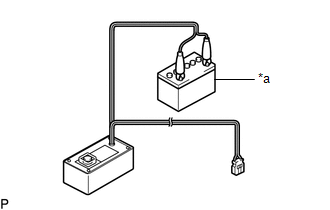
(2) Press the SST activation switch and check that the LED of the SST activation switch illuminates. CAUTION: If the LED is illuminated when the SST activation switch is not pressed, SST may be malfunctioning. In this case, do not use the malfunctioning SST. |
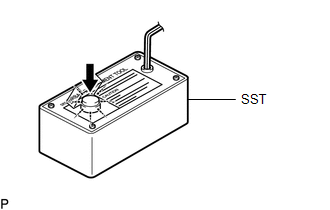 |
(b) Refer to Precaution.
for HV Model:
Click here 
for Gasoline Model:
Click here
(c) Disconnect the cable from the negative (-) battery terminal.
CAUTION:
Wait at least 90 seconds after disconnecting the cable from the negative (-) battery terminal to disable the SRS system.
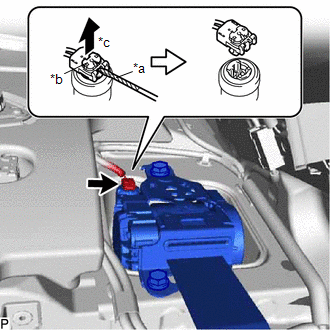
(d) Disconnect the seat belt pretensioner connector.
(1) Remove the package tray trim panel assembly.
Click here
(2) Using a screwdriver, pull out the locking button as shown in the illustration to release the lock and disconnect the pretensioner connector. HINT: Tape the screwdriver tip before use. |
|
(e) Connect SST.
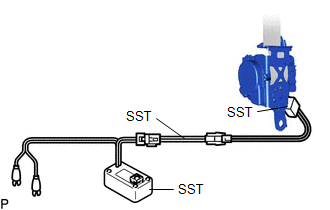
(1) After connecting the following SST to each other, connect them to the seat belt pretensioner.
SST: 09082-00700
SST: 09082-00802
09082-10801
09082-20801
NOTICE:
To avoid damaging the SST connector or wire harness, do not lock the secondary lock of the pretensioner connector.
(2) Move SST at least 10 m (32.8 ft.) away from the front of the vehicle.
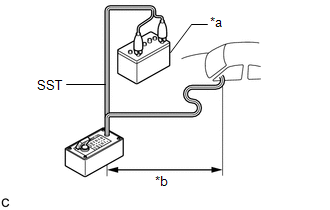
*a |
12 V Battery |
*b |
10 m (32.8 ft.) or more |
CAUTION:
- Do not perform deployment with any of the doors or windows open.
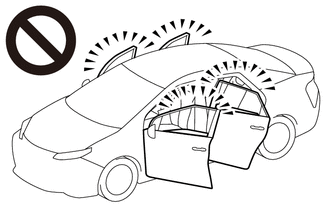
- If deployment is performed with any of the doors or windows open, dust and gas may enter the eyes or be breathed in.
(3) Close all of the doors and windows of the vehicle.
NOTICE:
Do not damage the SST wire harness.
(f) Deploy the seat belt pretensioner.
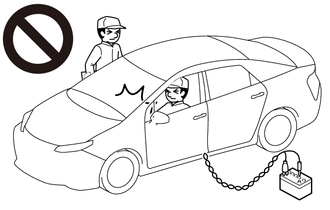
(1) Check that no one is inside the vehicle or within a 10 m (32.8 ft.) radius of the vehicle. |
 |
(2) Connect the red clip of SST to the positive (+) battery terminal and the black clip to the negative (-) battery terminal.
(3) Press the SST activation switch to deploy the seat belt pretensioner.
HINT:
The seat belt pretensioner will deploy at the same time as the LED of SST illuminates.
CAUTION:
- The rear seat 3 point type belt assembly produces an exploding sound when the pretensioner is deployed, so perform the operation outdoors where it will not disturb nearby residents.
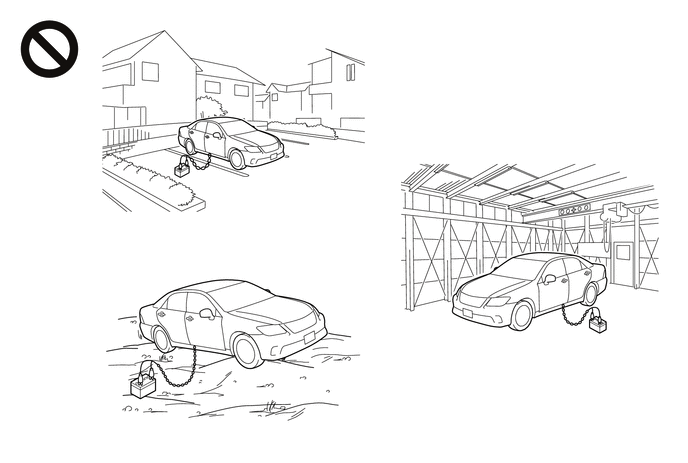
- If this procedure is performed indoors or on a rough road where safety cannot be ensured, unforeseen injuries may occur. Also, if this procedure is performed near a residential area, the deployment noise may disturb nearby residents.
(g) Dispose of the rear seat 3 point type belt assembly.
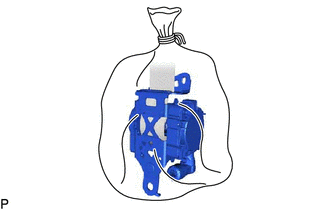
(1) Remove the rear seat 3 point type belt assembly and SST.
(2) Place the rear seat 3 point type belt assembly in a plastic bag, tie the end tightly, and dispose of it in the same way as other general parts.
CAUTION:
- The rear seat 3 point type belt assembly becomes extremely hot when the pretensioner is deployed, so do not touch it for at least 30 minutes after deployment.
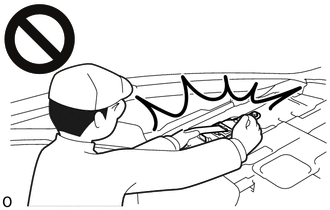
- Do not apply water, etc. to a rear seat 3 point type belt assembly with a deployed pretensioner.
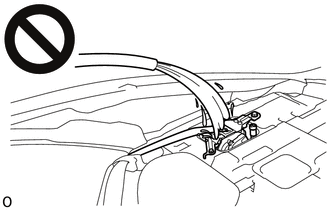
- If water is applied to the rear seat 3 point type belt assembly immediately after deployment, burns may be caused by the resulting steam.
- Always wear safety glasses and gloves when handling a rear seat 3 point type belt assembly with a deployed pretensioner.
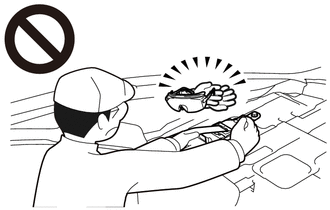
- If a rear seat 3 point type belt assembly with a deployed pretensioner is touched without wearing safety glasses and gloves, hot parts may cause burns and dust may enter the eyes.
- After removal, quickly seal the rear seat 3 point type belt assembly in a plastic bag.
- Never dispose of a rear seat 3 point type belt assembly with a pretensioner that has not been deployed.
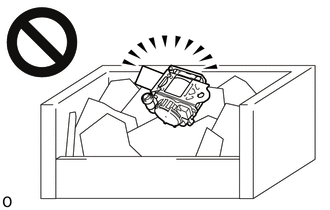
- If a rear seat 3 point type belt assembly with a pretensioner that has not been deployed is disposed of, and then deploys accidentally, unforeseen injuries may occur.
- Always wash your hands with water after completing the operation.
HINT:
When scrapping a vehicle, deploy the seat belt pretensioners, and then scrap the vehicle with the rear seat outer belt assemblies installed.
3. DISPOSE OF REAR SEAT 3 POINT TYPE BELT ASSEMBLY (When not Installed to Vehicle)
NOTICE:
- When disposing of a rear seat 3 point type belt assembly with a pretensioner, never deploy the pretensioner in the customer's vehicle.
- Be sure to observe the following procedure when deploying a seat belt pretensioner.
HINT:
Prepare a 12 V battery as the power source to deploy the seat belt pretensioner.
(a) Check the function of SST. Click here SST: 09082-00700 |
|
(b) Refer to Precaution.
for HV Model:
Click here
for Gasoline Model:
Click here
(c) Disconnect the cable from the negative (-) battery terminal.
CAUTION:
Wait at least 90 seconds after disconnecting the cable from the negative (-) battery terminal to disable the SRS system.
(d) Remove the rear seat 3 point type belt assembly.
Click here
(e) Wind the seat belt webbing with the retractor. |
|
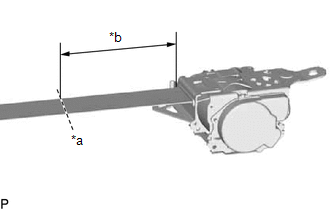
(f) When the seat belt webbing is sufficiently wound, cut the seat belt webbing approximately 100 mm (3.94 in.) from the retractor, as shown in the illustration.
HINT:
The retractor resistance increases in proportion with how much the seat belt webbing is wound.
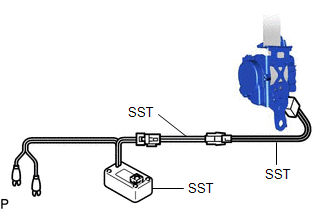
(g) Connect SST. (1) After connecting the following SST to each other, connect them to the seat belt pretensioner. SST: 09082-00700 SST: 09082-00802 09082-10801 09082-20801 NOTICE: To avoid damaging the SST connector or wire harness, do not lock the secondary lock of the pretensioner connector. (2) Place the rear seat 3 point type belt assembly on the ground and cover it with an unneeded tire and wheel assembly. NOTICE:
(3) Position and hold SST at least 10 m (32.8 ft.) away from the tire and wheel assembly. NOTICE: Do not damage the SST wire harness. |
 |
(h) Deploy the seat belt pretensioner.
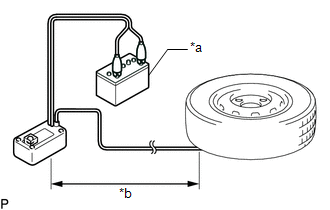
*a |
12 V Battery |
*b |
10 m (32.8 ft.) or more |
(1) Check that no one is within a 10 m (32.8 ft.) radius of the tire and wheel assembly.
(2) Connect the red clip of SST to the positive (+) battery terminal and the black clip to the negative (-) battery terminal.
(3) Press the SST activation switch to deploy the seat belt pretensioner.
HINT:
The seat belt pretensioner will deploy at the same time as the LED of SST illuminates.
CAUTION:
- The rear seat 3 point type belt assembly produces an exploding sound when the pretensioner is deployed, so perform the operation outdoors where it will not disturb nearby residents.
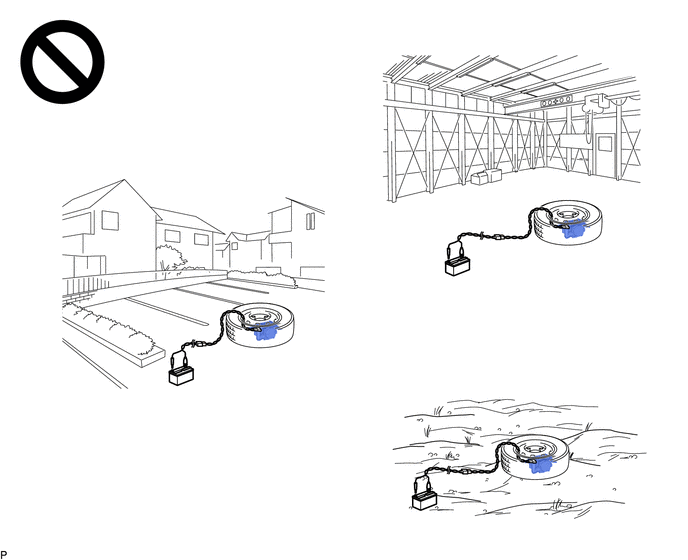
- If this procedure is performed indoors or on a rough road where safety cannot be ensured, unforeseen injuries may occur. Also, if this procedure is performed near a residential area, the deployment noise may disturb nearby residents.
(i) Dispose of the rear seat 3 point type belt assembly.
(1) Remove the tire and wheel assembly and SST.
(2) Place the rear seat 3 point type belt assembly in a plastic bag, tie the end tightly, and dispose of it in the same way as other general parts.
CAUTION:
- The rear seat 3 point type belt assembly becomes extremely hot when the pretensioner is deployed, so do not touch it for at least 30 minutes after deployment.
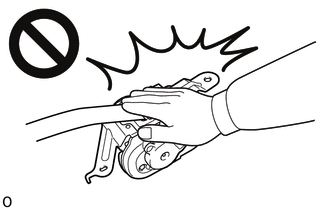
- Do not apply water, etc. to a rear seat 3 point type belt assembly with a deployed pretensioner.
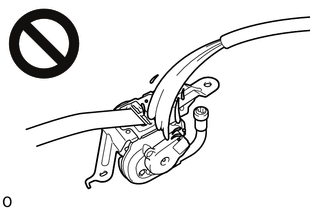
- If water is applied to the rear seat 3 point type belt assembly immediately after deployment, burns may be caused by the resulting steam.
- Always wear safety glasses and gloves when handling a rear seat 3 point type belt assembly with a deployed pretensioner.
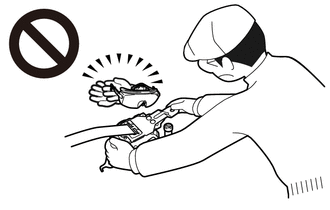
- If a rear seat 3 point type belt assembly with a deployed pretensioner is touched without wearing safety glasses and gloves, hot parts may cause burns and dust may enter the eyes.
- After removal, quickly seal the rear seat 3 point type belt assembly in a plastic bag.
- Never dispose of a rear seat 3 point type belt assembly with a pretensioner that has not been deployed.
- If a rear seat 3 point type belt assembly with a pretensioner that has not been deployed is disposed of, and then deploys accidentally, unforeseen injuries may occur.
- Always wash your hands with water after completing the operation.
Inspection
INSPECTION
PROCEDURE
1. INSPECT REAR SEAT 3 POINT TYPE BELT ASSEMBLY LH
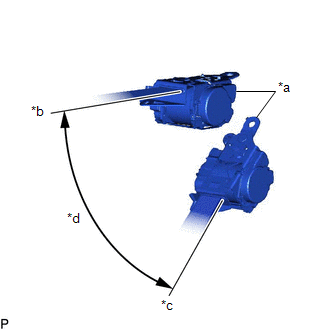
(a) Before installing the rear seat 3 point assembly, check the ELR function. NOTICE: Do not disassemble the retractor. (1) When the inclination of the retractor is 15° or less, check that the belt can be pulled from the retractor. When the inclination of the retractor is over 45°, check that the belt locks. If the result is not as specified, replace the rear seat 3 point assembly. |
|
Installation
INSTALLATION
PROCEDURE
1. INSTALL REAR SEAT BELT RETRACTOR COVER LH
(a) Install the rear seat belt retractor cover LH as shown in the illustration.
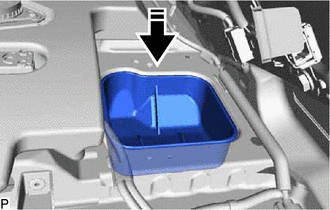
 |
Install in this Direction |
2. INSTALL REAR SEAT BELT RETRACTOR COVER RH
HINT:
Use the same procedure as for the LH side.
3. INSPECT REAR SEAT 3 POINT TYPE BELT ASSEMBLY LH
Click here 
4. INSTALL REAR SEAT 3 POINT TYPE BELT ASSEMBLY LH
(a) Engage the guide and temporarily install the rear seat 3 point type belt assembly LH with the 2 bolts. |
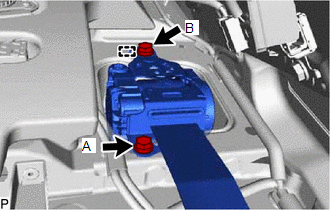 |
(b) Fully tighten the bolt (A), and then the bolt (B) to install the rear seat 3 point type belt assembly LH.
Torque:
Bolt (A) :
12,5 N·m {127 kgf·cm, 9 ft·lbf}
Bolt (B) :
42 N·m {428 kgf·cm, 31 ft·lbf}
(c) Connect the pretensioner connector and lock the locking button as shown in the illustration. NOTICE: Securely lock the locking button. |
|
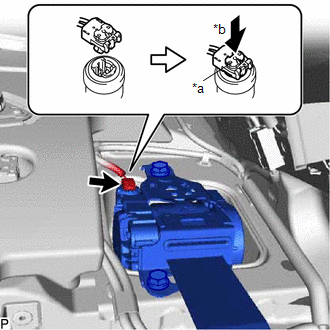
(d) Check that the ELR locks.
NOTICE:
This check should be performed with the rear seat outer belt assembly LH installed to the vehicle.
(1) With the rear seat 3 point type belt assembly LH installed to the vehicle, check that the belt locks when it is pulled out quickly.
5. INSTALL REAR SEAT 3 POINT TYPE BELT ASSEMBLY RH
HINT:
Use the same procedure as for the LH side.
6. INSTALL PACKAGE TRAY TRIM PANEL ASSEMBLY
(a) Pass the 3 rear seat belt floor anchors through the package tray trim panel assembly.
(b) Engage the 3 clips and 5 guides.
(c) Install the package tray trim panel assembly with the 2 clips.
(d) Return the rear seatback assembly LH and rear seatback assembly RH to their original position.
7. INSTALL REAR SEAT SHOULDER BELT COVER
(a) Engage the 2 guides and 2 claws to install the rear seat shoulder belt hole cover.
HINT:
Use the same procedure for the other rear seat shoulder belt hole covers.
8. INSTALL CENTER STOP LIGHT SET
Click here
9. CONNECT REAR SEAT 3 POINT TYPE BELT ASSEMBLY LH
(a) Install the floor anchor of the rear seat outer belt assembly LH with the bolt.
Torque:
42 N·m {428 kgf·cm, 31 ft·lbf}
NOTICE:
Do not allow the anchor part of the rear seat outer belt assembly LH to overlap the protruding parts of the floor panel.
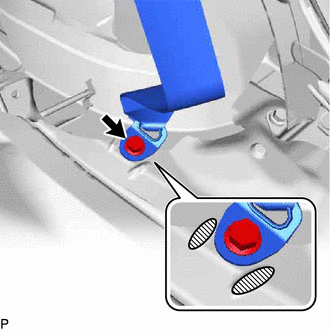
 |
Protruding Part |
10. CONNECT REAR SEAT 3 POINT TYPE BELT ASSEMBLY RH
HINT:
Use the same procedure as for the LH side.
11. INSTALL ROOF SIDE INNER GARNISH LH
Click here
12. INSTALL ROOF SIDE INNER GARNISH RH
HINT:
Use the same procedure as for the LH side.
13. INSTALL ROOF SIDE RAIL GARNISH ASSEMBLY LH
Click here
14. INSTALL ROOF SIDE RAIL GARNISH ASSEMBLY RH
HINT:
Use the same procedure as for the LH side.
15. CONNECT REAR DOOR OPENING TRIM WEATHERSTRIP LH
Click here
16. CONNECT REAR DOOR OPENING TRIM WEATHERSTRIP RH
Click here
17. INSTALL REAR SIDE SEATBACK ASSEMBLY LH
Click here
18. INSTALL REAR SIDE SEATBACK ASSEMBLY RH
HINT:
Use the same procedure as for the LH side.
19. INSTALL REAR SEAT CUSHION LOCK HOOK
Click here
20. INSTALL REAR SEAT CUSHION ASSEMBLY
Click here
21. CONNECT REAR CENTER SEAT OUTER BELT ASSEMBLY
Click here
22. CONNECT CABLE TO NEGATIVE AUXILIARY BATTERY TERMINAL
for A25A-FXS:
Click here
for 2GR-FKS:
Click here
23. INSTALL LUGGAGE COMPARTMENT INNER TRIM PAD (w/ Seat Heater System)
Click here
24. INSTALL SPARE WHEEL COVER ASSEMBLY (w/ Seat Heater System)
Click here
25. INSTALL LUGGAGE TRIM SERVICE HOLE COVER (for HV Model)
Click here
26. PERFORM DIAGNOSTIC SYSTEM CHECK
for HV Model:
Click here
for Gasoline Model:
Click here
27. INSPECT SRS WARNING LIGHT
for HV Model:
Click here
for Gasoline Model:
Click here
On-vehicle Inspection
ON-VEHICLE INSPECTION
CAUTION:
Be sure to correctly follow the removal and installation procedures for the rear seat 3 point type belt assembly.
PROCEDURE
1. INSPECT REAR SEAT 3 POINT TYPE BELT ASSEMBLY (for Vehicle not Involved in Collision)
(a) Perform a diagnostic system check.
for HV Model:
Click here 
for Gasoline Model:
Click here
(b) Visually check for defects with the rear seat 3 point type belt assembly installed to the vehicle.
(1) The defects to be checked are as follows:
- Cuts on the rear seat 3 point type belt assembly
- Small cracks on the rear seat 3 point type belt assembly
- Significant discoloration on the rear seat 3 point type belt assembly
OK:
No defects are found.
HINT:
If any defects are found, replace the rear seat 3 point type belt assembly with a new one.
2. INSPECT REAR SEAT 3 POINT TYPE BELT ASSEMBLY (for Vehicle Involved in Collision)
(a) Perform a diagnostic system check.
for HV Model:
Click here
for Gasoline Model:
Click here
(b) Visually check for defects with the rear seat 3 point type belt assembly removed from the vehicle.
(1) The defects to be checked are as follows:
- Cuts on the rear seat 3 point type belt assembly
- Small cracks on the rear seat 3 point type belt assembly
- Significant discoloration on the rear seat 3 point type belt assembly
- Cracks or other damage on the connector
OK:
No defects are found.
HINT:
If any defects are found, replace the rear seat 3 point type belt assembly with a new one.
Removal
REMOVAL
The necessary procedures (adjustment, calibration, initialization or registration) that must be performed after parts are removed and installed, or replaced during rear seat outer belt assembly removal/installation are shown below.
Necessary Procedure After Parts Removed/Installed/Replaced (for Gasoline Model)Replaced Part or Performed Procedure | Necessary Procedure | Effect/Inoperative Function When Necessary Procedures are not Performed | Link |
|---|---|---|---|
| *: When performing learning using the Techstream. Click here |
|||
Disconnect cable from negative battery terminal |
Perform steering sensor zero point calibration |
Lane departure alert system (w/ Steering Control) |
 |
Pre-collision system |
|||
Intelligent clearance sonar system* |
|||
Lighting system (for Gasoline Model with Cornering Light) |
|||
Memorize steering angle neutral point |
Parking assist monitor system |
|
|
Panoramic view monitor system |
|
||
CAUTION:
- Wear protective gloves. Sharp areas on the parts may injure your hands.
- Some of these service operations affect the SRS airbag system. Read the precautionary notices concerning the SRS airbag system before servicing.
Click here
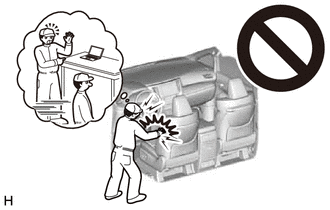
Replaced Part or Performed Procedure | Necessary Procedure | Effect/Inoperative Function When Necessary Procedures are not Performed | Link |
|---|---|---|---|
| *: When performing learning using the Techstream. Click here |
|||
Disconnect cable from negative auxiliary battery terminal |
Perform steering sensor zero point calibration |
Lane departure alert system (w/ Steering Control) |
|
Pre-collision system |
|||
Intelligent clearance sonar system* |
|||
Lighting system (for HV Model with Cornering Light) |
|||
Memorize steering angle neutral point |
Parking assist monitor system |
|
|
Panoramic view monitor system |
|
||
CAUTION:
- Wear protective gloves. Sharp areas on the parts may injure your hands.
- Some of these service operations affect the SRS airbag system. Read the precautionary notices concerning the SRS airbag system before servicing.
Click here
PROCEDURE
1. PRECAUTION
NOTICE:
After turning the engine switch (for Gasoline Model) or power switch (for HV Model) off, waiting time may be required before disconnecting the cable from the negative (-) auxiliary battery terminal. Therefore, make sure to read the disconnecting the cable from the negative (-) auxiliary battery terminal notices before proceeding with work.
Click here
2. REMOVE LUGGAGE TRIM SERVICE HOLE COVER (for HV Model)
Click here
3. REMOVE SPARE WHEEL COVER ASSEMBLY (w/ Seat Heater System)
Click here
4. REMOVE LUGGAGE COMPARTMENT INNER TRIM PAD (w/ Seat Heater System)
Click here
5. DISCONNECT CABLE FROM NEGATIVE AUXILIARY BATTERY TERMINAL
for A25A-FXS:
Click here
for 2GR-FKS:
Click here
CAUTION:
- Wait at least 90 seconds after disconnecting the cable from the negative (-) auxiliary battery terminal to disable the SRS system.
- If an airbag deploys for any reason, it may cause a serious injury.
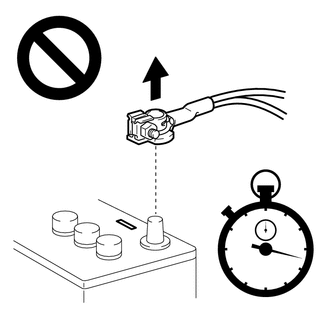
6. DISCONNECT REAR CENTER SEAT OUTER BELT ASSEMBLY
Click here
7. REMOVE REAR SEAT CUSHION ASSEMBLY
Click here
8. REMOVE REAR SEAT CUSHION LOCK HOOK
Click here
9. REMOVE REAR SIDE SEATBACK ASSEMBLY LH
Click here
10. REMOVE REAR SIDE SEATBACK ASSEMBLY RH
HINT:
Use the same procedure as for the LH side.
11. DISCONNECT REAR DOOR OPENING TRIM WEATHERSTRIP LH
(a) Disconnect the rear door opening trim weatherstrip LH.
12. DISCONNECT REAR DOOR OPENING TRIM WEATHERSTRIP RH
HINT:
Use the same procedure as for the LH side.
13. REMOVE ROOF SIDE RAIL GARNISH ASSEMBLY LH
Click here
14. REMOVE ROOF SIDE RAIL GARNISH ASSEMBLY RH
HINT:
Use the same procedure as for the LH side.
15. REMOVE ROOF SIDE INNER GARNISH LH
Click here
16. REMOVE ROOF SIDE INNER GARNISH RH
HINT:
Use the same procedure as for the LH side.
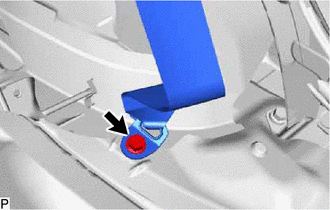
17. DISCONNECT REAR SEAT 3 POINT TYPE BELT ASSEMBLY LH
(a) Remove the bolt to disconnect the floor anchor of the rear seat 3 point type belt assembly LH. |
 |
18. DISCONNECT REAR SEAT 3 POINT TYPE BELT ASSEMBLY RH
HINT:
Use the same procedure as for the LH side.
19. REMOVE CENTER STOP LIGHT SET
Click here
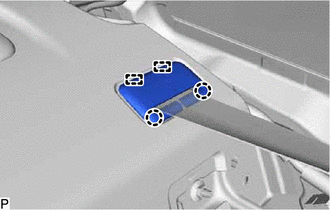
20. REMOVE REAR SEAT SHOULDER BELT COVER
(a) Disengage the 2 claws and 2 guides to remove the rear seat shoulder belt hole cover. HINT: Use the same procedure for the other rear seat shoulder belt hole covers. |
 |
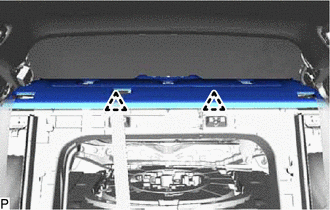
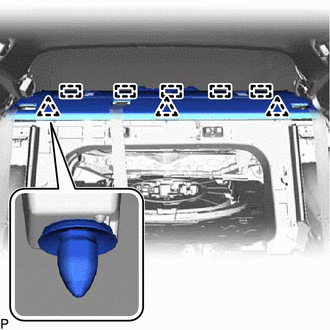
21. REMOVE PACKAGE TRAY TRIM PANEL ASSEMBLY
(a) Fold the rear seatback assembly LH and rear seatback assembly RH forward.
(b) Remove the 2 clips. |
 |
(c) Disengage the 3 clips and 5 guides. |
 |
(d) Pass the 3 rear seat belt floor anchors through the package tray trim panel assembly then remove the package tray trim panel assembly.
22. REMOVE REAR SEAT 3 POINT TYPE BELT ASSEMBLY LH
(a) Using a screwdriver, pull out the locking button as shown in the illustration to release the lock and disconnect the pretensioner connector. HINT: Tape the screwdriver tip before use. |
|
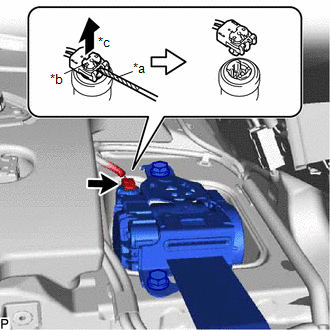
(b) Remove the 2 bolts. |
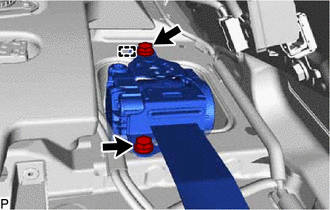 |
(c) Disengage the guide to remove the rear seat 3 point type belt assembly LH.
23. REMOVE REAR SEAT 3 POINT TYPE BELT ASSEMBLY RH
HINT:
Use the same procedure as for the LH side.
24. REMOVE REAR SEAT BELT RETRACTOR COVER LH
(a) Remove the rear seat belt retractor cover LH as shown in the illustration.
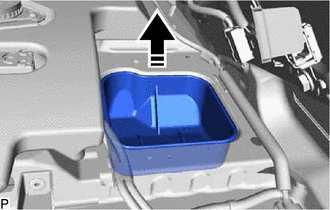
 |
Remove in this Direction |
25. REMOVE REAR SEAT BELT RETRACTOR COVER RH
HINT:
Use the same procedure as for the LH side.