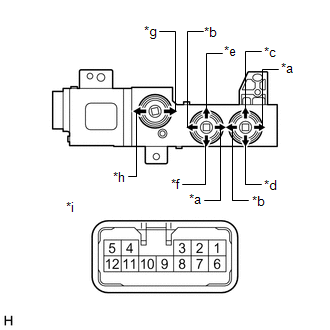
1. INSPECT FRONT POWER SEAT SWITCH LH (w/o Climate Control Seat System)
(a) Measure the resistance according to the value(s) in the table below.
Standard Resistance:
Slide Switch
Tester Connection
Condition
Specified Condition
4 - 6
Slide switch pressed
(Forward)
Below 1 Ω
1 - 12
4 - 12
Off
1 - 12
1 - 6
Slide switch pressed
(Rearward)
4 - 12
Front Vertical Switch
Tester Connection
Condition
Specified Condition
7 - 6
Front vertical switch pressed
(Up)
Below 1 Ω
11 - 12
7 - 12
Off
11 - 12
11 - 6
Front vertical switch pressed
(Down)
7 - 12
Lifter Switch
Tester Connection
Condition
Specified Condition
8 - 6
Lifter switch pressed
(Up)
Below 1 Ω
10 - 12
10 - 12
Off
8 - 12
10 - 6
Lifter switch pressed
(Down)
8 - 12
Reclining Switch
Tester Connection
Condition
Specified Condition
5 - 6
Reclining switch pressed
(Forward)
Below 1 Ω
11 - 6
7 - 6
3 - 12
5 - 12
Off
3 - 12
3 - 6
Reclining switch pressed
(Rearward)
5 - 12
10 - 6
8 - 6
Lumbar Support Switch
Tester Connection
Condition
Specified Condition
9 - 6
Lumbar switch pressed
(Hold)
Below 1 Ω
2 - 12
2 - 12
Off
9 - 12
2 - 6
Lumbar switch pressed
(Release)
9 - 12
If the result is not as specified, replace the front power seat switch LH.
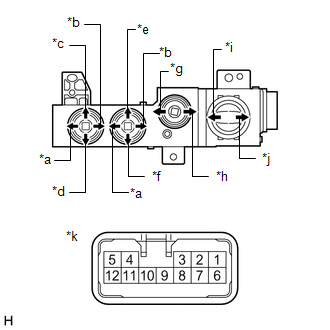
*a
Slide Switch (Forward)
*b
Slide Switch (Rearward)
*c
Front Vertical Switch (Up)
*d
Front Vertical Switch (Down)
*e
Lifter Switch (Up)
*f
Lifter Switch (Down)
*g
Reclining Switch (Forward)
*h
Reclining Switch (Rearward)
*i
Lumbar Support Switch (Hold)
*j
Lumbar Support Switch (Release)
*k
Component without harness connected
(Front Power Seat Switch LH)
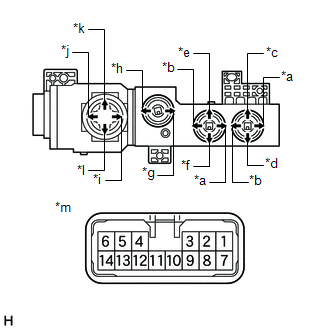
2. INSPECT FRONT POWER SEAT SWITCH LH (w/ Climate Control Seat System)
(a) Measure the resistance according to the value(s) in the table below.
Standard Resistance:
Slide Switch
Tester Connection
Condition
Specified Condition
7 - 20
Slide switch pressed
(Forward)
Below 1 Ω
7 - 20
Off
10 kΩ or higher
6 - 20
6 - 20
Slide switch pressed
(Rearward)
Below 1 Ω
Front Vertical Switch
Tester Connection
Condition
Specified Condition
4 - 20
Front vertical switch pressed
(Up)
Below 1 Ω
4 - 20
Off
10 kΩ or higher
5 - 20
5 - 20
Front vertical switch pressed
(Down)
Below 1 Ω
Lifter Switch
Tester Connection
Condition
Specified Condition
3 - 20
Lifter switch pressed
(Up)
Below 1 Ω
3 - 20
Off
10 kΩ or higher
8 - 20
8 - 20
Lifter switch pressed
(Down)
Below 1 Ω
Reclining Switch
Tester Connection
Condition
Specified Condition
2 - 20
Reclining switch pressed
(Forward)
Below 1 Ω
2 - 20
Off
10 kΩ or higher
1 - 20
1 - 20
Reclining switch pressed
(Rearward)
Below 1 Ω
Lumbar Support Switch
Tester Connection
Condition
Specified Condition
14 - 20
Lumbar switch pressed
(Hold)
Below 1 Ω
17 - 20
Lumbar switch pressed
(Release)
Below 1 Ω
11 - 20
Lumbar switch pressed
(Up)
Below 1 Ω
9 - 20
Lumbar switch pressed
(Down)
Below 1 Ω
14 - 20
Off
10 kΩ or higher
17 - 20
11 - 20
9 - 20
If the result is not as specified, replace the front power seat switch LH.
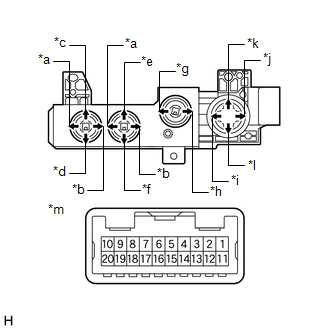
*a
Slide Switch (Forward)
*b
Slide Switch (Rearward)
*c
Front Vertical Switch (Up)
*d
Front Vertical Switch (Down)
*e
Lifter Switch (Up)
*f
Lifter Switch (Down)
*g
Reclining Switch (Forward)
*h
Reclining Switch (Rearward)
*i
Lumbar Support Switch (Hold)
*j
Lumbar Support Switch (Release)
*k
Lumbar Support Switch (Up)
*l
Lumbar Support Switch (Down)
*m
Component without harness connected
(Front Power Seat Switch LH)
3. INSPECT FRONT POWER SEAT SWITCH RH (w/o Climate Control Seat System)
(a) Measure the resistance according to the value(s) in the table below.
Standard Resistance:
Slide Switch
Tester Connection
Condition
Specified Condition
2 - 12
Slide switch pressed
(Forward)
Below 1 Ω
5 - 6
2 - 6
Off
5 - 6
2 - 6
Slide switch pressed
(Rearward)
5 - 12
Front Vertical Switch
Tester Connection
Condition
Specified Condition
7 - 6
Front vertical switch pressed
(Up)
Below 1 Ω
11 - 12
11 - 6
Off
7 - 6
11 - 6
Front vertical switch pressed
(Down)
7 - 12
Lifter Switch
Tester Connection
Condition
Specified Condition
8 - 6
Lifter switch pressed
(Up)
Below 1 Ω
10 - 12
10 - 6
Off
8 - 6
10 - 6
Lifter switch pressed
(Down)
8 - 12
Reclining Switch
Tester Connection
Condition
Specified Condition
11 - 12
Reclining switch pressed
(Forward)
Below 1 Ω
7 - 12
1 - 12
3 - 6
1 - 6
Off
3 - 6
1 - 6
Reclining switch pressed
(Rearward)
10 - 12
8 - 12
3 - 12
If the result is not as specified, replace the front power seat switch RH.
*a
Slide Switch (Forward)
*b
Slide Switch (Rearward)
*c
Front Vertical Switch (Up)
*d
Front Vertical Switch (Down)
*e
Lifter Switch (Up)
*f
Lifter Switch (Down)
*g
Reclining Switch (Forward)
*h
Reclining Switch (Rearward)
*i
Component without harness connected
(Front Power Seat Switch RH)
4. INSPECT FRONT POWER SEAT SWITCH RH (w/ Climate Control Seat System)
(a) Measure the resistance according to the value(s) in the table below.
Standard Resistance:
Slide Switch
Tester Connection
Condition
Specified Condition
2 - 11
Slide switch pressed
(Forward)
Below 1 Ω
6 - 9
2 - 9
Off
6 - 9
2 - 9
Slide switch pressed
(Rearward)
6 - 11
Front Vertical Switch
Tester Connection
Condition
Specified Condition
14 - 11
Front vertical switch pressed
(Up)
Below 1 Ω
7 - 9
14 - 9
Off
7 - 9
14 - 9
Front vertical switch pressed
(Down)
7 - 11
Lifter Switch
Tester Connection
Condition
Specified Condition
14 - 11
Lifter switch pressed
(Up)
Below 1 Ω
8 - 9
14 - 9
Off
8 - 9
14 - 9
Lifter switch pressed
(Down)
8 - 11
Reclining Switch
Tester Connection
Condition
Specified Condition
14 - 11
Reclining switch pressed
(Forward)
Below 1 Ω
7 - 11
1 - 11
5 - 9
1 - 9
Off
5 - 9
1 - 9
Reclining switch pressed
(Rearward)
14 - 11
8 - 11
5 - 11
Lumbar Support Switch
Tester Connection
Condition
Specified Condition
3 - 11
Lumbar switch pressed
(Hold)
Below 1 Ω
12 - 9
3 - 9
Lumbar switch pressed
(Release)
12 - 11
10 - 11
Lumbar switch pressed
(Up)
4 - 9
10 - 9
Lumbar switch pressed
(Down)
4 - 11
3 - 9
Off
12 - 9
10 - 9
4 - 9
If the result is not as specified, replace the front power seat switch RH.
*a
Slide Switch (Forward)
*b
Slide Switch (Rearward)
*c
Front Vertical Switch (Up)
*d
Front Vertical Switch (Down)
*e
Lifter Switch (Up)
*f
Lifter Switch (Down)
*g
Reclining Switch (Forward)
*h
Reclining Switch (Rearward)
*i
Lumbar Support Switch (Hold)
*j
Lumbar Support Switch (Release)
*k
Lumbar Support Switch (Up)
*l
Lumbar Support Switch (Down)
*m
Component without harness connected
(Front Power Seat Switch LH)
Installation
INSTALLATION
CAUTION:
Wear protective gloves. Sharp areas on the parts may injure your hands.
HINT:
Use the same procedure for the RH side and LH side.
The following procedure is for the LH side.
PROCEDURE
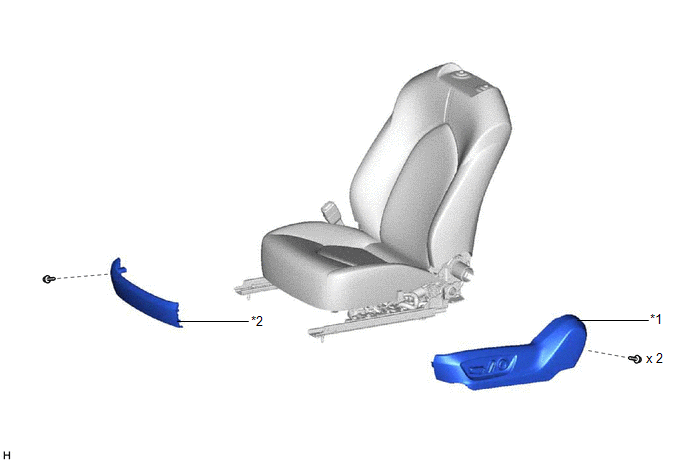
1. INSTALL FRONT POWER SEAT SWITCH
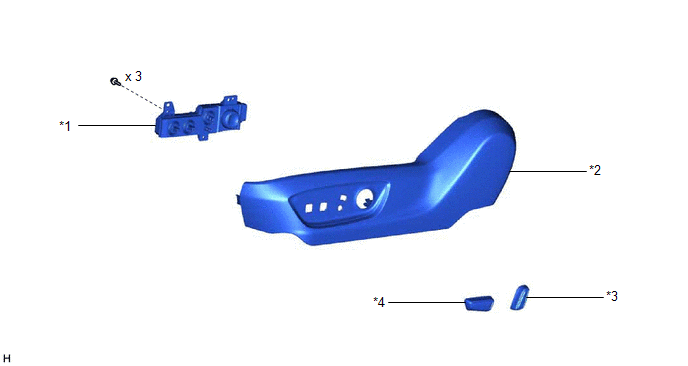
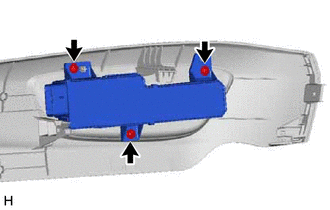
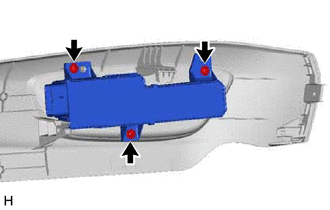
(a) Install the front power seat switch to the front seat cushion shield with the 3 screws.
2. INSTALL RECLINING POWER SEAT SWITCH KNOB
Click here
3. INSTALL SLIDE AND VERTICAL POWER SEAT SWITCH KNOB
Click here
4. INSTALL FRONT SEAT CUSHION SHIELD
Click here
5. INSTALL FRONT SEAT FRONT CUSHION SHIELD
Click here
6. CONNECT SEPARATE TYPE FRONT SEATBACK COVER
Click here
7. INSTALL FRONT SEAT ASSEMBLY
Click here
Removal
REMOVAL
The necessary procedures (adjustment, calibration, initialization, or registration) that must be performed after parts are removed and installed, or replaced during front power seat switch removal/installation are shown below.
Necessary Procedures After Parts Removed/Installed/Replaced (for Gasoline Model)
Replaced Part or Performed Procedure
Necessary Procedure
Effect/Inoperative Function when Necessary Procedure not Performed
Link
*: When performing learning using the Techstream.
Click here
Disconnect cable from negative auxiliary battery terminal
Perform steering sensor zero point calibration
Lane departure alert system (w/ Steering Control)
Pre-collision system
Intelligent clearance sonar system*
Lighting system (for Gasoline Model with Cornering Light)
Memorize steering angle neutral point
Parking assist monitor system
Panoramic view monitor system
Occupant detection ECU
Front passenger seat
Zero point calibration (Occupant classification system)
Occupant classification system
Passenger airbag ON/OFF indicator
Airbag system (Front passenger side)
Seat belt warning system (Front passenger)
Necessary Procedures After Parts Removed/Installed/Replaced (for HV Model)
Replaced Part or Performed Procedure
Necessary Procedure
Effect/Inoperative Function when Necessary Procedure not Performed
Link
*: When performing learning using the Techstream.
Click here
Disconnect cable from negative auxiliary battery terminal
Perform steering sensor zero point calibration
Lane departure alert system (w/ Steering Control)
Pre-collision system
Intelligent clearance sonar system*
Lighting system (for HV Model with Cornering Light)
Memorize steering angle neutral point
Parking assist monitor system
Panoramic view monitor system
Occupant detection ECU
Front passenger seat
Zero point calibration (Occupant classification system)
Occupant classification system
Passenger airbag ON/OFF indicator
Airbag system (Front passenger side)
Seat belt warning system (Front passenger)
CAUTION:
Be sure to read Precaution thoroughly before servicing.
for Gasoline Model: Click here
for HV Model: Click here
Wear protective gloves. Sharp areas on the parts may injure your hands.
HINT:
Use the same procedure for the RH side and LH side.
The following procedure is for the LH side.
PROCEDURE
1. REMOVE FRONT SEAT ASSEMBLY
Click here
2. DISCONNECT SEPARATE TYPE FRONT SEATBACK COVER
Click here
3. REMOVE FRONT SEAT FRONT CUSHION SHIELD
Click here
4. REMOVE FRONT SEAT CUSHION SHIELD
Click here
5. REMOVE SLIDE AND VERTICAL POWER SEAT SWITCH KNOB
Click here
6. REMOVE RECLINING POWER SEAT SWITCH KNOB
Click here
7. REMOVE FRONT POWER SEAT SWITCH
(a) Remove the 3 screws and front power seat switch from the front seat cushion shield.