Power Source Mode does not Change to ON (IG). Precaution. Problem Symptoms Table
Power Source Mode does not Change to ON (IG)
DESCRIPTION
If the engine switch is pressed with the electrical key transmitter sub-assembly in the cabin, the certification ECU (smart key ECU assembly) receives a signal and changes the power source mode.
Related Data List and Active Test ItemsProblem Symptom | Data List and Active Test |
|---|---|
Power source mode does not change to on (IG) but does change to on (ACC) |
Power Source Control
|
WIRING DIAGRAM
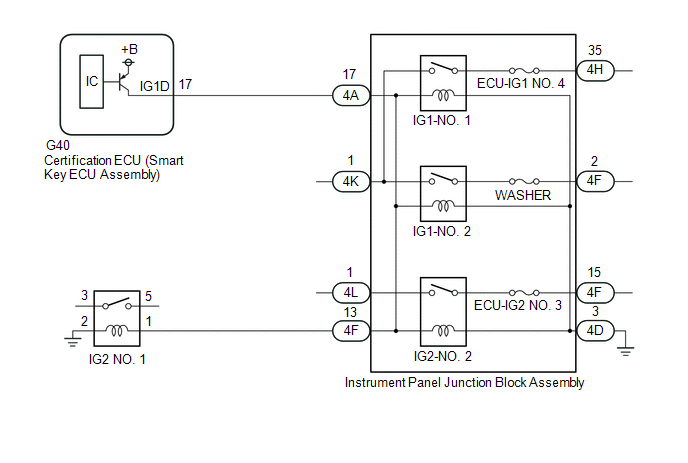
NOTICE:
- When using the Techstream with the engine switch off, connect the Techstream to the DLC3 and turn a courtesy light switch on and off at intervals of 1.5 seconds or less until communication between the Techstream and the vehicle begins. Then select the vehicle type under manual mode and enter the following menus: Body Electrical / Smart Key. While using the Techstream, periodically turn a courtesy light switch on and off at intervals of 1.5 seconds or less to maintain communication between the Techstream and the vehicle.
- The smart key system (for Start Function, Gasoline Model) uses the LIN communication system and CAN communication system. Inspect the communication function by following How to Proceed with Troubleshooting. Troubleshoot the smart key system (for Start Function, Gasoline Model) after confirming that the communication systems are functioning properly.
Click here

- Make sure that no DTCs are output. If any DTCs are output, proceed to Diagnostic Trouble Code Chart.
- If the smart key system (for Start Function, Gasoline Model) has been disabled, enable the system before performing troubleshooting.
Click here
- Inspect the fuses of circuits related to this system before performing the following procedure.
- Before replacing the certification ECU (smart key ECU assembly), refer to Registration.
Click here
- After completing repairs, confirm that the problem does not recur.
- After performing repairs, confirm that no DTCs are output by performing "DTC Output Confirmation Operation."
PROCEDURE
CHECK FOR DTC
(a) Using the Techstream, check for certification ECU (smart key ECU assembly) DTCs.
Body Electrical > Power Source Control > Trouble Codes Body Electrical > Smart Key > Trouble Codes Body Electrical > Starting Control > Trouble CodesResult | Proceed to |
|---|---|
DTCs are not output |
A |
Smart key system (for Start Function, Gasoline Model) DTCs are output |
B |
| B |  |
GO TO DIAGNOSTIC TROUBLE CODE CHART |
|

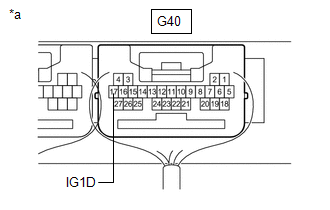
CHECK CERTIFICATION ECU (SMART KEY ECU ASSEMBLY)
(a) Measure the voltage according to the value(s) in the table below. Standard Voltage:
|
|
| NG | |
REPLACE CERTIFICATION ECU (SMART KEY ECU ASSEMBLY) |
|
CHECK HARNESS AND CONNECTOR (CERTIFICATION ECU (SMART KEY ECU ASSEMBLY) - INSTRUMENT PANEL JUNCTION BLOCK ASSEMBLY)
(a) Disconnect the 4A, 4D, 4L and 4K instrument panel junction block assembly connectors.
(b) Measure the resistance according to the value(s) in the table below.
Standard Resistance:
Tester Connection | Condition | Specified Condition |
|---|---|---|
G40-17 (IG1D) - 4A-17 |
Always |
Below 1 Ω |
4D-3 - Body ground |
Always |
Below 1 Ω |
G40-17 (IG1D) or 4A-17 - Other terminals and body ground |
Always |
10 kΩ or higher |
(c) Measure the voltage according to the value(s) in the table below.
Standard Voltage:
Tester Connection | Condition | Specified Condition |
|---|---|---|
4K-1 - Body ground |
Always |
11 to 14 V |
4L-1 - Body ground |
Always |
11 to 14 V |
| NG | |
REPAIR OR REPLACE HARNESS OR CONNECTOR |
|
CHECK INSTRUMENT PANEL JUNCTION BLOCK ASSEMBLY (IG1-NO. 1, IG1-NO. 2, IG2-NO. 2 RELAY)
(a) Remove the instrument panel junction block assembly.
Click here
(b) Connect all of the instrument panel junction block assembly connectors.
(c) Connect the G40 certification ECU (smart key ECU assembly) connector.
(d) Measure the voltage according to the value(s) in the table below.
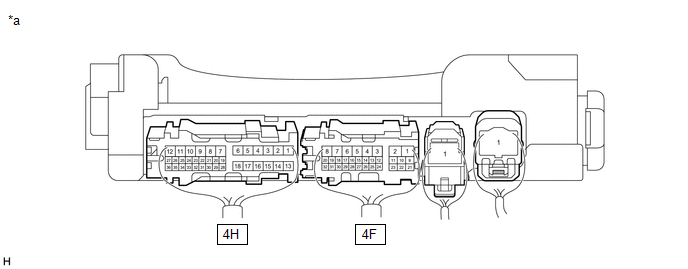
*a |
Component with harness connected (Instrument Panel Junction Block Assembly) |
- |
- |
Standard Voltage:
Tester Connection | Condition | Specified Condition |
|---|---|---|
4H-35 - Body ground |
Engine switch on (IG) |
11 to 14 V |
4F-2 - Body ground |
Engine switch on (IG) |
11 to 14 V |
4F-15 - Body ground |
Engine switch on (IG) |
11 to 14 V |
| NG | |
REPLACE INSTRUMENT PANEL JUNCTION BLOCK ASSEMBLY |
|
CHECK HARNESS AND CONNECTOR (INSTRUMENT PANEL JUNCTION BLOCK ASSEMBLY - IG2 NO. 1 RELAY)
(a) Remove the IG2 NO. 1 relay from the No. 1 engine room relay block and No. 1 junction block assembly.
(b) Disconnect the 4F instrument panel junction block assembly connector.
(c) Measure the resistance according to the value(s) in the table below.
Standard Resistance:
Tester Connection | Condition | Specified Condition |
|---|---|---|
4F-13 - No. 1 engine room relay block and No. 1 junction block assembly IG2 NO. 1 relay terminal 1 |
Always |
Below 1 Ω |
No. 1 engine room relay block and No. 1 junction block assembly IG2 NO. 1 relay terminal 2 - Body ground |
Always |
Below 1 Ω |
4F-13 or No. 1 engine room relay block and No. 1 junction block assembly IG2 NO. 1 relay terminal 1 - Other terminals and body ground |
Always |
10 kΩ or higher |
| NG | |
REPAIR OR REPLACE HARNESS OR CONNECTOR |
|
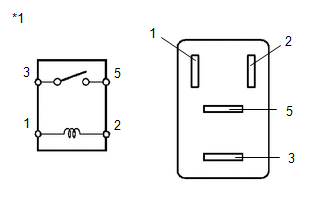
INSPECT IG2 NO. 1 RELAY
(a) Measure the resistance according to the value(s) in the table below. Standard Resistance:
|
|
| OK | |
USE SIMULATION METHOD TO CHECK |
| NG | |
REPLACE IG2 NO. 1 RELAY |
Precaution
PRECAUTION
CAUTION REGARDING INTERFERENCE WITH ELECTRONIC DEVICES
CAUTION:
As weak radio waves are emitted from the electrical key transmitter sub-assembly, if a pacemaker is being used, be sure to read the pacemaker instruction manual and the following.
- People with implantable cardiac pacemakers, cardiac resynchronization therapy-pacemakers or implantable cardioverter defibrillators should keep away from the smart key system antennas. The radio waves may affect the operation of such devices. If necessary, the entry function can be disabled. Ask your dealer for details, such as the frequency of radio waves and timing of the emitted radio waves. Then, consult your doctor to see if you should disable the entry function.
Click here

- User of any electrical medical device other than implantable cardiac pacemakers, cardiac resynchronization therapy-pacemakers or implantable cardioverter defibrillators should consult the manufacturer of the device for information about its operation under the influence of radio waves. Radio waves could have unexpected effects on the operation of such medical devices.
- Ask your dealer for details for disabling the smart key system.
Exterior antenna |
|
Interior antenna |
|
HINT:
The smart key system can be disabled by a customize setting.
Click here
PRECAUTION FOR DISCONNECTING CABLE FROM NEGATIVE BATTERY TERMINAL
NOTICE:
When disconnecting the cable from the negative (-) battery terminal, initialize the following systems after the cable is reconnected.
System Name | See Procedure |
|---|---|
Lane Departure Alert System (w/ Steering Control) |
|
Intelligent Clearance Sonar System |
|
Parking Assist Monitor System |
|
Panoramic View Monitor System |
|
Pre-collision System |
|
Lighting System (for Gasoline Model with Cornering Light) |
PRECAUTION WHEN USING TECHSTREAM
(a) When the engine switch is turned off, the DTCs stored in the steering lock ECU (steering lock actuator or upper bracket assembly) will be cleared. Be sure to record any output DTCs immediately.
(b) When using the Techstream with the engine switch off, connect the Techstream to the DLC3 and turn a courtesy light switch on and off at intervals of 1.5 seconds or less until communication between the Techstream and the vehicle begins. Then select the vehicle type under manual mode and enter the following menus: Body Electrical / Smart Key. While using the Techstream, periodically turn a courtesy light switch on and off at intervals of 1.5 seconds or less to maintain communication between the Techstream and the vehicle.
PRECAUTIONS FOR BATTERY
(a) If the battery became discharged and then was charged or the cable was disconnected and reconnected to the (-) battery terminal, the steering lock may not be released and the engine may not be able to be started unless the driver door is opened and closed with the engine switch off.
(b) After the battery is removed and reinstalled, be sure to wait at least 10 seconds before the next engine start. The engine may not start immediately after the battery is reinstalled.
HINT:
- After disconnecting and reconnecting a cable to the battery, the engine may not start on the first attempt. If this occurs, turn the engine switch off. The engine will start normally from the second time onward.
- When a cable to the battery is disconnected and reconnected, the power source mode returns to the mode it was in before the cable was disconnected.
PRECAUTION FOR REGISTRATION
(a) If replacing any of the following parts, refer to registration procedure.
Click here
(1) Certification ECU (smart key ECU assembly)
(2) Steering lock ECU (steering lock actuator or upper bracket assembly)
(3) ECM
(4) Electrical key transmitter sub-assembly
(5) Main body ECU (multiplex network body ECU)
(6) DCM (telematics transceiver)*
- *: for Toyota Entune Remote Connect Compatible Type
PRECAUTIONS FOR STEERING LOCK / UNLOCK FUNCTION
(a) After turning the engine switch off and opening and closing any of the doors, the steering wheel will be locked due to the steering lock function. Operating the engine switch again automatically cancels the steering lock function.
(b) To prevent the steering lock motor from overheating, the motor operation may be suspended if the steering is locked and unlocked repeatedly in a short period of time. In this case, refrain from operating the engine switch. After about 10 seconds, the steering lock motor will resume functioning.
Problem Symptoms Table
PROBLEM SYMPTOMS TABLE
HINT:
- Use the table below to help determine the cause of problem symptoms. If multiple suspected areas are listed, the potential causes of the symptoms are listed in order of probability in the "Suspected Area" column of the table. Check each symptom by checking the suspected areas in the order they are listed. Replace parts as necessary.
- Inspect the fuses and relays related to the system before inspecting the suspected areas below.
- If the problem occurs in certain locations or times of day, the possibility of wave interference is high.
- If a malfunction occurred after optional components were installed by the dealer, check if there is wave interference from the components.
Symptom | Suspected Area | Link |
|---|---|---|
Power source mode does not change to on (IG) or on (ACC) |
Smart key system (for Entry Function, Gasoline Model) |
 |
Wireless charging system |
||
Affected by wave interference |
||
Transmitter battery |
||
Electrical key transmitter sub-assembly |
||
No. 1 indoor electrical key antenna assembly (front floor) |
||
No. 1 indoor electrical key antenna assembly (rear floor) |
||
Engine switch |
||
Wire harness or connector |
||
Instrument panel junction block assembly |
||
Certification ECU (Smart key ECU assembly) |
||
Power source mode does not change to on (IG) |
Wire harness or connector |
|
Relay |
||
Instrument panel junction block assembly |
||
Certification ECU (Smart key ECU assembly) |
||
Power source mode does not change to on (ACC) |
Wire harness or connector |
|
Relay |
||
Instrument panel junction block assembly |
||
Certification ECU (Smart key ECU assembly) |
||
Engine does not start |
Transmitter battery |
|
Affected by wave interference |
||
SFI system |
||
Steering lock function |
||
Immobiliser function |
||
Wire harness or connector |
||
ST NO. 1 fuse |
||
ST relay |
||
Park/neutral position switch assembly |
||
Electrical key transmitter sub-assembly |
||
Stop light switch assembly |
||
Certification ECU (Smart key ECU assembly) |
||
New key cannot be registered |
LIN communication system |
|
Meter / gauge system |
||
Reregistration |
||
Electrical key transmitter sub-assembly |
||
Steering lock ECU (Steering lock actuator or upper bracket assembly) |
||
Certification ECU (Smart key ECU assembly) |
||
Additional key cannot be registered |
Smart key system (for Start Function, Gasoline Model) |
|
Steering lock function |
||
Electrical key transmitter sub-assembly |
||
Certification ECU (Smart key ECU assembly) |
||
New key registration warning message is not displayed |
Lighting system (int) |
|
Meter / gauge system |
||
Certification ECU (Smart key ECU assembly) |
||
Unable to unlock steering wheel (Engine cannot start) |
Wire harness or connector |
|
Steering lock ECU (Steering lock actuator or upper bracket assembly) |
||
Certification ECU (Smart key ECU assembly) |
||
Steering lock does not lock |
Lighting system (int) |
|
Wire harness or connector |
||
Steering lock ECU (Steering lock actuator or upper bracket assembly) |
||
Certification ECU (Smart key ECU assembly) |
||
Security indicator light does not blink |
Wire harness or connector |
|
Security indicator light (Radio and display receiver assembly) |
||
Main body ECU (Multiplex network body ECU) |
||
Certification ECU (Smart key ECU assembly) |
||
Immobiliser system does not operate properly |
Communication ID registration was defective |
|
Wire harness or connector |
||
ECM |
||
Engine cannot be started by remote air conditioner with remote start (Both the wireless door lock control system and push-button start function operate normally)* |
Refer to "Remote Engine Starter does not Operate" |
|
- *: for Toyota Entune Remote Connect Compatible Type