Engine/Power Switch Malfunction (B2278). Vehicle Speed Signal Malfunction (B2282,B2283). Brake Signal Malfunction (B2284)
Engine/Power Switch Malfunction (B2278)
DESCRIPTION
This DTC is stored when the SSW1 contact signal and SSW2 contact signal, which are detected when the power switch is operated, do not match.
DTC No. | Detection Item | DTC Detection Condition | Trouble Area | Note |
|---|---|---|---|---|
B2278 |
Engine/Power Switch Malfunction |
When the power switch is operated, the SSW1 contact signal and SSW2 contact signal do not match (1-trip detection logic*). |
|
|
- *: Only detected while a malfunction is present.
Vehicle Condition when Malfunction Detected | Fail-safe Function when Malfunction Detected |
|---|---|
If either the SSW1 contact signal or SSW2 contact signal is stuck on, the power source mode cannot be changed by pressing the power switch. If either the SSW1 contact signal or SSW2 contact signal is stuck off, emergency stop by pressing and holding the power switch for 2 seconds or more cannot be operated. |
- |
DTC No. | Data List and Active Test |
|---|---|
B2278 |
Power Source Control
|
WIRING DIAGRAM
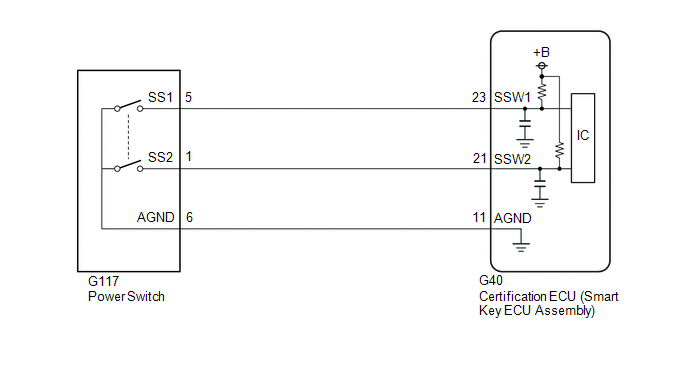
NOTICE:
- When using the Techstream with the power switch off, connect the Techstream to the DLC3 and turn a courtesy light switch on and off at intervals of 1.5 seconds or less until communication between the Techstream and the vehicle begins. Then select the vehicle type under manual mode and enter the following menus: Body Electrical / Smart Key. While using the Techstream, periodically turn a courtesy light switch on and off at intervals of 1.5 seconds or less to maintain communication between the Techstream and the vehicle.
- The smart key system (for Start Function, HV Model) uses the LIN communication system and CAN communication system. Inspect the communication function by following How to Proceed with Troubleshooting. Troubleshoot the smart key system (for Start Function, HV Model) after confirming that the communication systems are functioning properly.
Click here

- Before replacing the certification ECU (smart key ECU assembly), refer to Registration.
Click here
- After repair, confirm that no DTCs are output by performing "DTC Output Confirmation Operation".
PROCEDURE
READ VALUE USING TECHSTREAM (START SWITCH1, START SWITCH2)
(a) Connect the Techstream to the DLC3.
(b) Turn the power switch on (IG).
(c) Turn the Techstream on.
(d) Enter the following menus: Body Electrical / Power Source Control / Data List.
(e) Read the Data List according to the display on the Techstream.
Body Electrical > Power Source Control > Data ListTester Display | Measurement Item | Range | Normal Condition | Diagnostic Note |
|---|---|---|---|---|
Start Switch1 |
Power switch 1 status |
OFF or ON |
OFF: Power switch not pressed ON: Power switch pressed |
|
Start Switch2 |
Power switch 2 status |
OFF or ON |
OFF: Power switch not pressed ON: Power switch pressed |
|
Tester Display |
|---|
Start Switch1 |
Start Switch2 |
OK:
The Techstream display changes correctly in response to the power switch operation.
| NG |  |
GO TO STEP 3 |
|

READ VALUE USING TECHSTREAM (START SWITCH1, START SWITCH2)
(a) Enter the following menus: Body Electrical / Power Source Control / Data List.
(b) According to the display on the Techstream, read the Data List while wiggling the wire harness.
Body Electrical > Power Source Control > Data ListTester Display | Measurement Item | Range | Normal Condition | Diagnostic Note |
|---|---|---|---|---|
Start Switch1 |
Power switch 1 status |
OFF or ON |
OFF: Power switch not pressed ON: Power switch pressed |
|
Start Switch2 |
Power switch 2 status |
OFF or ON |
OFF: Power switch not pressed ON: Power switch pressed |
|
Tester Display |
|---|
Start Switch1 |
Start Switch2 |
OK:
The Techstream display changes correctly in response to the power switch operation.
| OK | |
USE SIMULATION METHOD TO CHECK |
| NG | |
REPAIR OR REPLACE HARNESS OR CONNECTOR |
CHECK HARNESS AND CONNECTOR (CERTIFICATION ECU (SMART KEY ECU ASSEMBLY) - POWER SWITCH)
(a) Disconnect the G40 certification ECU (smart key ECU assembly) connector.
(b) Disconnect the G117 power switch connector.
(c) Measure the resistance according to the value(s) in the table below.
Standard Resistance:
Tester Connection | Condition | Specified Condition |
|---|---|---|
G40-23 (SSW1) - G117-5 (SS1) |
Always |
Below 1 Ω |
G40-21 (SSW2) - G117-1 (SS2) |
Always |
Below 1 Ω |
G40-11 (AGND) - G117-6 (AGND) |
Always |
Below 1 Ω |
G40-23 (SSW1) or G117-5 (SS1) - Other terminals and body ground |
Always |
10 kΩ or higher |
G40-21 (SSW2) or G117-1 (SS2) - Other terminals and body ground |
Always |
10 kΩ or higher |
G40-11 (AGND) or G117-6 (AGND) - Other terminals and body ground |
Always |
10 kΩ or higher |
| NG | |
REPAIR OR REPLACE HARNESS OR CONNECTOR |
|
INSPECT POWER SWITCH
(a) Remove the power switch.
Click here
(b) Inspect the power switch.
Click here
| OK | |
REPLACE CERTIFICATION ECU (SMART KEY ECU ASSEMBLY) |
| NG | |
REPLACE POWER SWITCH |
Vehicle Speed Signal Malfunction (B2282,B2283)
DESCRIPTION
DTC B2282 is stored when the vehicle speed signal sent by the combination meter assembly via direct line and the vehicle speed signal sent via CAN communication do not match.
DTC B2283 is stored when a malfunction in the vehicle speed sensor is detected.
DTC No. | Detection Item | DTC Detection Condition | Trouble Area | Note |
|---|---|---|---|---|
B2282 |
Vehicle Speed Signal Malfunction |
The vehicle speed signal sent by the combination meter assembly via direct line and the vehicle speed signal sent via CAN communication do not match. (1-trip detection logic*) |
|
|
B2283 |
Vehicle Speed Sensor Malfunction |
Vehicle speed signal malfunction is detected (excessive deceleration is detected). (1-trip detection logic*) |
|
|
- *: Only detected while a malfunction is present and the power switch is on (IG).
DTC Code | Vehicle Condition when Malfunction Detected | Fail-safe Function when Malfunction Detected |
|---|---|---|
B2282 |
|
- |
B2283 |
|
Steering lock motor operation is prohibited. |
DTC No. | Data List and Active Test |
|---|---|
B2282 B2283 |
Power Source Control
|
WIRING DIAGRAM
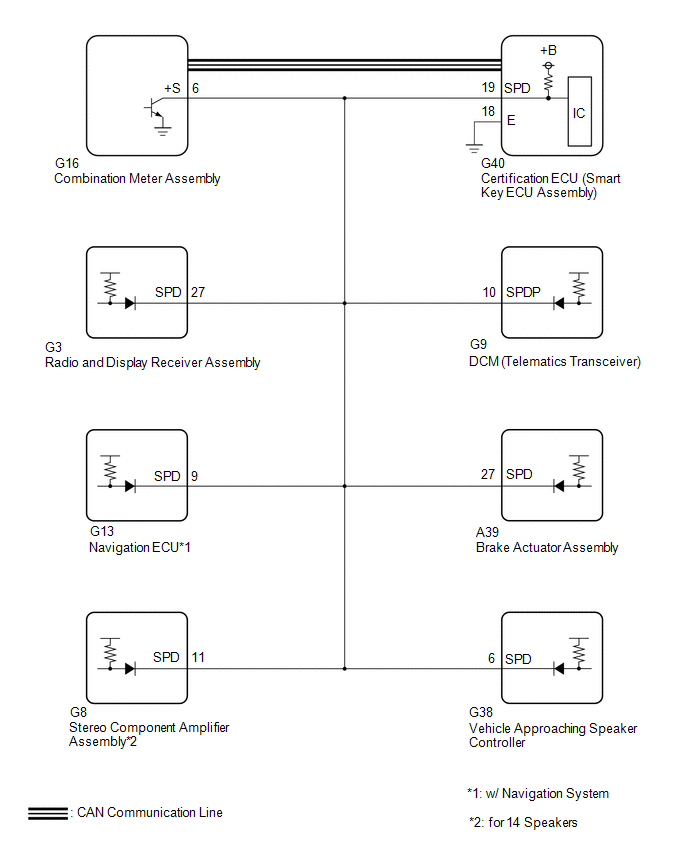
NOTICE:
- When using the Techstream with the power switch off, connect the Techstream to the DLC3 and turn a courtesy light switch on and off at intervals of 1.5 seconds or less until communication between the Techstream and the vehicle begins. Then select the vehicle type under manual mode and enter the following menus: Body Electrical / Smart Key. While using the Techstream, periodically turn a courtesy light switch on and off at intervals of 1.5 seconds or less to maintain communication between the Techstream and the vehicle.
- The smart key system (for Start Function, HV Model) uses the LIN communication system and CAN communication system. Inspect the communication function by following How to Proceed with Troubleshooting. Troubleshoot the smart key system (for Start Function, HV Model) after confirming that the communication systems are functioning properly.
Click here

- Before replacing the certification ECU (smart key ECU assembly), refer to Registration.
Click here
- After repair, confirm that no DTCs are output by performing "DTC Output Confirmation Operation".
PROCEDURE
READ VALUE USING TECHSTREAM (VEHICLE SPEED METER)
(a) Connect the Techstream to the DLC3.
(b) Turn the power switch on (IG).
(c) Turn the Techstream on.
(d) Enter the following menus: Body Electrical / Combination Meter / Data List.
(e) Read the Data List according to the display on the Techstream.
Body Electrical > Combination Meter > Data ListTester Display | Measurement Item | Range | Normal Condition | Diagnostic Note |
|---|---|---|---|---|
Vehicle Speed Meter |
Vehicle speed |
Min.: 0, Max.: 255 |
Almost same as actual vehicle speed (Speedometer tester) |
- |
Vehicle Speed Meter
HINT:
Using a speedometer tester, check the actual vehicle speed and the vehicle speed displayed on the Techstream.
OK:
Vehicle speed displayed on the Techstream is almost the same as the actual vehicle speed measured using a speedometer tester.
| NG |  |
GO TO METER / GAUGE SYSTEM (Speedometer Malfunction) |
|

READ VALUE USING TECHSTREAM (VEHICLE SPEED SIGNAL)
(a) Enter the following menus: Body Electrical / Power Source Control / Data List.
(b) Read the Data List according to the display on the Techstream.
Body Electrical > Power Source Control > Data ListTester Display | Measurement Item | Range | Normal Condition | Diagnostic Note |
|---|---|---|---|---|
Vehicle Speed Signal |
Vehicle being driven or stopped |
Stop or Run |
Stop: Vehicle stopped Run: Vehicle being driven at 5 km/h or more |
- |
Vehicle Speed Signal
OK:
The Techstream display changes correctly in response to the vehicle condition.
| OK | |
GO TO METER / GAUGE SYSTEM (HOW TO PROCEED WITH TROUBLESHOOTING) |
|
CHECK HARNESS AND CONNECTOR (CERTIFICATION ECU (SMART KEY ECU ASSEMBLY) - COMBINATION METER ASSEMBLY)
(a) Disconnect the G16 combination meter assembly connector.
(b) Disconnect the G40 certification ECU (smart key ECU assembly) connector.
(c) Disconnect the G3 radio and display receiver assembly connector.
(d) Disconnect the G9 DCM (telematics transceiver) connector.
(e) Disconnect the G13 navigation ECU connector.*1
(f) Disconnect the A39 brake actuator assembly connector.
(g) Disconnect the G8 stereo component amplifier assembly connector.*2
(h) Disconnect the G38 vehicle approaching speaker controller connector.
- *1: w/ Navigation System
- *2: for 14 Speakers
(i) Measure the resistance according to the value(s) in the table below.
Standard Resistance:
Tester Connection | Condition | Specified Condition |
|---|---|---|
G40-19 (SPD) - G16-6 (+S) |
Always |
Below 1 Ω |
G40-19 (SPD) or G16-6 (+S) - Other terminals and body ground |
Always |
10 kΩ or higher |
| NG | |
REPAIR OR REPLACE HARNESS OR CONNECTOR |
|
CHECK CERTIFICATION ECU (SMART KEY ECU ASSEMBLY)
(a) Connect the G40 certification ECU (smart key ECU assembly) connector.
(b) Connect the G16 combination meter assembly connector.
(c) Using an oscilloscope, check the waveform.
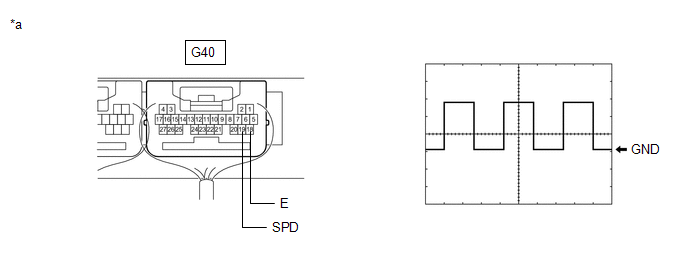
*a |
Component with harness connected (Certification ECU (Smart Key ECU Assembly)) |
- |
- |
Tester Connection | Condition | Tool Setting | Specified Condition |
|---|---|---|---|
G40-19 (SPD) - G40-18 (E) |
Power switch on (IG), vehicle being driven at approx. 5 km/h |
5 V/DIV., 20 ms./DIV. |
Pulse generation |
HINT:
The wavelength becomes shorter as the vehicle speed increases.
| OK | |
REPLACE CERTIFICATION ECU (SMART KEY ECU ASSEMBLY) |
| NG | |
GO TO METER / GAUGE SYSTEM (Speed Signal Circuit) |
Brake Signal Malfunction (B2284)
DESCRIPTION
This DTC is stored when the brake signal sent via direct line and the brake signal sent via CAN communication do not match.
DTC No. | Detection Item | DTC Detection Condition | Trouble Area | Note |
|---|---|---|---|---|
B2284 |
Brake Signal Malfunction |
The brake signal sent via direct line and the brake signal sent via CAN communication do not match. (1-trip detection logic*) |
|
|
- *: Only detected while a malfunction is present and the power switch is on (IG).
Vehicle Condition when Malfunction Detected | Fail-safe Function when Malfunction Detected |
|---|---|
With the electrical key transmitter sub-assembly in the cabin, even if a hybrid control system start operation is performed, the hybrid control system does not start (the key indicator display is not displayed on the multi-information display). However, the hybrid control system can be started by turning the power switch on (ACC) and then pressing and holding it.
|
- |
DTC No. | Data List and Active Test |
|---|---|
B2284 |
Power Source Control
|
WIRING DIAGRAM
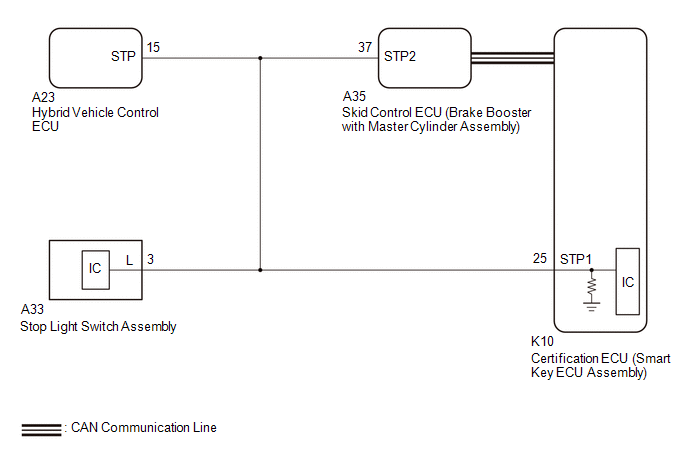
NOTICE:
- When using the Techstream with the power switch off, connect the Techstream to the DLC3 and turn a courtesy light switch on and off at intervals of 1.5 seconds or less until communication between the Techstream and the vehicle begins. Then select the vehicle type under manual mode and enter the following menus: Body Electrical / Smart Key. While using the Techstream, periodically turn a courtesy light switch on and off at intervals of 1.5 seconds or less to maintain communication between the Techstream and the vehicle.
- The smart key system (for Start Function, HV Model) uses the LIN communication system and CAN communication system. Inspect the communication function by following How to Proceed with Troubleshooting. Troubleshoot the smart key system (for Start Function, HV Model) after confirming that the communication systems are functioning properly.
Click here

- Inspect the fuses of circuits related to this system before performing the following procedure.
- Before replacing the certification ECU (smart key ECU assembly), refer to Registration.
Click here
- After repair, confirm that no DTCs are output by performing "DTC Output Confirmation Operation".
PROCEDURE
READ VALUE USING TECHSTREAM (STOP LIGHT SWITCH1)
(a) Connect the Techstream to the DLC3.
(b) Turn the power switch on (IG).
(c) Turn the Techstream on.
(d) Enter the following menus: Body Electrical / Power Source Control / Data List.
(e) Read the Data List according to the display on the Techstream.
Body Electrical > Power Source Control > Data ListTester Display | Measurement Item | Range | Normal Condition | Diagnostic Note |
|---|---|---|---|---|
Stop Light Switch1 |
State of brake pedal |
OFF or ON |
OFF: Brake pedal released ON: Brake pedal depressed |
|
Stop Light Switch1
OK:
The Techstream display changes correctly in response to the brake pedal operation.
| OK |  |
GO TO ELECTRONICALLY CONTROLLED BRAKE SYSTEM (HOW TO PROCEED WITH TROUBLESHOOTING) |
|

CHECK HARNESS AND CONNECTOR (CERTIFICATION ECU (SMART KEY ECU ASSEMBLY) - STOP LIGHT SWITCH ASSEMBLY)
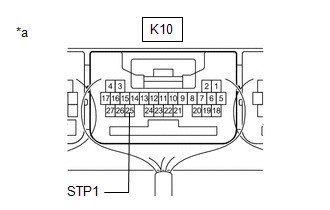
(a) Disconnect the K10 certification ECU (smart key ECU assembly) connector.
(b) Disconnect the A33 stop light switch assembly connector.
(c) Disconnect the A35 skid control ECU (brake booster with master cylinder assembly) connector.
(d) Disconnect the A23 hybrid vehicle control ECU connector.
(e) Measure the resistance according to the value(s) in the table below.
Standard Resistance:
Tester Connection | Condition | Specified Condition |
|---|---|---|
K10-25 (STP1) - A33-3 (L) |
Always |
Below 1 Ω |
| NG | |
REPAIR OR REPLACE HARNESS OR CONNECTOR |
|
CHECK CERTIFICATION ECU (SMART KEY ECU ASSEMBLY)
(a) Connect the K10 certification ECU (smart key ECU assembly) connector.
(b) Connect the A33 stop light switch assembly connector.
(c) Measure the voltage according to the value(s) in the table below. Standard Voltage:
|
|
| OK | |
REPLACE CERTIFICATION ECU (SMART KEY ECU ASSEMBLY) |
| NG | |
REPLACE STOP LIGHT SWITCH ASSEMBLY |