Instrument Panel Safety Pad
Components
COMPONENTS
ILLUSTRATION
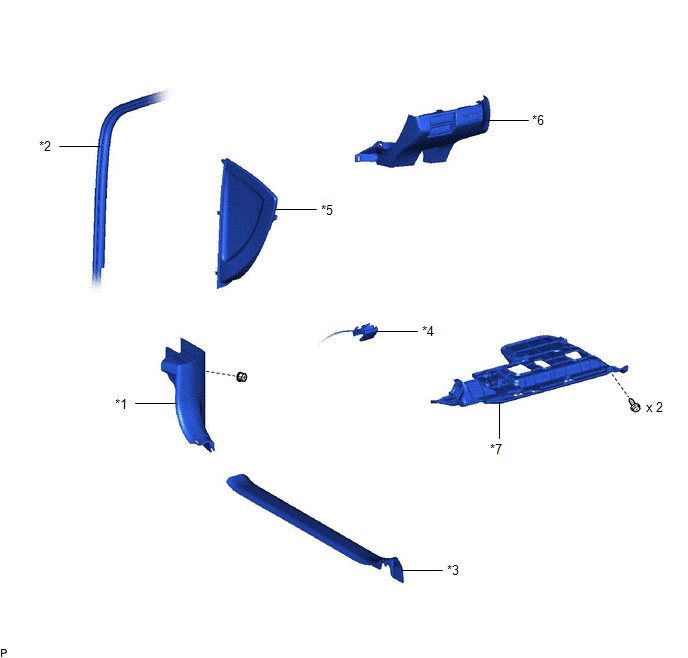
*1 |
COWL SIDE TRIM SUB-ASSEMBLY LH |
*2 |
FRONT DOOR OPENING TRIM WEATHERSTRIP LH |
*3 |
FRONT DOOR SCUFF PLATE LH |
*4 |
HOOD LOCK CONTROL LEVER SUB-ASSEMBLY |
*5 |
INSTRUMENT SIDE PANEL LH |
*6 |
NO. 1 INSTRUMENT PANEL SUB-ASSEMBLY |
*7 |
NO. 1 INSTRUMENT PANEL UNDER COVER SUB-ASSEMBLY |
- |
- |
ILLUSTRATION
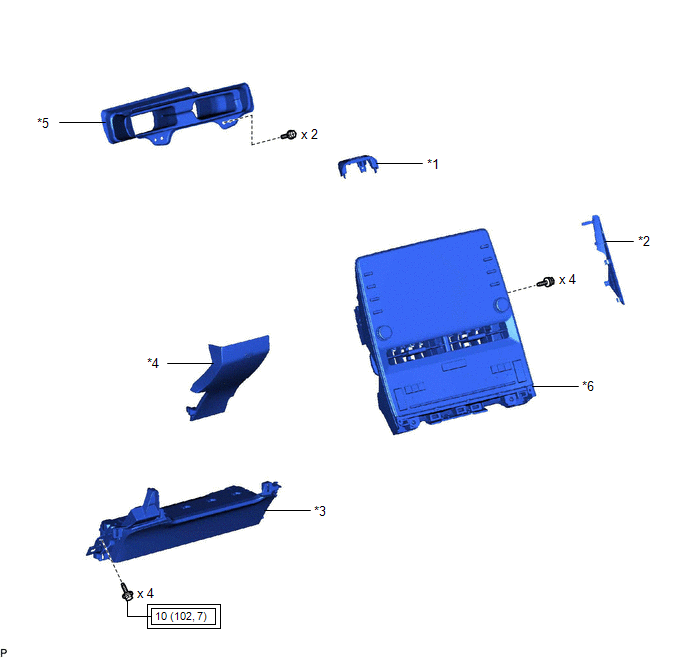
*1 |
CENTER NO. 1 INSTRUMENT CLUSTER FINISH PANEL |
*2 |
CENTER NO. 2 INSTRUMENT CLUSTER FINISH PANEL |
*3 |
LOWER NO. 1 INSTRUMENT PANEL AIRBAG ASSEMBLY |
*4 |
LOWER NO. 2 INSTRUMENT PANEL FINISH PANEL |
*5 |
NO. 2 HEATER TO REGISTER DUCT SUB-ASSEMBLY |
*6 |
RADIO AND DISPLAY RECEIVER ASSEMBLY WITH BRACKET |
 |
Tightening torque for "Major areas involving basic vehicle performance such as moving/turning/stopping": N*m (kgf*cm, ft.*lbf) |
- |
- |
ILLUSTRATION
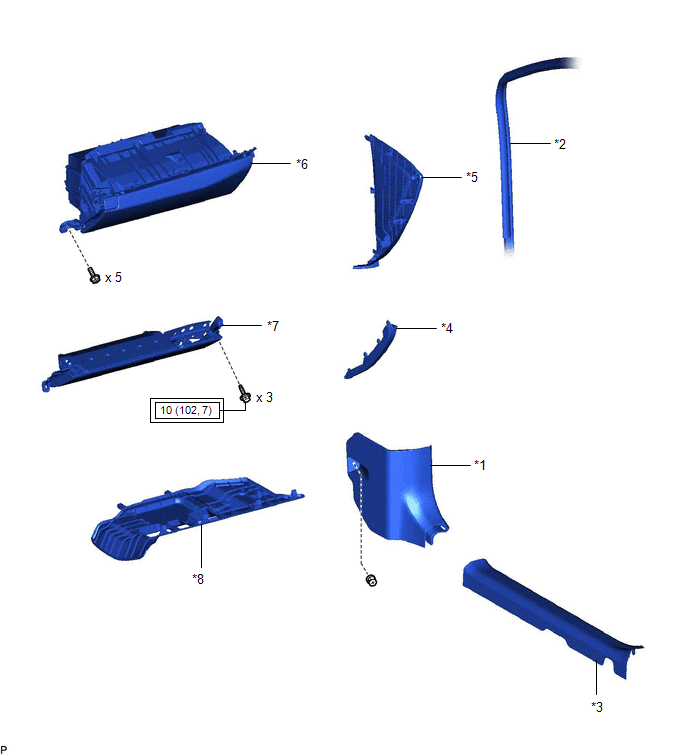
*1 |
COWL SIDE TRIM SUB-ASSEMBLY RH |
*2 |
FRONT DOOR OPENING TRIM WEATHERSTRIP RH |
*3 |
FRONT DOOR SCUFF PLATE RH |
*4 |
GLOVE COMPARTMENT PLATE |
*5 |
INSTRUMENT SIDE PANEL RH |
*6 |
LOWER INSTRUMENT PANEL SUB-ASSEMBLY |
*7 |
LOWER NO. 2 INSTRUMENT PANEL AIRBAG ASSEMBLY |
*8 |
NO. 2 INSTRUMENT PANEL UNDER COVER SUB-ASSEMBLY |
|
Tightening torque for "Major areas involving basic vehicle performance such as moving/turning/stopping": N*m (kgf*cm, ft.*lbf) |
- |
- |
ILLUSTRATION
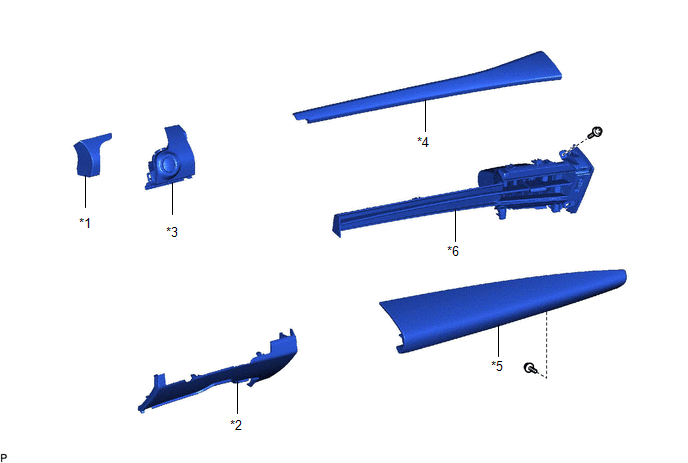
*1 |
INSTRUMENT CLUSTER FINISH PANEL GARNISH ASSEMBLY |
*2 |
LOWER CENTER INSTRUMENT PANEL FINISH PANEL |
*3 |
LOWER INSTRUMENT PANEL FINISH PANEL ASSEMBLY |
*4 |
NO. 2 INSTRUMENT CLUSTER FINISH PANEL GARNISH |
*5 |
NO. 2 INSTRUMENT PANEL GARNISH SUB-ASSEMBLY |
*6 |
NO. 4 INSTRUMENT PANEL REGISTER ASSEMBLY |
ILLUSTRATION
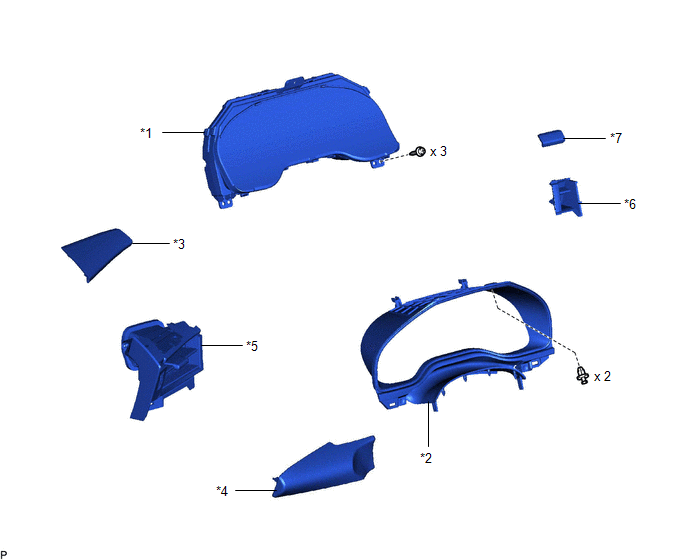
*1 |
COMBINATION METER ASSEMBLY |
*2 |
INSTRUMENT CLUSTER FINISH PANEL SUB-ASSEMBLY |
*3 |
NO. 1 INSTRUMENT CLUSTER FINISH PANEL GARNISH |
*4 |
NO. 1 INSTRUMENT PANEL GARNISH SUB-ASSEMBLY |
*5 |
NO. 1 INSTRUMENT PANEL REGISTER ASSEMBLY |
*6 |
NO. 2 INSTRUMENT CLUSTER MOULDING |
*7 |
NO. 3 INSTRUMENT CLUSTER FINISH PANEL GARNISH |
- |
- |
ILLUSTRATION
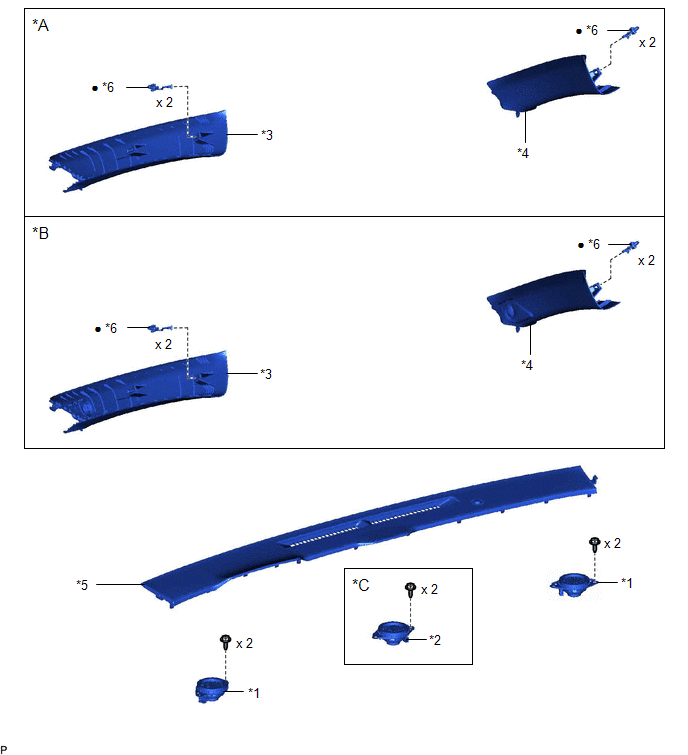
*A |
w/o Front No. 3 Speaker |
*B |
w/ Front No. 3 Speaker |
*C |
for 14 Speakers |
- |
- |
*1 |
FRONT NO. 2 SPEAKER ASSEMBLY |
*2 |
FRONT NO. 4 SPEAKER ASSEMBLY |
*3 |
FRONT PILLAR GARNISH LH |
*4 |
FRONT PILLAR GARNISH RH |
*5 |
NO. 1 DEFROSTER NOZZLE GARNISH |
*6 |
FRONT PILLAR GARNISH CLIP |
● |
Non-reusable part |
- |
- |
ILLUSTRATION
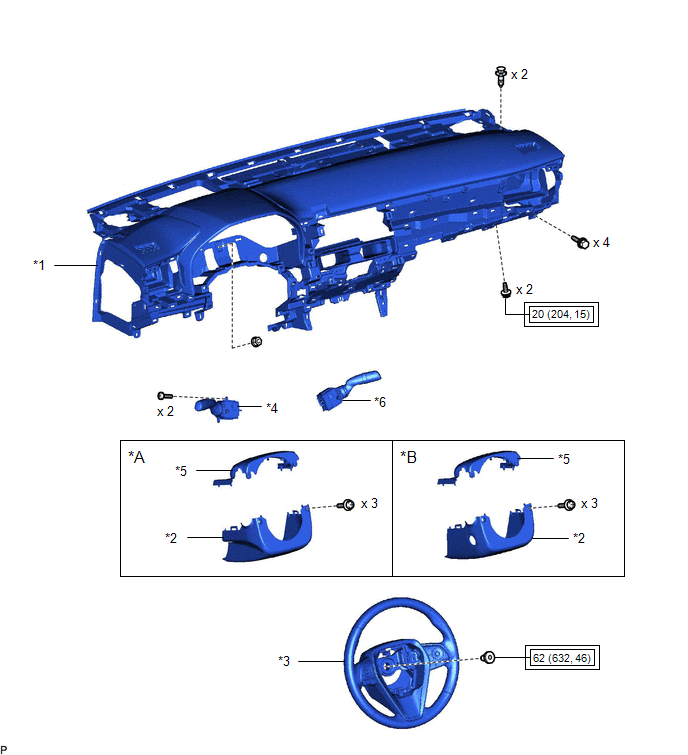
*A |
for Manual Tilt and Manual Telescopic Steering Column |
*B |
for Power Tilt and Power Telescopic Steering Column |
*1 |
INSTRUMENT PANEL SAFETY PAD SUB-ASSEMBLY |
*2 |
LOWER STEERING COLUMN COVER |
*3 |
STEERING WHEEL ASSEMBLY |
*4 |
TURN SIGNAL SWITCH |
*5 |
UPPER STEERING COLUMN COVER |
*6 |
WINDSHIELD WIPER SWITCH ASSEMBLY |
|
Tightening torque for "Major areas involving basic vehicle performance such as moving/turning/stopping": N*m (kgf*cm, ft.*lbf) |
- |
- |
ILLUSTRATION
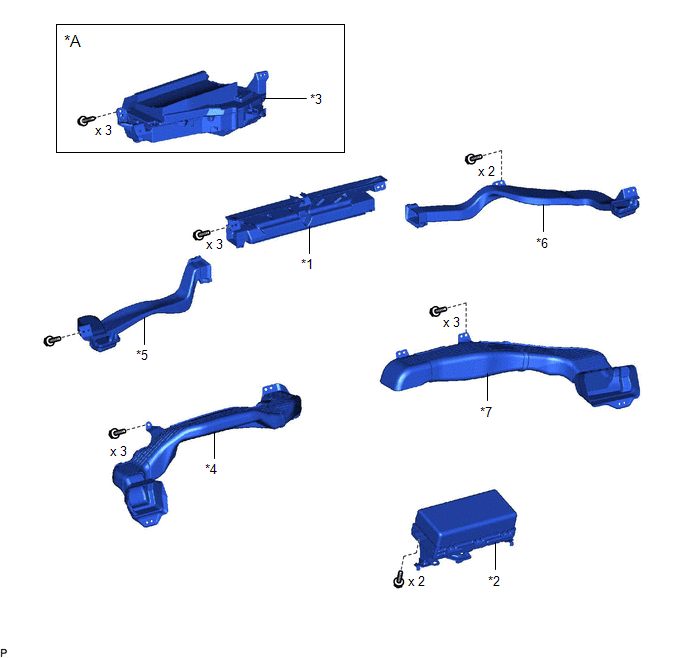
*A |
w/ Headup Display |
- |
- |
*1 |
DEFROSTER NOZZLE ASSEMBLY |
*2 |
INSTRUMENT PANEL PASSENGER AIRBAG ASSEMBLY |
*3 |
METER MIRROR SUB-ASSEMBLY |
*4 |
NO. 1 HEATER TO REGISTER DUCT SUB-ASSEMBLY |
*5 |
NO. 1 SIDE DEFROSTER NOZZLE DUCT |
*6 |
NO. 2 SIDE DEFROSTER NOZZLE DUCT |
*7 |
NO. 3 HEATER TO REGISTER DUCT SUB-ASSEMBLY |
- |
- |
ILLUSTRATION
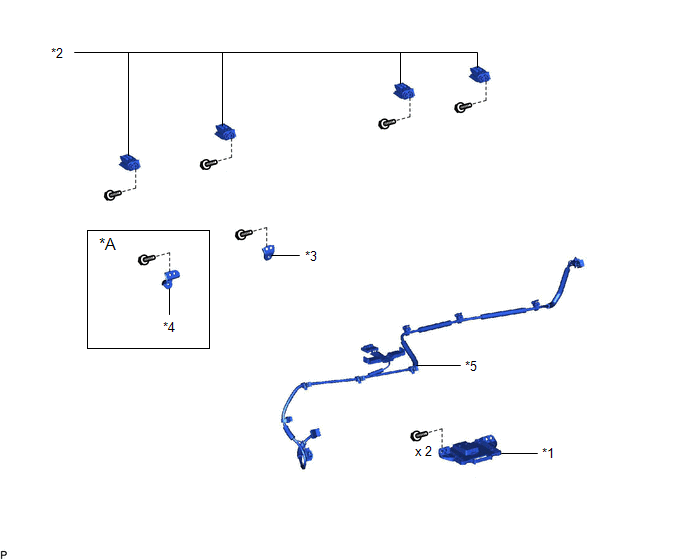
*A |
w/ Headup Display |
- |
- |
*1 |
NAVIGATION ANTENNA ASSEMBLY WITH BRACKET |
*2 |
NO. 1 INSTRUMENT PANEL PIN |
*3 |
NO. 1 METER BRACKET SUB-ASSEMBLY |
*4 |
NO. 2 METER BRACKET SUB-ASSEMBLY |
*5 |
NO. 4 ANTENNA CORD SUB-ASSEMBLY |
- |
- |
ILLUSTRATION
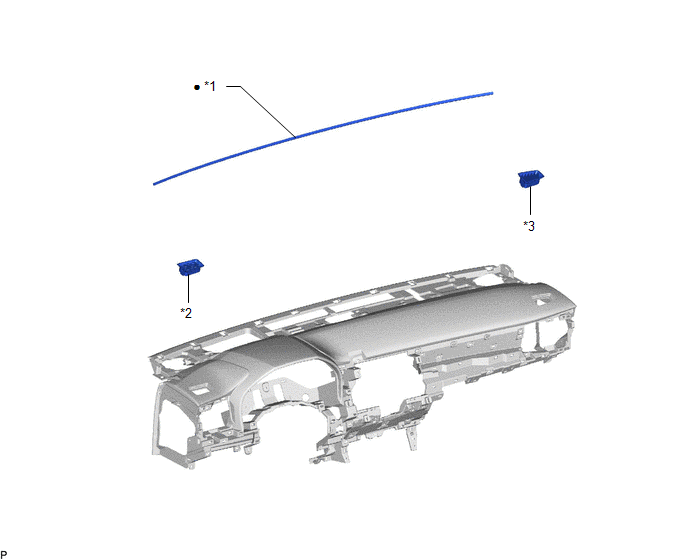
*1 |
INSTRUMENT PANEL CUSHION |
*2 |
NO. 1 SIDE DEFROSTER NOZZLE |
*3 |
NO. 2 SIDE DEFROSTER NOZZLE |
- |
- |
● |
Non-reusable part |
- |
- |
Disassembly
DISASSEMBLY
PROCEDURE
1. REMOVE INSTRUMENT PANEL PASSENGER AIRBAG ASSEMBLY
Click here 
2. REMOVE NO. 1 SIDE DEFROSTER NOZZLE DUCT
(a) Remove the screw <C>. |
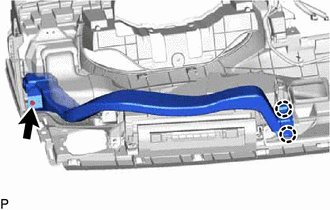 |
(b) Disengage the 2 claws to remove the No. 1 side defroster nozzle duct.
3. REMOVE NO. 2 SIDE DEFROSTER NOZZLE DUCT
(a) Remove the 2 screws <C>. |
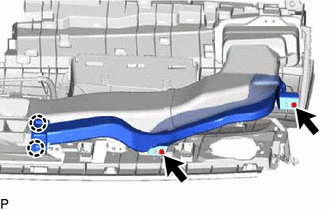 |
(b) Disengage the 2 claws to remove the No. 2 side defroster nozzle duct.
4. REMOVE DEFROSTER NOZZLE ASSEMBLY
(a) Remove the 3 screws <C>. |
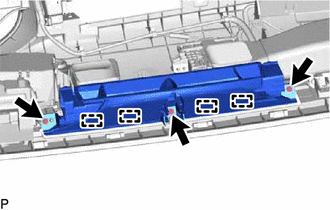 |
(b) Disengage the 4 guides to remove the defroster nozzle assembly.
5. REMOVE METER MIRROR SUB-ASSEMBLY (w/ Headup Display)
Click here
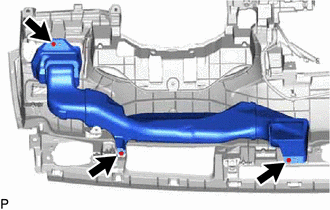
6. REMOVE NO. 1 HEATER TO REGISTER DUCT SUB-ASSEMBLY
(a) Remove the 3 screws <C> and No. 1 heater to register duct sub-assembly. |
 |
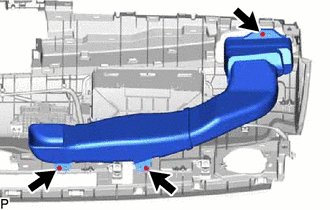
7. REMOVE NO. 3 HEATER TO REGISTER DUCT SUB-ASSEMBLY
(a) Remove the 3 screws <C> and No. 3 heater to register duct sub-assembly. |
 |
8. REMOVE NO. 4 ANTENNA CORD SUB-ASSEMBLY
Click here
9. REMOVE NAVIGATION ANTENNA ASSEMBLY WITH BRACKET
Click here
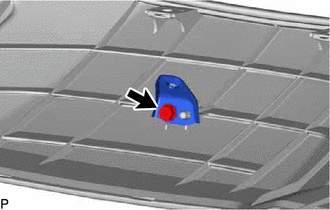
10. REMOVE NO. 1 METER BRACKET SUB-ASSEMBLY
(a) Remove the screw <C> and No. 1 meter bracket sub-assembly. |
 |
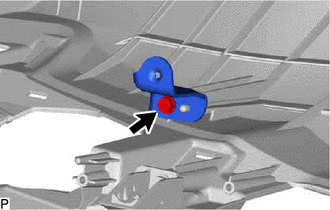
11. REMOVE NO. 2 METER BRACKET SUB-ASSEMBLY (w/ Headup Display)
(a) Remove the screw <C> and No. 2 meter bracket sub-assembly. |
 |
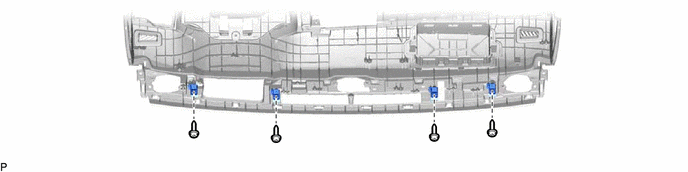
12. REMOVE NO. 1 INSTRUMENT PANEL PIN
(a) Remove the 4 screws <C> and 4 No. 1 instrument panel pins.
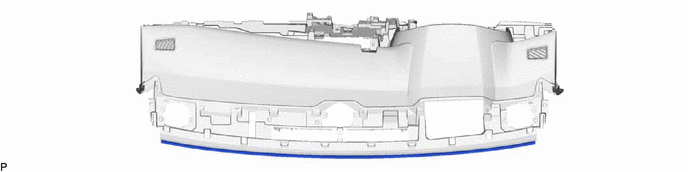
13. REMOVE INSTRUMENT PANEL CUSHION
(a) Remove the instrument panel cushion.
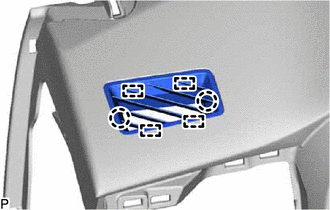
14. REMOVE NO. 1 SIDE DEFROSTER NOZZLE
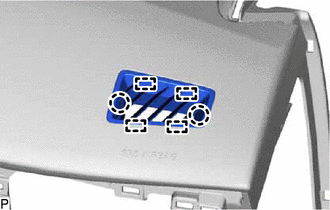
(a) Disengage the 2 claws and 4 guides to remove the No. 1 side defroster nozzle. |
 |
15. REMOVE NO. 2 SIDE DEFROSTER NOZZLE
(a) Disengage the 2 claws and 4 guides to remove the No. 2 side defroster nozzle. |
 |
Installation
INSTALLATION
PROCEDURE
1. INSTALL INSTRUMENT PANEL SAFETY PAD SUB-ASSEMBLY
(a) Engage the 5 guides as shown in the illustration to temporarily install the instrument panel safety pad sub-assembly.
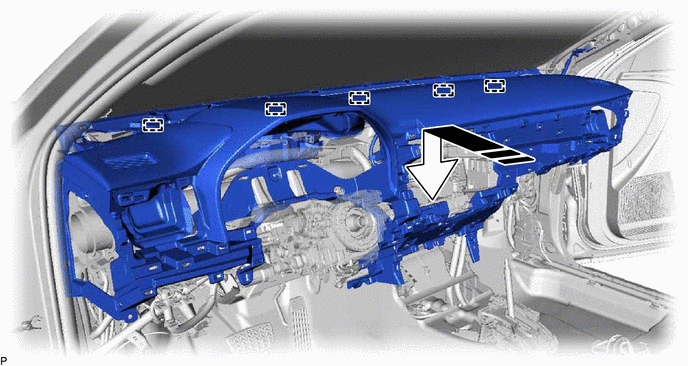
 |
Install in this Direction |
- |
- |
NOTICE:
- Do not damage the instrument panel safety pad sub-assembly.
- Do not allow the wire harnesses to interfere with the surrounding parts.
(b) Install the instrument panel safety pad sub-assembly with the 4 bolts <B>, 2 bolts <A> and nut <E>.
Torque:
Bolt<A> :
20 N·m {204 kgf·cm, 15 ft·lbf}
(c) Install the 2 clips.
(d) Engage each clamp.
(e) Connect each connector.
(f) Engage the 2 claws to connect the cooler (room temp. sensor) thermistor.
2. CONNECT NO. 2 INSTRUMENT PANEL WIRE
Click here 
3. INSTALL TURN SIGNAL SWITCH
Click here
4. INSTALL WINDSHIELD WIPER SWITCH ASSEMBLY
Click here
5. INSTALL UPPER STEERING COLUMN COVER
for Manual Tilt and Manual Telescopic Steering Column: Click here
for Power Tilt and Power Telescopic Steering Column: Click here
6. INSTALL LOWER STEERING COLUMN COVER
for Manual Tilt and Manual Telescopic Steering Column: Click here
for Power Tilt and Power Telescopic Steering Column: Click here
7. ALIGN FRONT WHEELS FACING STRAIGHT AHEAD
8. INSPECT AND ADJUST SPIRAL CABLE WITH SENSOR SUB-ASSEMBLY
Click here
9. INSTALL STEERING WHEEL ASSEMBLY
Click here
10. CHECK STEERING WHEEL CENTER POINT
11. INSTALL HORN BUTTON ASSEMBLY
Click here
12. INSTALL FRONT NO. 2 SPEAKER ASSEMBLY (for RH Side)
Click here
13. INSTALL FRONT NO. 4 SPEAKER ASSEMBLY (for 14 Speakers)
Click here
14. INSTALL FRONT NO. 2 SPEAKER ASSEMBLY (for LH Side)
Click here
15. INSTALL NO. 1 DEFROSTER NOZZLE GARNISH
(a) Connect the connector.
(b) Engage the 9 guides, 9 clips and 2 claws as shown in the illustration to install the No. 1 defroster nozzle garnish.
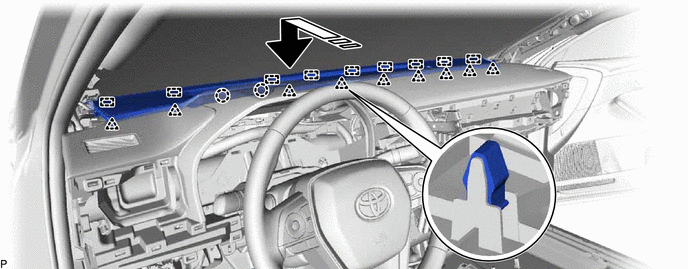
|
Install in this Direction |
- |
- |
16. INSTALL FRONT PILLAR GARNISH RH
HINT:
Use the same procedure as for the LH side.
Click here
17. INSTALL FRONT PILLAR GARNISH LH
Click here
18. INSTALL NO. 2 INSTRUMENT CLUSTER MOULDING
(a) Engage the 2 clips as shown in the illustration to install the No. 2 instrument cluster moulding.
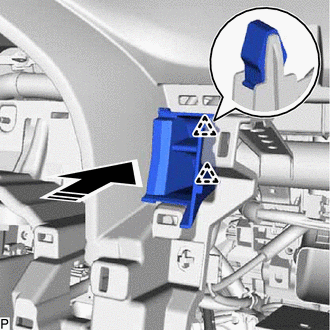
|
Install in this Direction |
19. INSTALL NO. 3 INSTRUMENT CLUSTER FINISH PANEL GARNISH
(a) Engage the 2 clips as shown in the illustration to install the No. 3 instrument cluster finish panel garnish.
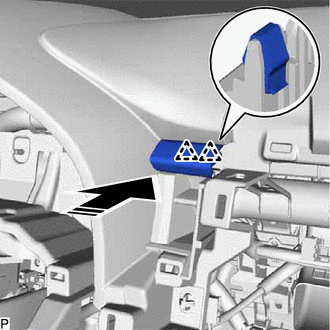
|
Install in this Direction |
20. INSTALL NO. 1 INSTRUMENT PANEL REGISTER ASSEMBLY
(a) Engage the 4 clips as shown in the illustration to install the No. 1 instrument panel register assembly.
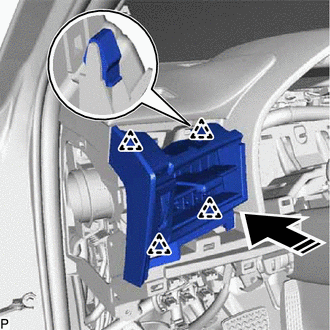
|
Install in this Direction |
21. INSTALL NO. 1 INSTRUMENT CLUSTER FINISH PANEL GARNISH
(a) Engage the 2 guides and 2 clips as shown in the illustration to install the No. 1 instrument cluster finish panel garnish.
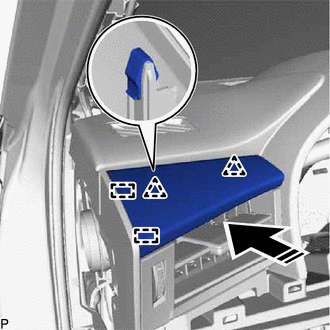
|
Install in this Direction |
22. INSTALL COMBINATION METER ASSEMBLY
Click here
23. INSTALL INSTRUMENT CLUSTER FINISH PANEL SUB-ASSEMBLY
(a) Engage the 2 guides and 2 clips as shown in the illustration.
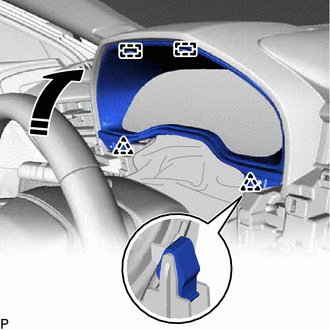
|
Install in this Direction |
(b) Install the 2 clips.
(c) Engage the 2 guides and 4 clips as shown in the illustration to install the instrument cluster finish panel sub-assembly.
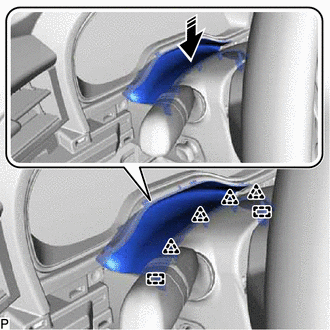
|
Install in this Direction |
24. INSTALL NO. 1 INSTRUMENT PANEL GARNISH SUB-ASSEMBLY
(a) Engage the 5 clips as shown in the illustration to install the No. 1 instrument panel garnish sub-assembly.
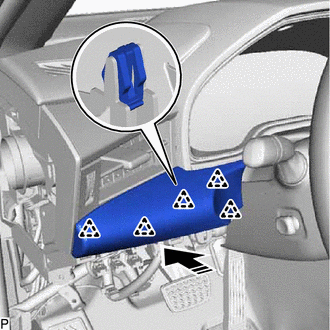
|
Install in this Direction |
25. INSTALL LOWER INSTRUMENT PANEL FINISH PANEL ASSEMBLY
(a) Connect the connector.
(b) Engage the 4 clips as shown in the illustration to install the lower instrument panel finish panel assembly.
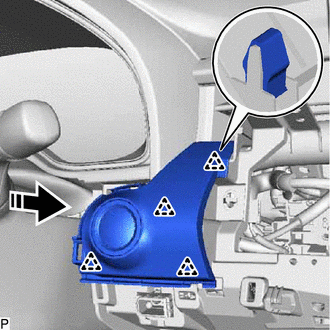
|
Install in this Direction |
26. INSTALL INSTRUMENT CLUSTER FINISH PANEL GARNISH ASSEMBLY
(a) Engage the 2 clips and claw as shown in the illustration to install the instrument cluster finish panel garnish assembly.
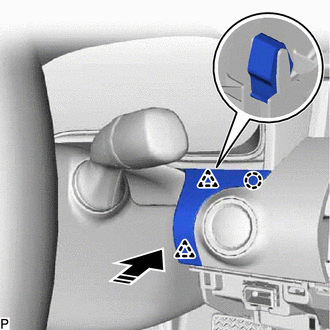
|
Install in this Direction |
27. INSTALL NO. 4 INSTRUMENT PANEL REGISTER ASSEMBLY
(a) Engage the 9 clips as shown in the illustration.
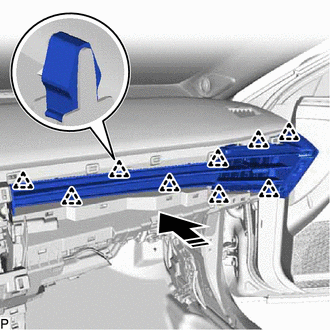
|
Install in this Direction |
(b) Install the No. 4 instrument panel register assembly with the screw <D>.
28. INSTALL NO. 2 INSTRUMENT CLUSTER FINISH PANEL GARNISH
(a) Engage the 2 guides and 5 clips as shown in the illustration to install the No. 2 instrument cluster finish panel garnish.
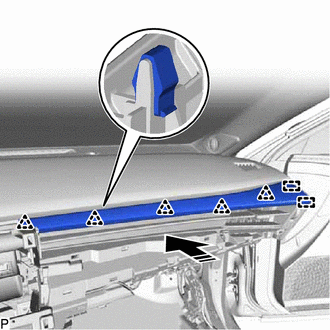
|
Install in this Direction |
29. INSTALL NO. 2 INSTRUMENT PANEL GARNISH SUB-ASSEMBLY
(a) Engage the 10 clips as shown in the illustration.
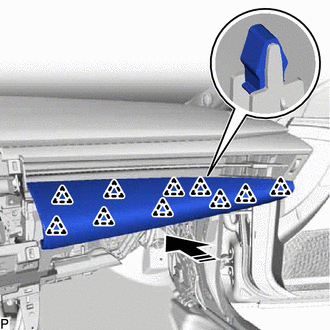
|
Install in this Direction |
(b) Install the No. 2 instrument panel garnish sub-assembly with the screw <D>.
30. INSTALL LOWER CENTER INSTRUMENT PANEL FINISH PANEL
(a) Engage the 8 clips as shown in the illustration to install the lower center instrument panel finish panel.
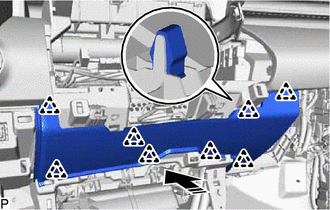
|
Install in this Direction |
31. INSTALL LOWER INSTRUMENT PANEL SUB-ASSEMBLY
(a) Connect the connector and engage the clamp.
(b) Engage the 3 clips as shown in the illustration.
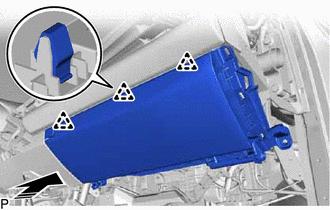
|
Install in this Direction |
(c) Install the lower instrument panel sub-assembly with the 5 screws <C>.
32. INSTALL LOWER NO. 2 INSTRUMENT PANEL AIRBAG ASSEMBLY
Click here
33. INSTALL INSTRUMENT SIDE PANEL RH
(a) Insert the instrument side panel RH in the direction indicated by the arrow (1) shown in the illustration to engage the 3 guides.
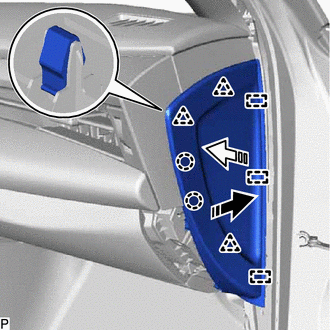
|
Install in this Direction (1) |
 |
Install in this Direction (2) |
(b) Push the instrument side panel RH in the direction indicated by the arrow (2) shown in the illustration to engage the 3 clips and 2 claws and install it.
34. INSTALL FRONT DOOR OPENING TRIM WEATHERSTRIP RH
Click here
35. INSTALL GLOVE COMPARTMENT PLATE
(a) Engage the 4 clips as shown in the illustration to install the glove compartment plate.
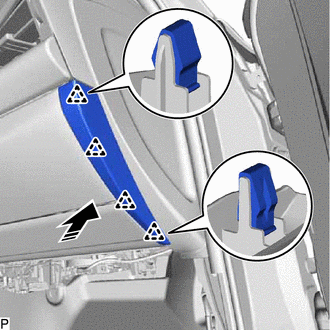
|
Install in this Direction |
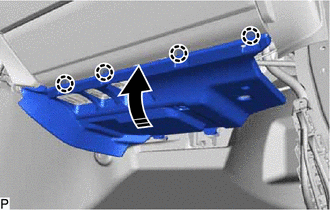
36. INSTALL NO. 2 INSTRUMENT PANEL UNDER COVER SUB-ASSEMBLY
(a) Connect the connector.
(b) Engage the clamp.
(c) Engage the 2 guides as shown in the illustration.
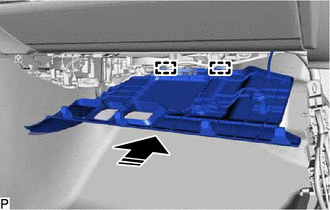
|
Install in this Direction |
(d) Engage the 4 claws as shown in the illustration to install the No. 2 instrument panel under cover sub-assembly.
|
Install in this Direction |
37. INSTALL COWL SIDE TRIM SUB-ASSEMBLY RH
HINT:
Use the same procedure as for the LH side.
Click here
38. INSTALL FRONT DOOR SCUFF PLATE RH
HINT:
Use the same procedure as for the LH side.
Click here
39. INSTALL NO. 2 HEATER TO REGISTER DUCT SUB-ASSEMBLY
(a) Install the No. 2 heater to register duct sub-assembly with the 2 screws <C>.
40. INSTALL RADIO AND DISPLAY RECEIVER ASSEMBLY WITH BRACKET
Click here
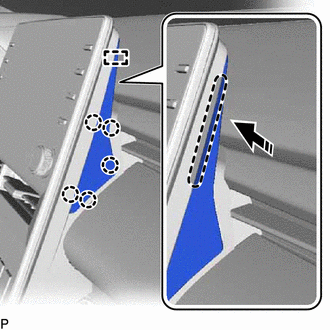
41. INSTALL CENTER NO. 2 INSTRUMENT CLUSTER FINISH PANEL
(a) Engage the guide and 5 claws as shown in the illustration to install the center No. 2 instrument cluster finish panel.
 |
Place Hand Here |
|
Install in this Direction |
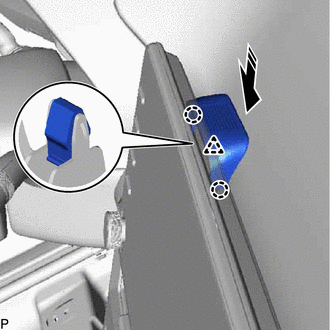
42. INSTALL CENTER NO. 1 INSTRUMENT CLUSTER FINISH PANEL
(a) Engage the clip and 2 claws as shown in the illustration to install the center No. 1 instrument cluster finish panel.
|
Install in this Direction |
43. INSTALL LOWER NO. 1 INSTRUMENT PANEL AIRBAG ASSEMBLY
Click here
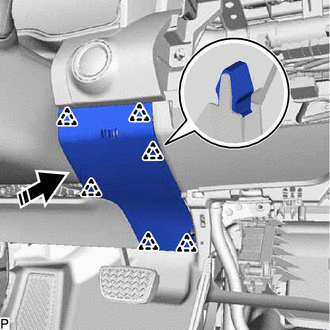
44. INSTALL LOWER NO. 2 INSTRUMENT PANEL FINISH PANEL
(a) Engage the 6 clips as shown in the illustration to install the lower No. 2 instrument panel finish panel.
|
Install in this Direction |
45. INSTALL NO. 1 INSTRUMENT PANEL SUB-ASSEMBLY
(a) Connect each connector.
(b) Engage the clamp.
(c) Engage the 6 clips as shown in the illustration to install the No. 1 instrument panel sub-assembly.
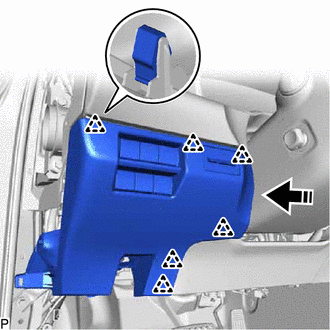
|
Install in this Direction |
46. CONNECT HOOD LOCK CONTROL LEVER SUB-ASSEMBLY
(a) Engage the claw and 2 guides to connect the hood lock control lever sub-assembly.
47. INSTALL NO. 1 INSTRUMENT PANEL UNDER COVER SUB-ASSEMBLY
(a) Connect the connector and engage the 2 clamps.
(b) Engage the 2 claws to install the DLC3 connector.
(c) Engage the 2 guides and 2 claws as shown in the illustration.
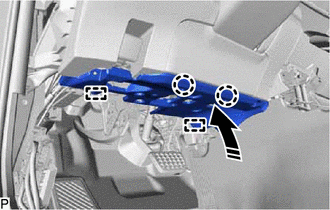
|
Install in this Direction |
(d) Install the No. 1 instrument panel under cover sub-assembly with the 2 screws <C>.
48. INSTALL INSTRUMENT SIDE PANEL LH
(a) Insert the instrument side panel LH in the direction indicated by the arrow (1) shown in the illustration to engage the 3 guides.
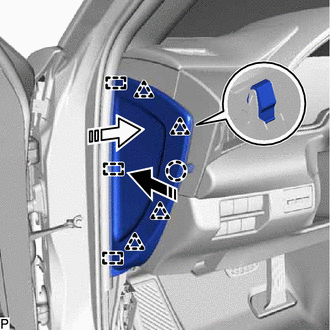
|
Install in this Direction (1) |
|
Install in this Direction (2) |
(b) Push the instrument side panel LH in the direction indicated by the arrow (2) shown in the illustration to engage the 4 clips and claw and install it.
49. INSTALL FRONT DOOR OPENING TRIM WEATHERSTRIP LH
Click here
50. INSTALL COWL SIDE TRIM SUB-ASSEMBLY LH
Click here
51. INSTALL FRONT DOOR SCUFF PLATE LH
Click here
52. INSTALL CONSOLE ASSEMBLY
Click here
Precaution
PRECAUTION
PRECAUTION FOR VEHICLE WITH SRS AIRBAG AND SEAT BELT PRETENSIONER
(a) Some operations in this section may affect the SRS parts. Prior to performing the corresponding operations, read the precautions regarding the SRS parts.
for Gasoline Model: Click here 
for HV Model: Click here
TABLE OF BOLT, SCREW AND NUT
HINT:
All bolts, screws and nuts relevant to installing and removing the instrument panel are shown along with their alphabet codes in the table below.
Code | Shape | Size | Code | Shape | Size |
|---|---|---|---|---|---|
<A> |
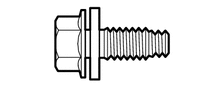 |
Diameter=8 mm (0.315 in.) Length=21 mm (0.827 in.) |
<B> |
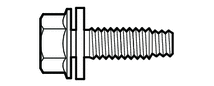 |
Diameter=6 mm (0.236 in.) Length=20 mm (0.787 in.) |
<C> |
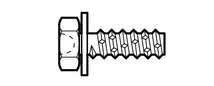 |
Diameter=5 mm (0.197 in.) Length=15 mm (0.591 in.) |
<D> |
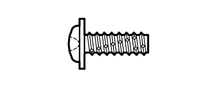 |
Diameter=5 mm (0.197 in.) Length=14 mm (0.551 in.) |
<E> |
 |
Diameter=6 mm (0.236 in.) |
- |
- |
- |
Reassembly
REASSEMBLY
PROCEDURE
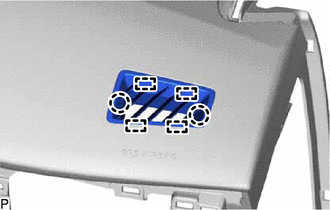
1. INSTALL NO. 2 SIDE DEFROSTER NOZZLE
(a) Engage the 4 guides and 2 claws to install the No. 2 side defroster nozzle. |
 |
2. INSTALL NO. 1 SIDE DEFROSTER NOZZLE
(a) Engage the 4 guides and 2 claws to install the No. 1 side defroster nozzle. |
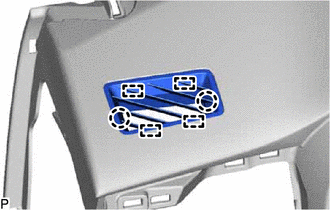 |
3. INSTALL INSTRUMENT PANEL CUSHION
(a) Clean the instrument panel safety pad sub-assembly surface.
(1) Remove any remaining double-sided tape from the instrument panel safety pad sub-assembly.
(2) Wipe off any tape adhesive residue with cleaner.
(b) Remove the release paper from a new instrument panel cushion.
HINT:
After removing the release paper, keep the exposed adhesive free from foreign matter.
(c) Install the instrument panel cushion as shown in the illustration.
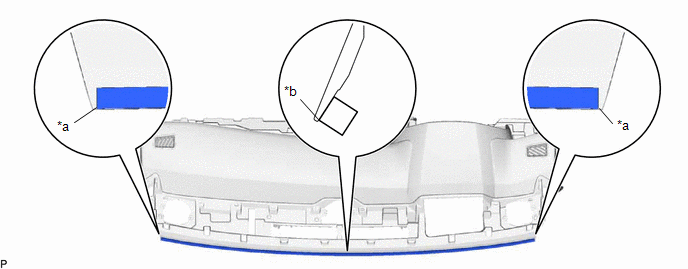
*a |
Edge of Curved Surface |
*b |
Outline |
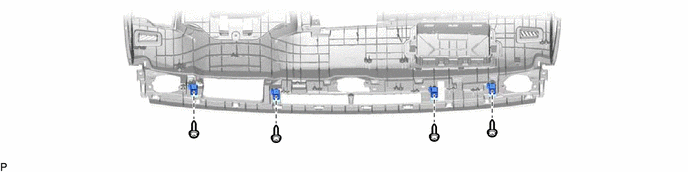
4. INSTALL NO. 1 INSTRUMENT PANEL PIN
(a) Install the 4 No. 1 instrument panel pins with the 4 screws <C>.
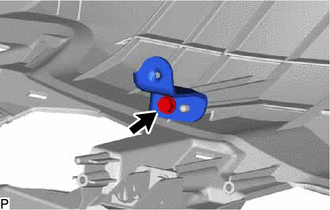
5. INSTALL NO. 2 METER BRACKET SUB-ASSEMBLY (w/ Headup Display)
(a) Install the No. 2 meter bracket sub-assembly with the screw <C>. |
 |
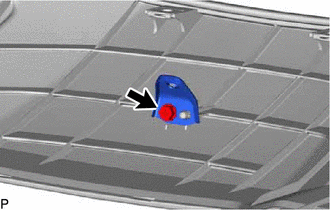
6. INSTALL NO. 1 METER BRACKET SUB-ASSEMBLY
(a) Install the No. 1 meter bracket sub-assembly with the screw <C>. |
 |
7. INSTALL NAVIGATION ANTENNA ASSEMBLY WITH BRACKET
Click here 
8. INSTALL NO. 4 ANTENNA CORD SUB-ASSEMBLY
Click here
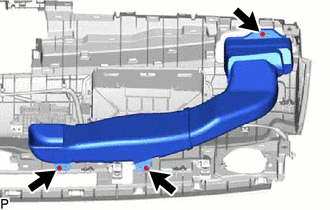
9. INSTALL NO. 3 HEATER TO REGISTER DUCT SUB-ASSEMBLY
(a) Install the No. 3 heater to register duct sub-assembly with the 3 screws <C>. |
 |
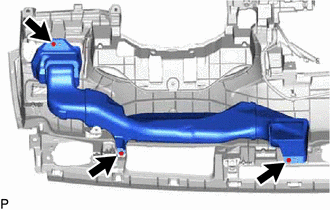
10. INSTALL NO. 1 HEATER TO REGISTER DUCT SUB-ASSEMBLY
(a) Install the No. 1 heater to register duct sub-assembly with the 3 screws <C>. |
 |
11. INSTALL METER MIRROR SUB-ASSEMBLY (w/ Headup Display)
Click here
12. INSTALL DEFROSTER NOZZLE ASSEMBLY
(a) Engage the 4 guides. |
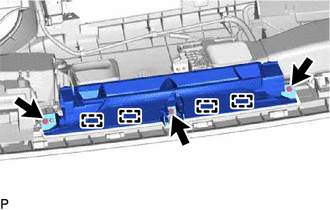 |
(b) Install the defroster nozzle assembly with the 3 screws <C>.
13. INSTALL NO. 2 SIDE DEFROSTER NOZZLE DUCT
(a) Engage the 2 claws. |
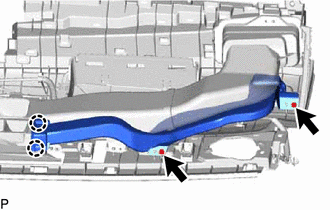 |
(b) Install the No. 2 side defroster nozzle duct with the 2 screws <C>.
14. INSTALL NO. 1 SIDE DEFROSTER NOZZLE DUCT
(a) Engage the 2 claws. |
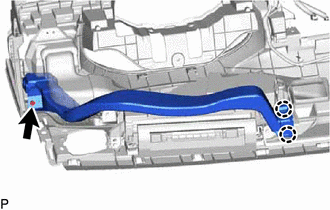 |
(b) Install the No. 1 side defroster nozzle duct with the screw <C>.
15. INSTALL INSTRUMENT PANEL PASSENGER AIRBAG ASSEMBLY
Click here