Seat Heater Switch(for Rear Side)
Components
COMPONENTS
ILLUSTRATION
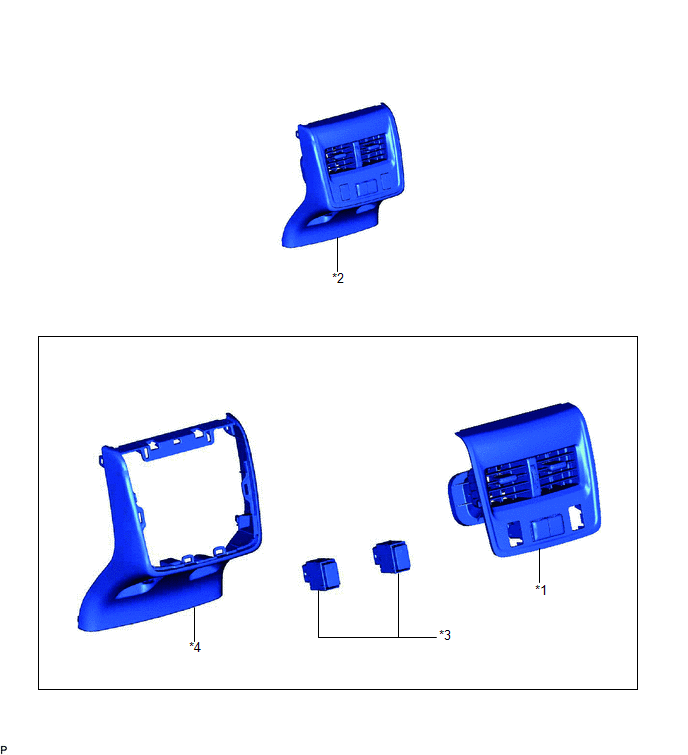
*1 |
CONSOLE BOX ORNAMENT |
*2 |
CONSOLE REAR END PANEL SUB-ASSEMBLY |
*3 |
SEAT HEATER SWITCH |
*4 |
CONSOLE REAR END PANEL |
Inspection
INSPECTION
PROCEDURE
1. INSPECT SEAT HEATER SWITCH
(a) Measure the resistance according to the value(s) in the table below. Standard Resistance:
If the result is not as specified, replace the seat heater switch. |
|
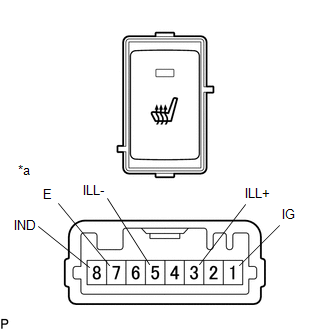
(b) Apply auxiliary battery voltage to the seat heater switch connector, and check that the seat heater switch indicator illuminates.
OK:
Measurement Condition | Switch Condition | Specified Condition |
|---|---|---|
Auxiliary battery positive (+) → 1 (IG) Auxiliary battery positive (-) → 8 (IND) |
Seat heater switch on |
Indicator illuminates |
If the result is not as specified, replace the seat heater switch.
(c) Apply auxiliary battery voltage to the seat heater switch connector, and check that the seat heater switch indicator illuminates.
OK:
Measurement Condition | Specified Condition |
|---|---|
Auxiliary battery positive (+) → 3 (ILL+) Auxiliary battery positive (-) → 5 (ILL-) |
Illuminates |
If the result is not as specified, replace the seat heater switch.
Installation
INSTALLATION
PROCEDURE
1. INSTALL SEAT HEATER SWITCH
(a) Engage the 2 guides and 2 claws to install the seat heater switch to the console box ornament.
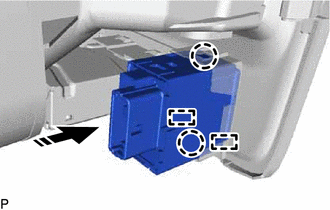
 |
Install in this Direction |
2. INSTALL CONSOLE BOX ORNAMENT
Click here 
3. INSTALL CONSOLE REAR END PANEL SUB-ASSEMBLY
Click here
Removal
REMOVAL
PROCEDURE
1. REMOVE CONSOLE REAR END PANEL SUB-ASSEMBLY
Click here 
2. REMOVE CONSOLE BOX ORNAMENT
Click here
3. REMOVE SEAT HEATER SWITCH
(a) Disengage the 2 claws and 2 guides to remove the seat heater switch from the console box ornament.
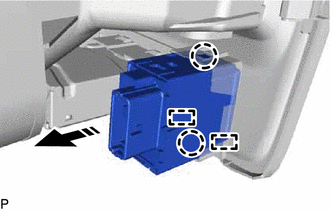
 |
Remove in this Direction |