Parts Location. Precaution. Problem Symptoms Table
Parts Location
PARTS LOCATION
ILLUSTRATION
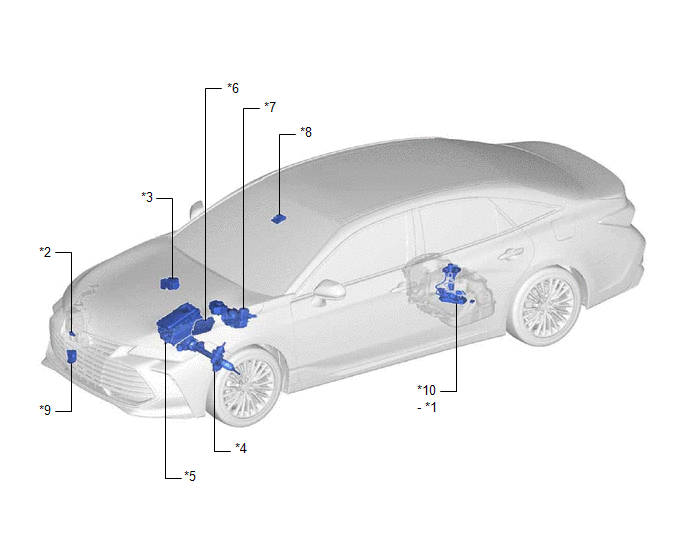
*1 |
FUEL SENDER GAUGE ASSEMBLY |
*2 |
LEVEL WARNING SWITCH ASSEMBLY |
*3 |
PARKING BRAKE ECU (BRAKE ACTUATOR ASSEMBLY) |
*4 |
POWER STEERING ECU (RACK AND PINION POWER STEERING GEAR ASSEMBLY) |
*5 |
INVERTER WITH CONVERTER ASSEMBLY |
*6 |
ECM |
*7 |
SKID CONTROL ECU (BRAKE BOOSTER WITH MASTER CYLINDER ASSEMBLY) |
*8 |
FORWARD RECOGNITION CAMERA |
*9 |
SWING GRILLE ACTUATOR ASSEMBLY |
*10 |
FUEL SUCTION TUBE WITH PUMP AND GAUGE ASSEMBLY |
ILLUSTRATION
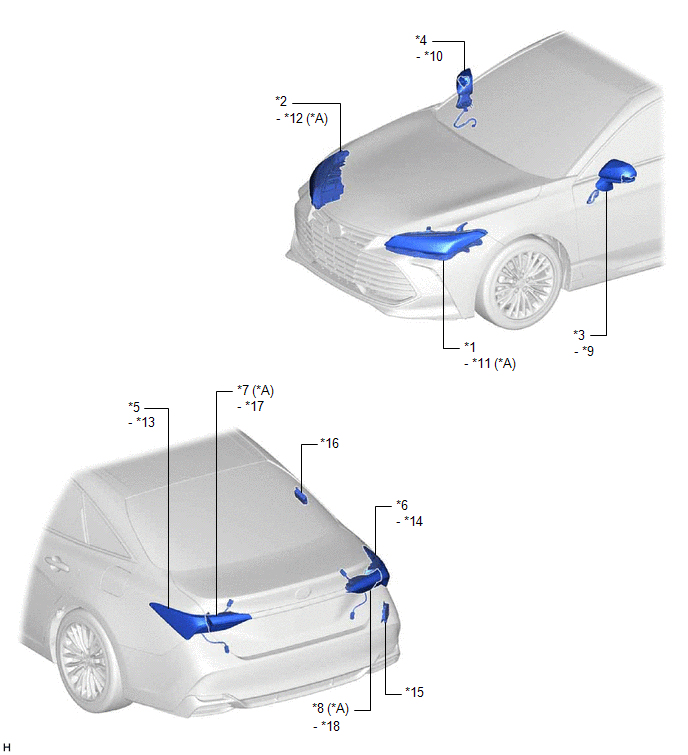
*A |
w/ Cornering Light |
- |
- |
*1 |
HEADLIGHT ASSEMBLY LH |
*2 |
HEADLIGHT ASSEMBLY RH |
*3 |
OUTER REAR VIEW MIRROR SUB-ASSEMBLY LH |
*4 |
OUTER REAR VIEW MIRROR SUB-ASSEMBLY RH |
*5 |
REAR COMBINATION LIGHT ASSEMBLY LH |
*6 |
REAR COMBINATION LIGHT ASSEMBLY RH |
*7 |
REAR LIGHT ASSEMBLY LH |
*8 |
REAR LIGHT ASSEMBLY RH |
*9 |
SIDE TURN SIGNAL LIGHT ASSEMBLY LH |
*10 |
SIDE TURN SIGNAL LIGHT ASSEMBLY RH |
*11 |
HEADLIGHT ECU SUB-ASSEMBLY LH |
*12 |
HEADLIGHT ECU SUB-ASSEMBLY RH |
*13 |
REAR COMBINATION LIGHT SOCKET AND WIRE LH |
*14 |
REAR COMBINATION LIGHT SOCKET AND WIRE RH |
*15 |
BLIND SPOT MONITOR SENSOR RH |
*16 |
ELECTRICAL KEY AND TIRE PRESSURE WARNING ECU AND RECEIVER |
*17 |
REAR LIGHT CORD LH |
*18 |
REAR LIGHT CORD RH |
ILLUSTRATION
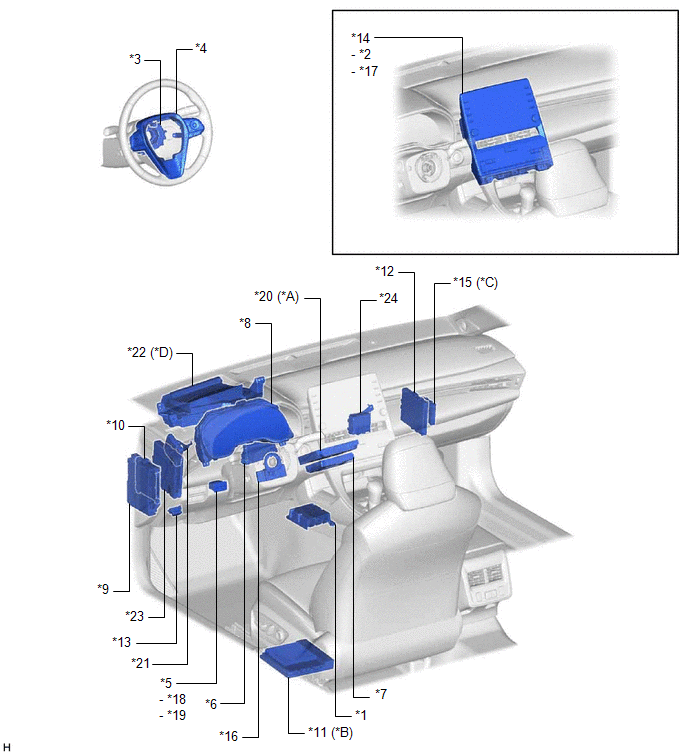
*A |
w/ Navigation System |
*B |
for 14 Speakers |
*C |
w/ Intelligent Clearance Sonar System |
*D |
w/ Headup Display System |
*1 |
AIRBAG ECU ASSEMBLY |
*2 |
HAZARD WARNING SWITCH ASSEMBLY |
*3 |
SPIRAL CABLE SUB-ASSEMBLY |
*4 |
STEERING PAD SWITCH ASSEMBLY |
*5 |
TRIP SWITCH |
*6 |
AIR CONDITIONING AMPLIFIER ASSEMBLY |
*7 |
DCM (TELEMATICS TRANSCEIVER) |
*8 |
COMBINATION METER ASSEMBLY |
*9 |
INSTRUMENT PANEL JUNCTION BLOCK ASSEMBLY - ECU-DCC NO. 2 FUSE - METER-IG2 FUSE - HAZ FUSE |
*10 |
MAIN BODY ECU (MULTIPLEX NETWORK BODY ECU) |
*11 |
STEREO COMPONENT AMPLIFIERASSEMBLY |
*12 |
CERTIFICATION ECU (SMART KEY ECU ASSEMBLY) |
*13 |
DLC3 |
*14 |
RADIO AND DISPLAY RECEIVER ASSEMBLY |
*15 |
CLEARANCE WARNING ECU ASSEMBLY |
*16 |
STEERING SENSOR |
*17 |
REAR SEAT BELT WARNING LIGHT |
*18 |
ODO/TRIP SWITCH |
*19 |
LIGHT CONTROL RHEOSTAT SWITCH |
*20 |
NAVIGATION ECU |
*21 |
DRIVING SUPPORT ECU ASSEMBLY |
*22 |
METER MIRROR SUB-ASSEMBLY |
*23 |
HYBRID VEHICLE CONTROL ECU |
*24 |
VEHICLE APPROACHING SPEAKER CONTROLLER |
ILLUSTRATION
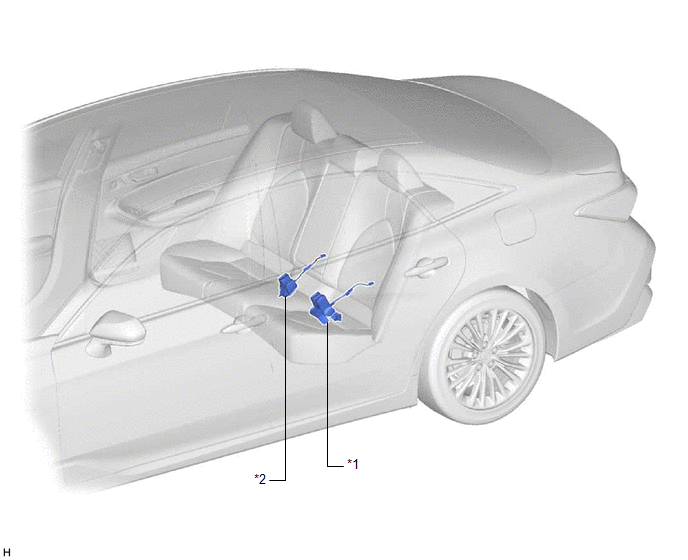
*1 |
REAR SEAT INNER BELT ASSEMBLY LH |
*2 |
REAR SEAT INNER WITH CENTER BELT ASSEMBLY RH |
ILLUSTRATION
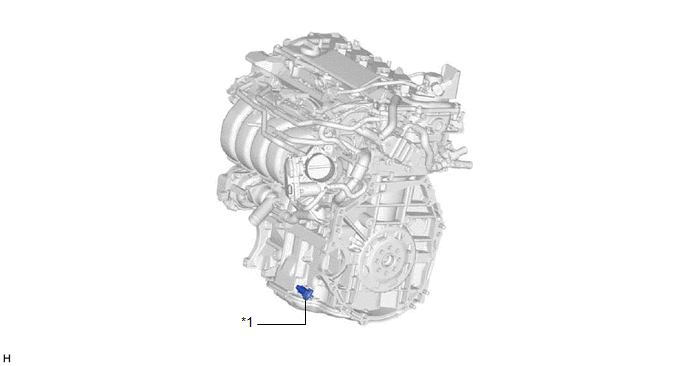
*1 |
ENGINE OIL LEVEL SENSOR |
- |
- |
Precaution
PRECAUTION
NOTICE:
When disconnecting the cable from the negative (-) auxiliary battery terminal, initialize the following systems after the cable is reconnected.
System Name | See Procedure |
|---|---|
Lane Departure Alert System (w/ Steering Control) |
 |
Intelligent Clearance Sonar System |
|
Parking Assist Monitor System |
|
Panoramic View Monitor System |
|
Pre-collision System |
|
Lighting System (for HV Model with Cornering Light) |
PRECAUTION FOR DISCONNECTING CABLE FROM NEGATIVE AUXILIARY BATTERY TERMINAL
PRECAUTION FOR REPLACING COMBINATION METER ASSEMBLY
When replacing the combination meter assembly, always replace it with a new one. If a combination meter assembly which was installed to another vehicle is used, the information stored in it will not match the information from the vehicle and a DTC may be stored.
FUEL RECEIVER GAUGE OPERATION
(a) OPERATION
The combination meter assembly uses the fuel sender gauge assembly to detect the amount of fuel remaining in the fuel tank assembly. The Hall IC built into the fuel sender gauge assembly changes the output voltage according to the amount of fuel remaining. The combination meter assembly receives fuel injection volume signals from the ECM and detects the voltage output from the fuel sender gauge assembly and operates the fuel receiver gauge.
(b) FUEL RECEIVER GAUGE READING
(1) During normal driving:
As the fuel level in the fuel tank assembly changes when driving on a hill or applying the brakes, the fuel receiver gauge reading is updated according to the fuel injection volume during normal driving. However, as the fuel injection volume measurement has a margin of error, the value is indicated after correction by input values from the fuel sender gauge assembly.
(2) During refueling:
The fuel level in the fuel tank assembly rises rapidly when fuel is added. If the averaging process that is used during normal driving is used in this case, the fuel receiver gauge reading cannot be updated promptly. Therefore, when it is judged that fuel is being added to the vehicle based on the changes in the fuel level, output values from the fuel sender gauge assembly is immediately reflected in the fuel receiver gauge reading. This control is called refueling judgment.
(c) REFUELING JUDGMENT CONDITIONS
NOTICE:
Add fuel with the power switch off to ensure safety and to enable refueling judgment so that an appropriate fuel receiver gauge reading will be obtained.
(1) Normal judgment condition (When normal refueling method is used)
With the power switch off, the fuel sender gauge assembly detects a change of 7.0 liters (7.4 US qts, 6.2 Imp. qts) or more in the fuel level.
(2) Other judgment conditions (When other refueling method is used)
Any of the following conditions is met:
- With the vehicle and engine stopped and the power switch on (IG), the fuel sender gauge assembly detects a change of 7.0 liters (7.4 US qts, 6.2 Imp. qts) or more in the fuel level.
- With the vehicle stopped, the power switch is on (IG), the fuel sender gauge assembly detects a change of 15.0 liters (15.9 US qts, 13.2 Imp. qts) or more in the fuel level.
(d) PRECAUTION FOR REFUELING
(1) The fuel sender gauge assembly cannot detect changes in the fuel level within certain ranges (around points E and F). Therefore, even if 7.0 liters (7.4 US qts, 6.2 Imp. qts) or more of fuel is added, refueling judgment may not be performed and the fuel receiver gauge reading may not change when fuel level is within such ranges.
(2) The fuel sender gauge reading takes approximately 25 seconds to rise from point E to F. If the vehicle is driven while the fuel sender gauge reading is rising, the fuel sender gauge reading will stop rising. After the fuel sender gauge reading stops rising, normal fuel sender gauge reading operation begins. The fuel sender gauge reading takes approximately 1 minute per 1 liter (1.1 US qts, 0.9 Imp. qts) to rise while the vehicle is being driven, and takes approximately 8 minutes per 1 liter (1.1 US qts, 0.9 Imp. qts) to rise while the vehicle is stopped.
(e) FORCED RESET OF FUEL RECEIVER GAUGE
When driving at a vehicle speed of 1,8 km/h or more, if the output value from the fuel sender gauge assembly is different from the fuel receiver gauge reading by 15.0 liters (15.9 US qts, 13.2 Imp. qts) or more for approximately 5 minutes, the output value from the fuel sender gauge assembly is immediately reflected in the fuel receiver gauge reading to compensate for a situation when refueling judgment cannot be made.
SERVICE MODE (w/ Toyota Entune Remote Connect)
NOTICE:
- Before servicing, enter service mode to restrain telematics communication functions and prevent the Toyota Entune Remote Connect from being operated while servicing.
- Service mode can be entered by using the Techstream or operating the radio and display receiver assembly.
(a) Service mode
HINT:
To cancel service mode, turn the power switch off and on (IG) to display the service mode screen and cancel service mode.
(1) Service mode (Using the Techstream)
- Connect the Techstream to the DLC3.
- Turn the power switch on (IG).
- Turn the Techstream on.
- Enter the following menus: Body Electrical / Telematics / Trouble Codes.
(2) Service mode (When not using the Techstream)
- Start diagnostic mode.
w/o Navigation System: Click here
w/ Navigation System: Click here
Problem Symptoms Table
PROBLEM SYMPTOMS TABLE
NOTICE:
When replacing the combination meter assembly, always replace it with a new one. If a combination meter assembly which was installed to another vehicle is used, the information stored in it will not match the information from the vehicle and a DTC may be stored.
HINT:
- The following problem symptoms table is based on the assumption that each system related to the combination meter assembly is normal.
- Refer to System Description for details about the communication between the combination meter assembly and each ECU.
Click here

- Use the table below to help determine the cause of problem symptoms. If multiple suspected areas are listed, the potential causes of the symptoms are listed in order of probability in the "Suspected Area" column of the table. Check each symptom by checking the suspected areas in the order they are listed. Replace parts as necessary.
- Inspect the fuses and relays related to this system before inspecting the suspected areas below.
Symptom | Suspected Area | Link |
|---|---|---|
Speedometer malfunction |
Speedometer circuit |
|
Hybrid system indicator malfunction |
Hybrid system indicator circuit |
|
Fuel receiver gauge display malfunction |
Fuel receiver gauge display circuit |
|
Engine coolant temperature receiver gauge malfunction |
Engine coolant temperature receiver gauge circuit |
|
Symptom | Suspected Area | Link |
|---|---|---|
Fuel level warning light malfunction (Fuel receiver gauge is normal) |
Combination meter assembly |
|
Malfunction other than above |
Combination meter assembly |
|
Symptom | Suspected Area | Link |
|---|---|---|
Multi-information display is not displayed |
Combination meter assembly |
|
Digital tachometer malfunction |
Tachometer circuit |
|
Engine Oil Level Low Add or Replace display malfunction |
Engine oil level sensor circuit |
|
Proximity Notification System Malfunction Visit Your Dealer display malfunction |
Vehicle proximity notification system warning display circuit |
|
Close Fuel Lid display malfunction |
Fuel lid opener system operation display circuit |
|
Ready to Refuel display malfunction |
Fuel lid opener system operation display circuit |
|
Please Wait Fuel Door Opening display malfunction |
Fuel lid opener system operation display circuit |
|
Malfunction other than above |
Combination meter assembly |
|
Symptom | Suspected Area | Link |
|---|---|---|
Buzzer malfunction |
Combination meter assembly |
|
Symptom | Suspected Area | Link |
|---|---|---|
Entire combination meter does not operate |
Power source circuit |
|
Operating ODO/TRIP switch (trip switch) does not change odometer/TRIP meter display |
ODO/TRIP switch circuit |
|
Operating steering pad switch does not change multi-information display |
Steering pad switch circuit |
|
Operating light control rheostat does not change light brightness |
Light control rheostat switch circuit |
|
Meter illumination malfunction |
Combination meter assembly |
|
Other systems that use the speed signal do not operate normally |
Speed signal circuit |
|