Vanity Light
Components
COMPONENTS
ILLUSTRATION
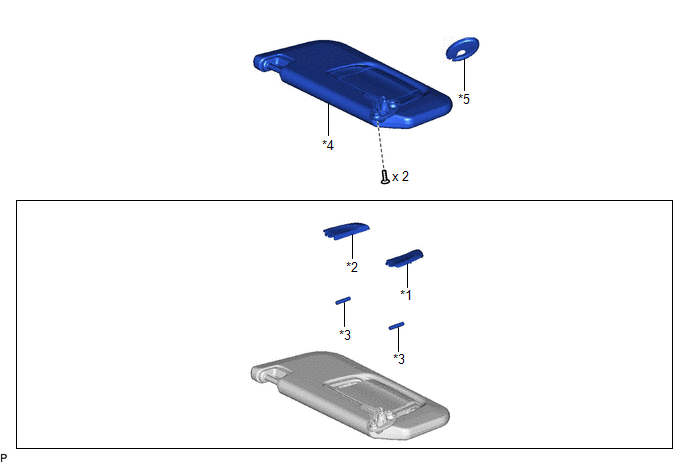
*1 |
FRONT LENS HOLDER LH |
*2 |
FRONT LENS HOLDER RH |
*3 |
VANITY LIGHT BULB |
*4 |
VISOR ASSEMBLY |
*5 |
VISOR BRACKET COVER |
- |
- |
Inspection
INSPECTION
PROCEDURE
1. INSPECT VISOR ASSEMBLY LH
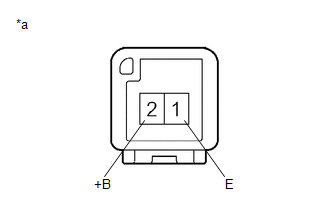
(a) Apply auxiliary battery voltage to the visor assembly LH and check that the lights illuminate. OK:
If the result is not as specified, replace the bulb or visor assembly LH. |
|
2. INSPECT VISOR ASSEMBLY RH
(a) Apply auxiliary battery voltage to the visor assembly RH and check that the lights illuminate. OK:
If the result is not as specified, replace the bulb or visor assembly RH. |
|
Installation
INSTALLATION
HINT:
- Use the same procedure for the RH side and LH side.
- The following procedure is for the LH side.
PROCEDURE
1. INSTALL VANITY LIGHT BULB
(a) Install the 2 vanity light bulbs to the visor assembly.
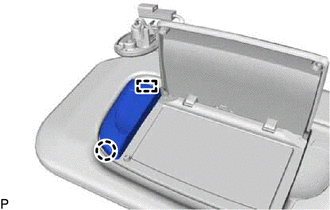
2. INSTALL FRONT LENS HOLDER LH
(a) Engage the guide and claw to install the front lens holder LH. |
 |
3. INSTALL FRONT LENS HOLDER RH
HINT:
Use the same procedure as for the front lens holder LH.
4. INSTALL VISOR ASSEMBLY
Click here 
5. INSTALL VISOR BRACKET COVER
Click here
Removal
REMOVAL
HINT:
- Use the same procedure for the RH side and LH side.
- The following procedure is for the LH side.
PROCEDURE
1. REMOVE VISOR BRACKET COVER
Click here 
2. REMOVE VISOR ASSEMBLY
Click here
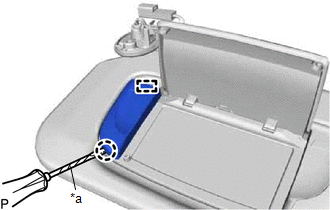
3. REMOVE FRONT LENS HOLDER LH
(a) Using a screwdriver with its tip wrapped with protective tape, disengage the claw and guide to remove the front lens holder LH. |
|
4. REMOVE FRONT LENS HOLDER RH
HINT:
Use the same procedure as for the front lens holder LH.
5. REMOVE VANITY LIGHT BULB
(a) Remove the 2 vanity light bulbs from the visor assembly.