Entire Combination Meter does not Operate. Fuel Lid Opener System Operation Message Display Malfunction. Fuel Receiver Gauge Display Malfunction
Entire Combination Meter does not Operate
DESCRIPTION
This circuit is the power source circuit for the combination meter assembly. This circuit provides two types of power sources; one is a constant power source, and the other is an IG power source.
WIRING DIAGRAM
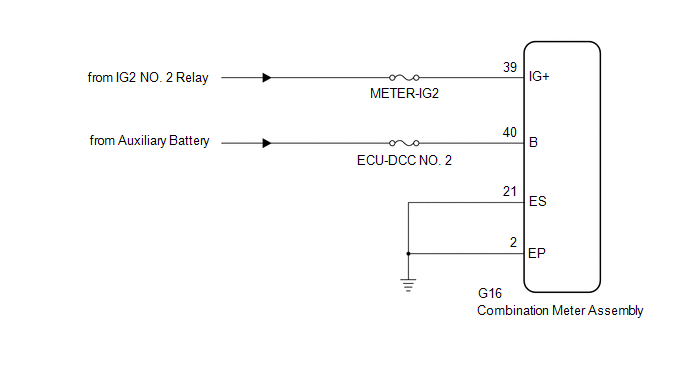
NOTICE:
- When replacing the combination meter assembly, always replace it with a new one. If a combination meter assembly which was installed to another vehicle is used, the information stored in it will not match the information from the vehicle and a DTC may be stored.
- Inspect the fuses of circuits related to this system before performing the following procedure.
PROCEDURE
CHECK HARNESS AND CONNECTOR (POWER SOURCE CIRCUIT)
(a) Disconnect the G16 combination meter assembly connector.
(b) Measure the resistance according to the value(s) in the table below.
Standard Resistance:
Tester Connection | Condition | Specified Condition |
|---|---|---|
G16-21 (ES) - Body ground |
Always |
Below 1 Ω |
G16-2 (EP) - Body ground |
Always |
Below 1 Ω |
(c) Measure the voltage according to the value(s) in the table below.
Standard Voltage:
Tester Connection | Condition | Specified Condition |
|---|---|---|
G16-39 (IG+) - Body ground |
Power switch off |
Below 1 V |
Power switch on (IG) |
11 to 14 V |
|
G16-40 (B) - Body ground |
Power switch off |
11 to 14 V |
| OK |  |
REPLACE COMBINATION METER ASSEMBLY |
| NG | |
REPAIR OR REPLACE HARNESS OR CONNECTOR |
Fuel Lid Opener System Operation Message Display Malfunction
DESCRIPTION
The combination meter assembly and ECM are connected via direct line. The combination meter assembly displays fuel lid opener system operation messages according to the fuel lid signals received from the ECM.
WIRING DIAGRAM
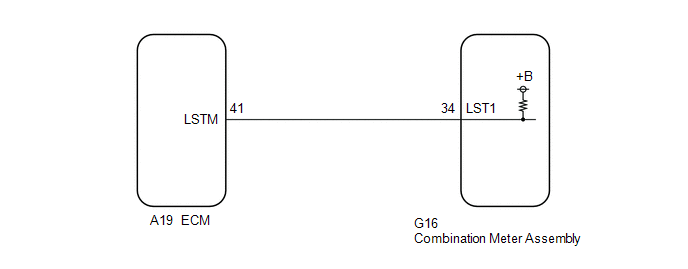
NOTICE:
- When replacing the combination meter assembly, always replace it with a new one. If a combination meter assembly which was installed to another vehicle is used, the information stored in it will not match the information from the vehicle and a DTC may be stored.
- The following troubleshooting procedure is based on the assumption that the SFI system and fuel lid opener system are normal. Confirm that the SFI system and fuel lid opener system are not malfunctioning before performing the following procedure.
SFI system: Click here

Fuel lid opener system: Click here
PROCEDURE
INSPECT COMBINATION METER ASSEMBLY (OUTPUT VOLTAGE)
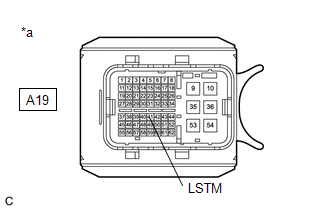
*a |
Front view of wire harness connector (to ECM) |
(a) Disconnect the A19 ECM connector.
(b) Measure the voltage according to the value(s) in the table below.
Standard Voltage:
Tester Connection | Condition | Specified Condition |
|---|---|---|
A19-41 (LSTM) - Body ground |
Always |
11 to 14 V |
| NG |  |
GO TO STEP 3 |
|

INSPECT COMBINATION METER ASSEMBLY (INPUT WAVEFORM)
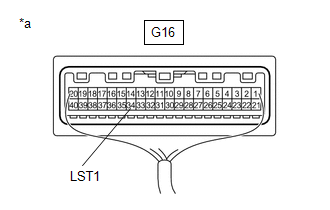
*a |
Component with harness connected (Combination Meter Assembly) |
(a) Connect the A19 ECM connector.
(b) Remove the combination meter assembly with the connector(s) still connected.
(c) Operate the fuel lid opener switch.
(d) Check the signal waveform according to the condition(s) in the table below.
- Waveform 1:
Item
Condition
Tester Connection
G16-34 (LST1) - Body ground
Tool setting
5 V/DIV., 20 ms./DIV.
Condition
"Ready to Refuel" displayed on multi-information display
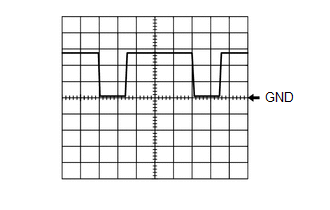
- Waveform 2:
Item
Condition
Tester Connection
G16-34 (LST1) - Body ground
Tool setting
5 V/DIV., 20 ms./DIV.
Condition
"Close Fuel Lid" displayed on multi-information display
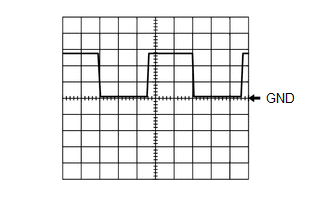
HINT:
This waveform is output when the fuel lid opener switch is operated if the fuel lid is open and any of the following conditions are met:
- The vehicle has been driven for 1 km (0.6 mile) or more at a speed of 50 km/h or more.
- 30 minutes or more have elapsed since the fuel lid opener switch was operated.
OK:
All of the waveforms are output normally.
| OK | |
REPLACE COMBINATION METER ASSEMBLY |
| NG | |
REPLACE ECM |
CHECK HARNESS AND CONNECTOR (ECM - COMBINATION METER ASSEMBLY)
(a) Disconnect the G16 combination meter assembly connector.
(b) Measure the resistance according to the value(s) in the table below.
Standard Resistance:
Tester Connection | Condition | Specified Condition |
|---|---|---|
A19-41 (LSTM) - G16-34 (LST1) |
Always |
Below 1 Ω |
A19-41 (LSTM) or G16-34 (LST1) - Body ground |
Always |
10 kΩ or higher |
| OK | |
REPLACE COMBINATION METER ASSEMBLY |
| NG | |
REPAIR OR REPLACE HARNESS OR CONNECTOR |
Fuel Receiver Gauge Display Malfunction
DESCRIPTION
FUEL RECEIVER GAUGE OPERATION
(a) OPERATION
The combination meter assembly uses the fuel sender gauge assembly to detect the amount of fuel remaining in the fuel tank assembly. The Hall IC built into the fuel sender gauge assembly changes the output voltage according to the amount of fuel remaining. The combination meter assembly receives fuel injection volume signals from the ECM and detects the voltage output from the fuel sender gauge assembly and operates the fuel receiver gauge.
FUEL RECEIVER GAUGE READING
(a) During normal driving:
As the fuel level in the fuel tank assembly changes when driving on a hill or applying the brakes, the fuel receiver gauge reading is updated according to the fuel injection volume during normal driving. However, as the fuel injection volume measurement has a margin of error, the value is indicated after correction by input values from the fuel sender gauge assembly.
(b) During refueling:
The fuel level in the fuel tank assembly rises rapidly when fuel is added. If the averaging process that is used during normal driving is used in this case, the fuel receiver gauge reading cannot be updated promptly. Therefore, when it is judged that fuel is being added to the vehicle based on the changes in the fuel level, output values from the fuel sender gauge assembly is immediately reflected in the fuel receiver gauge reading. This control is called refueling judgment.
NOTICE:
Add fuel with the power switch off to ensure safety and to enable refueling judgment so that an appropriate fuel receiver gauge reading will be obtained.
REFUELING JUDGMENT CONDITIONS
(a) Normal judgment condition (When normal refueling method is used)
With the power switch off, the fuel sender gauge assembly detects a change of 7.0 liters (7.4 US qts, 6.2 Imp. qts) or more in the fuel level.
(b) Other judgment conditions (When other refueling method is used)
Any of the following conditions is met:
- With the vehicle and engine stopped and the power switch on (IG), the fuel sender gauge assembly detects a change of 7.0 liters (7.4 US qts, 6.2 Imp. qts) or more in the fuel level.
- With the vehicle stopped, the power switch is on (IG), the fuel sender gauge assembly detects a change of 15.0 liters (15.9 US qts, 13.2 Imp. qts) or more in the fuel level.
PRECAUTION FOR REFUELING
(a) The fuel sender gauge assembly cannot detect changes in the fuel level within certain ranges (around points E and F). Therefore, even if 7.0 liters (7.4 US qts, 6.2 Imp. qts) or more of fuel is added, refueling judgment may not be performed and the fuel receiver gauge reading may not change when fuel level is within such ranges.
(b) The fuel sender gauge reading takes approximately 25 seconds to rise from point E to F. If the vehicle is driven while the fuel sender gauge reading is rising, the fuel sender gauge reading will stop rising. After the fuel sender gauge reading stops rising, normal fuel sender gauge reading operation begins. The fuel sender gauge reading takes approximately 1 minute per 1 liter (1.1 US qts, 0.9 Imp. qts) to rise while the vehicle is being driven, and takes approximately 8 minutes per 1 liter (1.1 US qts, 0.9 Imp. qts) to rise while the vehicle is stopped.
FORCED RESET OF FUEL RECEIVER GAUGE
When driving at a vehicle speed of 1,8 km/h or more, if the output value from the fuel sender gauge assembly is different from the fuel receiver gauge reading by 15.0 liters (15.9 US qts, 13.2 Imp. qts) or more for approximately 5 minutes, the output value from the fuel sender gauge assembly is immediately reflected in the fuel receiver gauge reading to compensate for a situation when refueling judgment cannot be made.
WIRING DIAGRAM
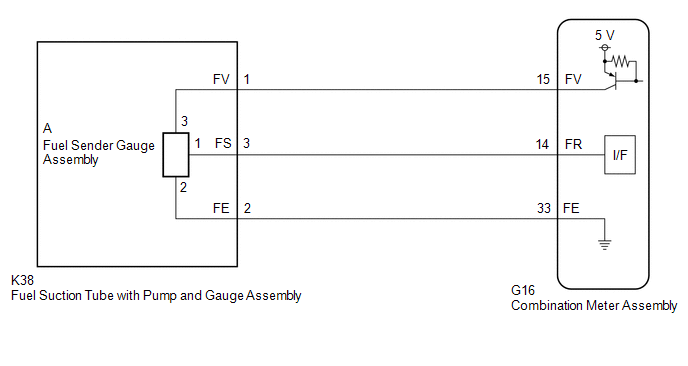
NOTICE:
When replacing the combination meter assembly, always replace it with a new one. If a combination meter assembly which was installed to another vehicle is used, the information stored in it will not match the information from the vehicle and a DTC may be stored.
HINT:
The fuel level warning light will come on when the fuel level is below 6.6 liters (7.0 US qts, 5.8 Imp. qts).
PROCEDURE
CHECK FOR DTC (SFI SYSTEM)
(a) Check if SFI system DTCs are output.
Powertrain > Engine > Trouble CodesResult | Proceed to |
|---|---|
DTCs are not output |
A |
DTCs are output |
B |
| B |  |
GO TO SFI SYSTEM |
|

CHECK FOR DTC (ELECTRONICALLY CONTROLLED BRAKE SYSTEM)
(a) Check if electronically controlled brake system DTCs are output.
Chassis > ABS/VSC/TRAC > Trouble CodesResult | Proceed to |
|---|---|
DTCs are not output |
A |
DTCs are output |
B |
| B | |
GO TO ELECTRONICALLY CONTROLLED BRAKE SYSTEM |
|
CHECK FOR DTC (METER / GAUGE SYSTEM)
(a) Check if meter / gauge system DTCs are output.
Body Electrical > Combination Meter > Trouble CodesResult | Proceed to |
|---|---|
DTC B150013 is not output |
A |
DTC B150013 is output |
B |
| B | |
GO TO B150013 |
|
CHECK SYMPTOMS
(a) Ask the customer about the problem symptoms.
Result | Proceed to |
|---|---|
Malfunction occurs when adding fuel (Even after adding fuel, reading does not increase at all or increases very slowly, etc.) |
A |
Malfunction occurs during normal driving (The reading does not change, decreases quickly or decreases when the vehicle is not being driven, etc.) (The problem symptom recurs) |
B |
Malfunction occurs during normal driving (The reading does not change, decreases quickly or decreases when the vehicle is not being driven, etc.) (The problem symptom does not recur) |
C |
| B | |
GO TO STEP 8 |
| C | |
GO TO STEP 10 |
|
PERFORM ACTIVE TEST USING TECHSTREAM
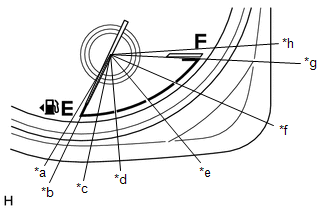
*a |
Fuel Gauge Operation (Sender E) |
*b |
Fuel Gauge Operation (Empty) |
*c |
Fuel Gauge Operation (Warning) |
*d |
Fuel Gauge Operation (1/4) |
*e |
Fuel Gauge Operation (1/2) |
*f |
Fuel Gauge Operation (3/4) |
*g |
Fuel Gauge Operation (Full) |
*h |
Fuel Gauge Operation (Sender F) |
(a) Connect the Techstream to the DLC3.
(b) Turn the power switch on (IG).
(c) Turn the Techstream on.
(d) Enter following menus: Body Electrical / Combination Meter / Active Test.
(e) Perform the Active Test according to the display on the Techstream.
Body Electrical > Combination Meter > Active TestTester Display | Measurement Item | Control Range | Diagnostic Note |
|---|---|---|---|
Fuel Gauge Operation (Sender E) |
Fuel receiver gauge (Sender E) |
ON |
- |
Fuel Gauge Operation (Empty) |
Fuel receiver gauge (Empty) |
ON |
- |
Fuel Gauge Operation (Warning) |
Fuel receiver gauge (Warning) |
ON |
- |
Fuel Gauge Operation (1/4) |
Fuel receiver gauge (1/4) |
ON |
- |
Fuel Gauge Operation (1/2) |
Fuel receiver gauge (1/2) |
ON |
- |
Fuel Gauge Operation (3/4) |
Fuel receiver gauge (3/4) |
ON |
- |
Fuel Gauge Operation (Full) |
Fuel receiver gauge (Full) |
ON |
- |
Fuel Gauge Operation (Sender F) |
Fuel receiver gauge (Sender F) |
ON |
- |
Fuel Gauge Operation (Sender E)
Body Electrical > Combination Meter > Active TestFuel Gauge Operation (Empty)
Body Electrical > Combination Meter > Active TestFuel Gauge Operation (Warning)
Body Electrical > Combination Meter > Active TestFuel Gauge Operation (1/4)
Body Electrical > Combination Meter > Active TestFuel Gauge Operation (1/2)
Body Electrical > Combination Meter > Active TestFuel Gauge Operation (3/4)
Body Electrical > Combination Meter > Active TestFuel Gauge Operation (Full)
Body Electrical > Combination Meter > Active TestFuel Gauge Operation (Sender F)
OK:
Fuel receiver gauge indication is normal.
| NG | |
REPLACE COMBINATION METER ASSEMBLY |
|
CHECK FUEL RECEIVER GAUGE OPERATION BY ADDING FUEL
(a) Record the fuel receiver gauge reading.
(b) If the fuel tank assembly is almost full, drain 20 liters (21.1 US qts, 17.6 Imp. qts) or more of fuel. (This is not necessary when the fuel tank assembly is sufficiently below full.)
(c) Disconnect the cable from the negative (-) auxiliary battery terminal to reset the fuel receiver gauge.
NOTICE:
Make sure that the power switch is off before disconnecting the cable from the negative (-) auxiliary battery terminal.
(d) Connect the cable to the negative (-) auxiliary battery terminal and turn the power switch on (IG).
(e) Check that the fuel receiver gauge has been reset.
(f) Drive the vehicle at 1,8 km/h or more, then move the shift lever to P and turn the power switch off.
(g) Add 7.0 liters (7.4 US qts, 6.2 Imp. qts) or more of fuel, turn the power switch on (IG), and check that the fuel receiver gauge reading increases in proportion to the amount of fuel added.
Result | Proceed to |
|---|---|
Fuel receiver gauge reading increases in proportion to the amount of fuel added |
A |
Fuel receiver gauge reading does not change even when fuel is added |
B |
| B | |
REPLACE COMBINATION METER ASSEMBLY |
|
INSPECT FUEL TANK ASSEMBLY
HINT:
Inspect the fuel tank assembly for deformation, foreign matter or an improperly installed fuel receiver gauge, as this may be the cause of the fuel receiver gauge malfunction.
(a) Visually check the fuel tank assembly for any abnormalities.
(b) Check if there is an excessive amount of foreign matter in the fuel tank assembly.
(c) Check the installation condition of the fuel tank assembly and fuel sender gauge assembly.
Result | Proceed to |
|---|---|
Normal |
A |
Appearance of the fuel tank assembly is abnormal |
B |
There is an excessive amount of foreign matter in the fuel tank assembly |
C |
The fuel tank assembly or fuel sender gauge assembly is not installed correctly |
D |
| A | |
REPLACE COMBINATION METER ASSEMBLY |
| B | |
REPLACE FUEL TANK ASSEMBLY |
| C | |
CLEAN INSIDE OF FUEL TANK ASSEMBLY |
| D | |
INSTALL FUEL TANK ASSEMBLY OR FUEL SENDER GAUGE ASSEMBLY CORRECTLY |
PERFORM ACTIVE TEST USING TECHSTREAM
*a |
Fuel Gauge Operation (Sender E) |
*b |
Fuel Gauge Operation (Empty) |
*c |
Fuel Gauge Operation (Warning) |
*d |
Fuel Gauge Operation (1/4) |
*e |
Fuel Gauge Operation (1/2) |
*f |
Fuel Gauge Operation (3/4) |
*g |
Fuel Gauge Operation (Full) |
*h |
Fuel Gauge Operation (Sender F) |
(a) Connect the Techstream to the DLC3.
(b) Turn the power switch on (IG).
(c) Turn the Techstream on.
(d) Enter following menus: Body Electrical / Combination Meter / Active Test.
(e) Perform the Active Test according to the display on the Techstream.
Body Electrical > Combination Meter > Active TestTester Display | Measurement Item | Control Range | Diagnostic Note |
|---|---|---|---|
Fuel Gauge Operation (Sender E) |
Fuel receiver gauge (Sender E) |
ON |
- |
Fuel Gauge Operation (Empty) |
Fuel receiver gauge (Empty) |
ON |
- |
Fuel Gauge Operation (Warning) |
Fuel receiver gauge (Warning) |
ON |
- |
Fuel Gauge Operation (1/4) |
Fuel receiver gauge (1/4) |
ON |
- |
Fuel Gauge Operation (1/2) |
Fuel receiver gauge (1/2) |
ON |
- |
Fuel Gauge Operation (3/4) |
Fuel receiver gauge (3/4) |
ON |
- |
Fuel Gauge Operation (Full) |
Fuel receiver gauge (Full) |
ON |
- |
Fuel Gauge Operation (Sender F) |
Fuel receiver gauge (Sender F) |
ON |
- |
Fuel Gauge Operation (Sender E)
Body Electrical > Combination Meter > Active TestFuel Gauge Operation (Empty)
Body Electrical > Combination Meter > Active TestFuel Gauge Operation (Warning)
Body Electrical > Combination Meter > Active TestFuel Gauge Operation (1/4)
Body Electrical > Combination Meter > Active TestFuel Gauge Operation (1/2)
Body Electrical > Combination Meter > Active TestFuel Gauge Operation (3/4)
Body Electrical > Combination Meter > Active TestFuel Gauge Operation (Full)
Body Electrical > Combination Meter > Active TestFuel Gauge Operation (Sender F)
OK:
Fuel receiver gauge indication is normal.
| NG | |
REPLACE COMBINATION METER ASSEMBLY |
|
INSPECT FUEL RECEIVER GAUGE
(a) Disconnect the cable from the negative (-) auxiliary battery terminal to reset the fuel receiver gauge.
NOTICE:
Make sure that the power switch is off before disconnecting the cable from the negative (-) auxiliary battery terminal.
(b) Connect the cable to the negative (-) auxiliary battery terminal and turn the power switch on (IG).
(c) Check if the fuel receiver gauge reading corresponds with the amount of fuel remaining in the fuel tank assembly.
Result | Proceed to |
|---|---|
Fuel receiver gauge reading corresponds with the amount of fuel remaining in the fuel tank assembly |
A |
Fuel receiver gauge reading does not correspond with the amount of fuel remaining in the fuel tank assembly |
B |
| A | |
END |
| B | |
REPLACE COMBINATION METER ASSEMBLY |
INSPECT FUEL TANK ASSEMBLY
HINT:
Inspect the fuel tank assembly for deformation, foreign matter or an improperly installed fuel receiver gauge, as this may be the cause of the fuel receiver gauge malfunction.
(a) Visually check the fuel tank assembly for any abnormalities.
(b) Check if there is an excessive amount of foreign matter in the fuel tank assembly.
(c) Check the installation condition of the fuel tank assembly and fuel sender gauge assembly.
Result | Proceed to |
|---|---|
Normal |
A |
Appearance of the fuel tank assembly is abnormal |
B |
There is an excessive amount of foreign matter in the fuel tank assembly |
C |
The fuel tank assembly or fuel sender gauge assembly is not installed correctly |
D |
| A | |
REPLACE COMBINATION METER ASSEMBLY |
| B | |
REPLACE FUEL TANK ASSEMBLY |
| C | |
CLEAN INSIDE OF FUEL TANK ASSEMBLY |
| D | |
INSTALL FUEL TANK ASSEMBLY OR FUEL SENDER GAUGE ASSEMBLY CORRECTLY |