Lumbar Support Adjuster Assembly
Components
COMPONENTS
ILLUSTRATION
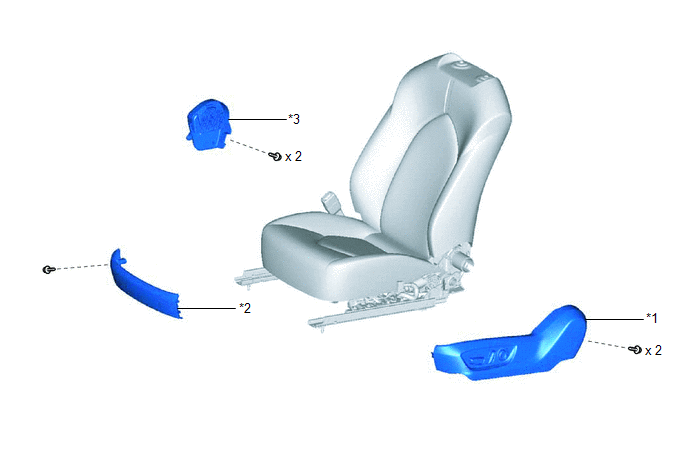
*1 |
FRONT SEAT CUSHION SHIELD |
*2 |
FRONT SEAT FRONT CUSHION SHIELD |
*3 |
FRONT SEAT INNER CUSHION SHIELD |
- |
- |
ILLUSTRATION
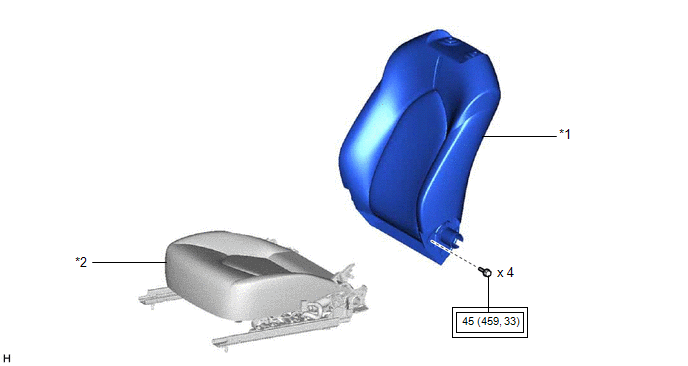
*1 |
SEPARATE TYPE FRONT SEATBACK ASSEMBLY |
*2 |
SEPARATE TYPE FRONT SEAT CUSHION ASSEMBLY |
 |
Tightening torque for "Major areas involving basic vehicle performance such as moving/turning/stopping": N*m (kgf*cm, ft.*lbf) |
- |
- |
ILLUSTRATION
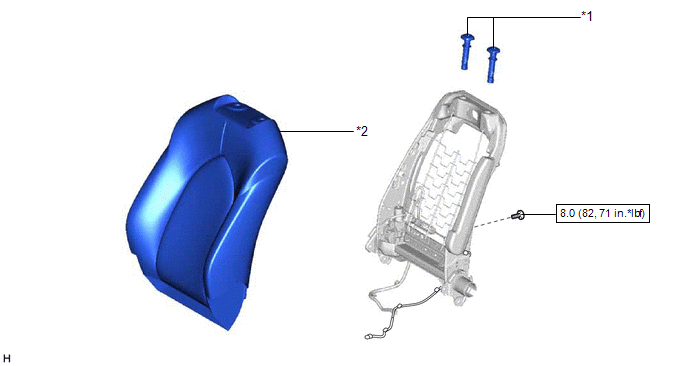
*1 |
FRONT SEAT HEADREST SUPPORT |
*2 |
SEPARATE TYPE FRONT SEATBACK COVER WITH PAD |
 |
N*m (kgf*cm, ft.*lbf): Specified torque |
- |
- |
ILLUSTRATION
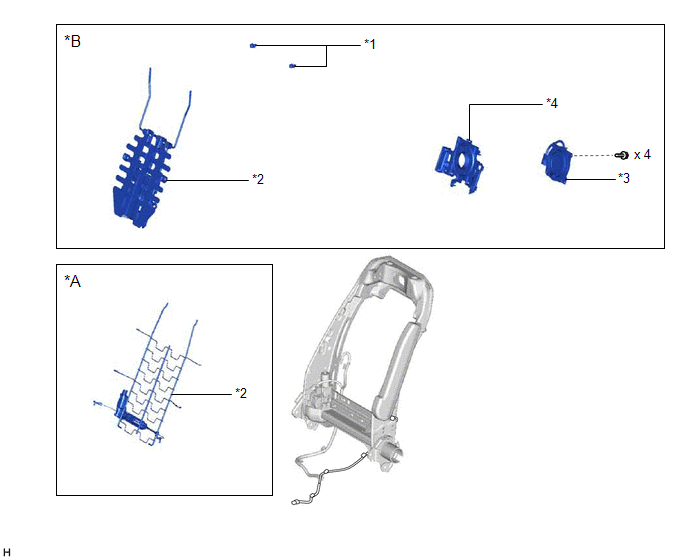
*A |
w/o Climate Control Seat System |
*B |
w/ Climate Control Seat System |
*1 |
FRONT NO. 2 SEATBACK HOOK |
*2 |
LUMBAR SUPPORT ADJUSTER ASSEMBLY |
*3 |
SEATBACK CLIMATE CONTROL BLOWER |
*4 |
SEATBACK BLOWER FAN ADAPTER |
Inspection
INSPECTION
PROCEDURE
1. INSPECT LUMBAR SUPPORT ADJUSTER ASSEMBLY LH
(a) Check the operation of the lumbar support adjuster assembly LH. (w/o Climate Control Seat System) (1) Check that the front seatback moves smoothly when the auxiliary battery is connected to the lumbar support adjuster assembly LH connector terminals. OK:
If the result is not as specified, replace the lumbar support adjuster assembly LH. |
|
(b) Check the operation of the lumbar support adjuster assembly LH. (w/ Climate Control Seat System)
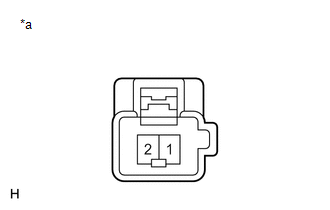
*a |
Component without harness connected (Lumbar Support Adjuster Assembly LH) |
(1) Check that the front seatback moves forward and backward smoothly when the auxiliary battery is connected to the lumbar support adjuster assembly LH connector terminals.
OK:
Auxiliary Battery Connection | Operational Direction |
|---|---|
Auxiliary battery positive (+) → Terminal 2 Auxiliary battery negative (-) → Terminal 1 |
Seatback moves forward |
Auxiliary battery positive (+) → Terminal 1 Auxiliary battery negative (-) → Terminal 2 |
Seatback moves backward |
If the result is not as specified, replace the lumbar support adjuster assembly LH.
(2) Check that the front seatback moves upward and downward smoothly when the auxiliary battery is connected to the lumbar support adjuster assembly LH connector terminals. OK:
If the result is not as specified, replace the lumbar support adjuster assembly LH. |
|
2. INSPECT LUMBAR SUPPORT ADJUSTER ASSEMBLY RH
(a) Check the operation of the lumbar support adjuster assembly.
*a |
Component without harness connected (Lumbar Support Adjuster Assembly RH) |
(1) Check that the front seatback moves forward and backward smoothly when the auxiliary battery is connected to the lumbar support adjuster assembly RH connector terminals.
OK:
Auxiliary Battery Connection | Operational Direction |
|---|---|
Auxiliary battery positive (+) → Terminal 2 Auxiliary battery negative (-) → Terminal 1 |
Seatback moves forward |
Auxiliary battery positive (+) → Terminal 1 Auxiliary battery negative (-) → Terminal 2 |
Seatback moves backward |
If the result is not as specified, replace the lumbar support adjuster assembly RH.
(2) Check that the front seatback moves upward and downward smoothly when the auxiliary battery is connected to the lumbar support adjuster assembly RH connector terminals. OK:
If the result is not as specified, replace the lumbar support adjuster assembly RH. |
|
Installation
INSTALLATION
CAUTION:
Wear protective gloves. Sharp areas on the parts may injure your hands.
HINT:
- Use the same procedure for the RH side and LH side.
- The following procedure is for the LH side.
PROCEDURE
1. INSTALL FRONT NO. 2 SEATBACK HOOK (w/ Climate Control Seat System)
Click here 
2. INSTALL LUMBAR SUPPORT ADJUSTER ASSEMBLY
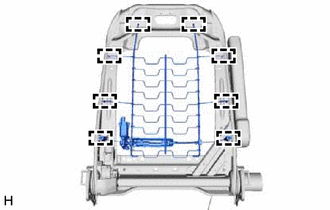
(a) w/o Climate Control Seat System:
(1) Engage the 8 hooks to install the lumbar support adjuster assembly. |
 |
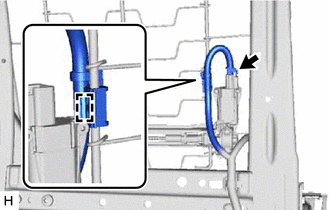
(2) Connect the connector and engage the clamp. HINT: Connect the connector first. |
 |
(b) w/ Climate Control Seat System:
(1) Engage the 2 guides to install the lumbar support adjuster assembly as shown in the illustration.
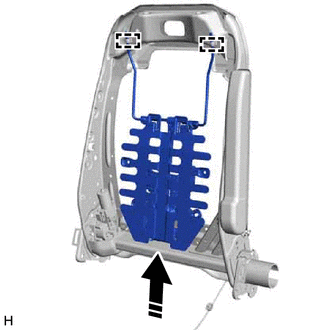
 |
Install in this Direction |
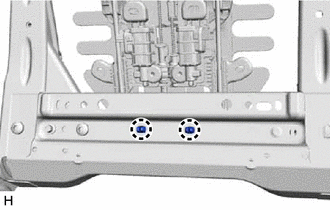
(2) Engage the 2 claws. |
 |
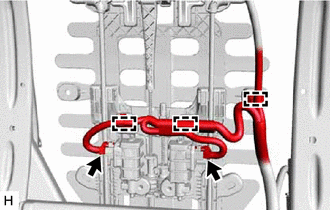
(3) Connect the 2 connectors and engage the 3 clamps. HINT: Connect the 2 connectors first. |
 |
3. INSTALL SEATBACK CLIMATE CONTROL BLOWER (w/ Climate Control Seat System)
Click here
4. INSTALL SEPARATE TYPE FRONT SEATBACK COVER WITH PAD
Click here
5. INSTALL FRONT SEAT HEADREST SUPPORT
Click here
6. INSTALL SEPARATE TYPE FRONT SEATBACK ASSEMBLY
Click here
7. INSTALL FRONT SEAT INNER CUSHION SHIELD
Click here
8. INSTALL FRONT SEAT CUSHION SHIELD
Click here
9. INSTALL FRONT SEAT FRONT CUSHION SHIELD
Click here
10. CONNECT SEPARATE TYPE FRONT SEATBACK COVER
Click here
11. INSTALL FRONT SEAT ASSEMBLY
Click here
Removal
REMOVAL
The necessary procedures (adjustment, calibration, initialization, or registration) that must be performed after parts are removed and installed, or replaced during lumbar support adjuster assembly removal/installation are shown below.
Necessary Procedures After Parts Removed/Installed/Replaced (for Gasoline Model)Replaced Part or Performed Procedure | Necessary Procedure | Effect/Inoperative Function when Necessary Procedure not Performed | Link |
|---|---|---|---|
| *: When performing learning using the Techstream. Click here |
|||
Disconnect cable from negative auxiliary battery terminal |
Perform steering sensor zero point calibration |
Lane departure alert system (w/ Steering Control) |
 |
Pre-collision system |
|||
Intelligent clearance sonar system* |
|||
Lighting system (for Gasoline Model with Cornering Light) |
|||
Memorize steering angle neutral point |
Parking assist monitor system |
|
|
Panoramic view monitor system |
|
||
|
Zero point calibration (Occupant classification system) |
|
|
|
Initialize position control ECU |
Front power seat control system |
|
Replaced Part or Performed Procedure | Necessary Procedure | Effect/Inoperative Function when Necessary Procedure not Performed | Link |
|---|---|---|---|
| *: When performing learning using the Techstream. Click here |
|||
Disconnect cable from negative auxiliary battery terminal |
Perform steering sensor zero point calibration |
Lane departure alert system (w/ Steering Control) |
|
Pre-collision system |
|||
Intelligent clearance sonar system* |
|||
Lighting system (for HV Model with Cornering Light) |
|||
Memorize steering angle neutral point |
Parking assist monitor system |
|
|
Panoramic view monitor system |
|
||
|
Zero point calibration (Occupant classification system) |
|
|
|
Initialize position control ECU |
Front power seat control system |
|
CAUTION:
- Be sure to read Precaution thoroughly before servicing.
for Gasoline Model: Click here
for HV Model: Click here
- Wear protective gloves. Sharp areas on the parts may injure your hands.
HINT:
- Use the same procedure for the RH side and LH side.
- The following procedure is for the LH side.
PROCEDURE
1. REMOVE FRONT SEAT ASSEMBLY
Click here
2. DISCONNECT SEPARATE TYPE FRONT SEATBACK COVER
Click here
3. REMOVE FRONT SEAT FRONT CUSHION SHIELD
Click here
4. REMOVE FRONT SEAT CUSHION SHIELD
Click here
5. REMOVE FRONT SEAT INNER CUSHION SHIELD
Click here
6. REMOVE SEPARATE TYPE FRONT SEATBACK ASSEMBLY
Click here
7. REMOVE FRONT SEAT HEADREST SUPPORT
Click here
8. REMOVE SEPARATE TYPE FRONT SEATBACK COVER WITH PAD
Click here
9. REMOVE SEATBACK CLIMATE CONTROL BLOWER (w/ Climate Control Seat System)
Click here
10. REMOVE LUMBAR SUPPORT ADJUSTER ASSEMBLY
(a) w/o Climate Control Seat System:
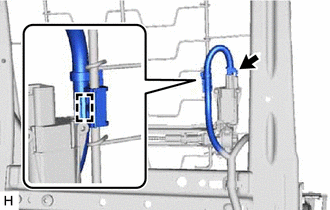
(1) Disengage the clamp and disconnect the connector. HINT: Disengage the clamp first. |
 |
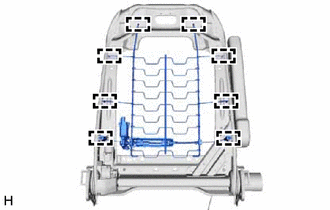
(2) Disengage the 8 hooks to remove the lumbar support adjuster assembly. |
 |
(b) w/ Climate Control Seat System:
(1) Disengage the 3 clamps and disconnect the 2 connectors. HINT: Disengage the 3 clamps first. |
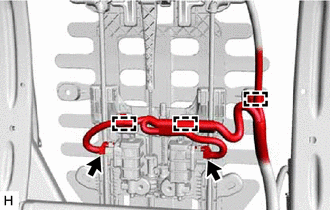 |
(2) Disengage the 2 claws. |
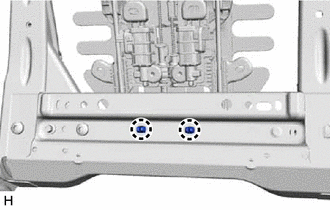 |
(3) Disengage the 2 guides to remove the lumbar support adjuster assembly as shown in the illustration.
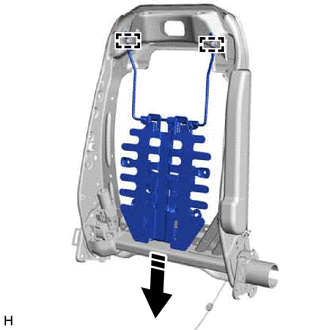
 |
Remove in this Direction |
11. REMOVE FRONT NO. 2 SEATBACK HOOK (w/ Climate Control Seat System)
Click here