Camshaft Position Sensor "A" Bank 1 or Single Sensor No Signal (P034031,P034531). Ignition Coil "A" Circuit Open (P035113-P035613). Camshaft Position Sensor "B" Bank 1 Circuit Short to Ground (P036511
Camshaft Position Sensor "A" Bank 1 or Single Sensor No Signal (P034031,P034531)
DESCRIPTION
Refer to DTC P034011.
Click here 
DTC No. | Detection Item | DTC Detection Condition | Trouble Area | MIL | Memory | Note |
|---|---|---|---|---|---|---|
P034031 |
Camshaft Position Sensor "A" Bank 1 or Single Sensor No Signal |
A missing VVT sensor (for intake camshaft of bank 1) signal despite the crankshaft position sensor inputs being normal at an engine speed of 600 rpm or higher (1 trip detection logic). |
|
Comes on |
DTC stored |
SAE Code: P0340 |
P034531 |
Camshaft Position Sensor "A" Bank 2 No Signal |
A missing VVT sensor (for intake camshaft of bank 2) signal despite the crankshaft position sensor inputs being normal at an engine speed of 600 rpm or higher (1 trip detection logic). |
|
Comes on |
DTC stored |
SAE Code: P0345 |
Reference: Inspection using an oscilloscope.
Click here
MONITOR DESCRIPTION
If no pulse signal is transmitted by the VVT sensor (for intake camshaft) despite the camshaft rotating the ECM interprets this as a malfunction of the sensor.
MONITOR STRATEGY
Related DTCs |
P0340: VVT sensor (bank 1) verify pulse input P0345: VVT sensor (bank 2) verify pulse input |
Required Sensors/Components (Main) |
VVT sensor (for intake camshaft) |
Required Sensors/Components (Related) |
Crankshaft position sensor |
Frequency of Operation |
Continuous |
Duration |
5 seconds |
MIL Operation |
Immediate |
Sequence of Operation |
None |
TYPICAL ENABLING CONDITIONS
P0340: VVT Sensor (Bank 1) Verify Pulse InputAll of the following conditions are met |
- |
Engine speed |
600 rpm or higher |
Battery voltage |
8 V or higher |
Engine switch |
On (IG) |
VVT sensor voltage |
0.3 to 4.7 V |
VVT sensor range check fail (P0342, P0343) |
Not detected |
All of the following conditions are met |
- |
Engine speed |
600 rpm or higher |
Battery voltage |
8 V or higher |
Engine switch |
On (IG) |
VVT sensor voltage |
0.3 to 4.7 V |
VVT sensor range check fail (P0347, P0348) |
Not detected |
TYPICAL MALFUNCTION THRESHOLDS
VVT sensor signal |
No signal |
CONFIRMATION DRIVING PATTERN
HINT:
- After repair has been completed, clear the DTC and then check that the vehicle has returned to normal by performing the following All Readiness check procedure.
Click here
- When clearing the permanent DTCs, refer to the "CLEAR PERMANENT DTC" procedure.
Click here
- Connect the Techstream to the DLC3.
- Turn the engine switch on (IG).
- Turn the Techstream on.
- Clear the DTCs (even if no DTCs are stored, perform the clear DTC procedure).
- Turn the engine switch off and wait for at least 30 seconds.
- Start the engine [A].
- Idle the engine for 10 seconds or more [B].
- Turn the Techstream on.
- Enter the following menus: Powertrain / Engine / Trouble Codes [C].
- Read the pending DTCs.
HINT:
- If a pending DTC is output, the system is malfunctioning.
- If a pending DTC is not output, perform the following procedure.
- Enter the following menus: Powertrain / Engine / Utility / All Readiness.
- Input the DTC: P034031 or P034531.
- Check the DTC judgment result.
Techstream Display
Description
NORMAL
- DTC judgment completed
- System normal
ABNORMAL
- DTC judgment completed
- System abnormal
INCOMPLETE
- DTC judgment not completed
- Perform driving pattern after confirming DTC enabling conditions
HINT:
- If the judgment result is NORMAL, the system is normal.
- If the judgment result is ABNORMAL, the system is malfunctioning.
- If the judgment result is INCOMPLETE, perform steps [B] through [C] again.
- [A] to [C]: Normal judgment procedure.
The normal judgment procedure is used to complete DTC judgment and also used when clearing permanent DTCs.
- When clearing the permanent DTCs, do not disconnect the cable from the battery terminal or attempt to clear the DTCs during this procedure, as doing so will clear the universal trip and normal judgment histories.
WIRING DIAGRAM
Refer to DTC P034011.
Click here
HINT:
- If no problem is found through this diagnostic troubleshooting procedure, there may be a mechanical problem with the engine.
- Read Freeze Frame Data using the Techstream. The ECM records vehicle and driving condition information as Freeze Frame Data the moment a DTC is stored. When troubleshooting, Freeze Frame Data can help determine if the vehicle was moving or stationary, if the engine was warmed up or not, if the air fuel ratio was lean or rich, and other data from the time the malfunction occurred.
PROCEDURE
CHECK HARNESS AND CONNECTOR
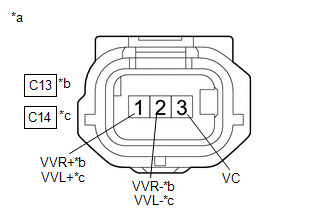
*a |
Front view of wire harness connector (to VVT Sensor (for Intake Camshaft)) |
*b |
Bank 1 |
*c |
Bank 2 |
HINT:
Make sure that the connector is properly connected. If it is not, securely connect it and check for DTCs again.
(a) Disconnect the VVT sensor (for intake camshaft) connector.
(b) Turn the engine switch on (IG).
(c) Measure the voltage according to the value(s) in the table below.
Standard Voltage:
Tester Connection | Condition | Specified Condition |
|---|---|---|
C13-3 (VC) - Body ground |
Engine switch on (IG) |
4.5 to 5.5 V |
C14-3 (VC) - Body ground |
Engine switch on (IG) |
4.5 to 5.5 V |
C13-1 (VVR+) - Body ground |
Engine switch on (IG) |
3.0 to 5.0 V |
C14-1 (VVL+) - Body ground |
Engine switch on (IG) |
3.0 to 5.0 V |
(d) Turn the engine switch off and wait for at least 30 seconds.
(e) Measure the resistance according to the value(s) in the table below.
Standard Resistance:
Tester Connection | Condition | Specified Condition |
|---|---|---|
C13-3 (VC) - C13-1 (VVR+) |
Engine switch off |
1.425 to 1.575 kΩ |
C14-3 (VC) - C14-1 (VVL+) |
Engine switch off |
1.425 to 1.575 kΩ |
C13-2 (VVR-) - Body ground |
Always |
Below 1 Ω |
C14-2 (VVL-) - Body ground |
Always |
Below 1 Ω |
| NG |  |
GO TO STEP 4 |
|

CHECK SENSOR INSTALLATION AND CONDUCT VISUAL INSPECTION (VVT SENSOR (FOR INTAKE CAMSHAFT))
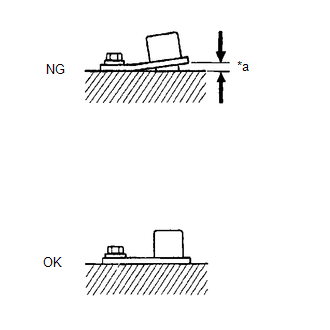
*a |
Clearance |
(a) Visually check the VVT sensor (for intake camshaft) for damage.
(b) Check the VVT sensor (for intake camshaft) installation condition.
OK:
The VVT sensor (for intake camshaft) does not have any damage and is installed properly.
| NG | |
SECURELY REINSTALL VVT SENSOR (FOR INTAKE CAMSHAFT) |
|
INSPECT INTAKE CAMSHAFT (TIMING ROTOR)
(a) Check the timing rotor of the intake camshaft.
OK:
Camshaft timing rotor does not have any cracks or deformation.
HINT:
Perform "Inspection After Repair" after replacing the intake camshaft.
Click here
| OK | |
REPLACE VVT SENSOR (FOR INTAKE CAMSHAFT) |
| NG | |
REPLACE INTAKE CAMSHAFT |
CHECK HARNESS AND CONNECTOR (VVT SENSOR (FOR INTAKE CAMSHAFT) - ECM)
(a) Disconnect the VVT sensor (for intake camshaft) connector.
(b) Disconnect the ECM connector.
(c) Measure the resistance according to the value(s) in the table below.
Standard Resistance:
Tester Connection | Condition | Specified Condition |
|---|---|---|
C13-1 (VVR+) - C56-132 (VV1+) |
Always |
Below 1 Ω |
C13-2 (VVR-) - C56-100 (VV1-) |
Always |
Below 1 Ω |
C13-3 (VC) - C56-99 (VCV1) |
Always |
Below 1 Ω |
C14-1 (VVL+) - C56-129 (VV2+) |
Always |
Below 1 Ω |
C14-2 (VVL-) - C56-97 (VV2-) |
Always |
Below 1 Ω |
C14-3 (VC) - C56-98 (VCV2) |
Always |
Below 1 Ω |
C13-1 (VVR+) or C56-132 (VV1+) - Body ground and other terminals |
Always |
10 kΩ or higher |
C13-2 (VVR-) or C56-100 (VV1-) - Body ground and other terminals |
Always |
10 kΩ or higher |
C13-3 (VC) or C56-99 (VCV1) - Body ground and other terminals |
Always |
10 kΩ or higher |
C14-1 (VVL+) or C56-129 (VV2+) - Body ground and other terminals |
Always |
10 kΩ or higher |
C14-2 (VVL-) or C56-97 (VV2-) - Body ground and other terminals |
Always |
10 kΩ or higher |
C14-3 (VC) or C56-98 (VCV2) - Body ground and other terminals |
Always |
10 kΩ or higher |
| OK | |
REPLACE ECM |
| NG | |
REPAIR OR REPLACE HARNESS OR CONNECTOR |
Ignition Coil "A" Circuit Open (P035113-P035613)
DESCRIPTION
HINT:
- These DTCs indicate malfunctions relating to the primary circuit.
- If DTC P035113 is output, check the No. 1 ignition coil assembly circuit.
- If DTC P035213 is output, check the No. 2 ignition coil assembly circuit.
- If DTC P035313 is output, check the No. 3 ignition coil assembly circuit.
- If DTC P035413 is output, check the No. 4 ignition coil assembly circuit.
- If DTC P035513 is output, check the No. 5 ignition coil assembly circuit.
- If DTC P035613 is output, check the No. 6 ignition coil assembly circuit.
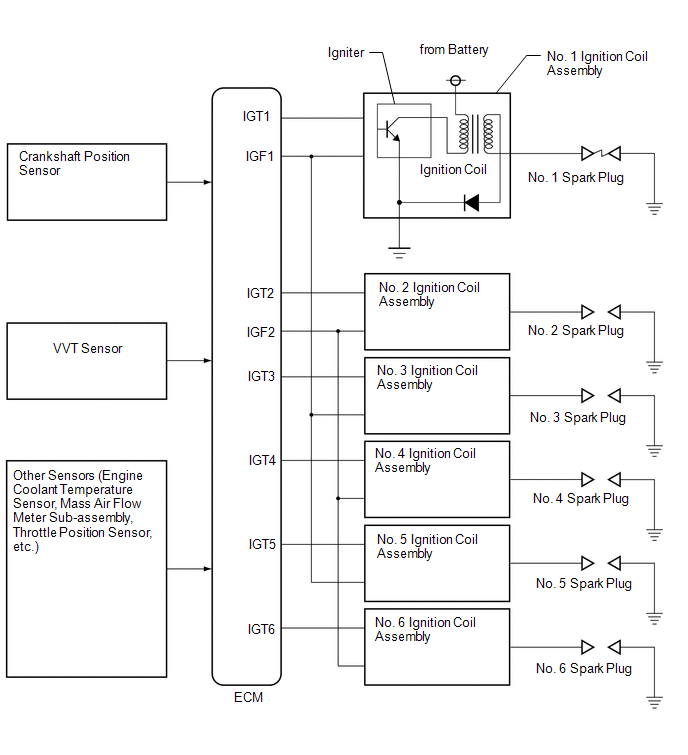
A Direct Ignition System (DIS) is used on this vehicle.
The DIS is a 1-cylinder ignition system in which each cylinder is ignited by one ignition coil assembly and one spark plug is connected to the end of each secondary wiring. A powerful voltage, generated in the secondary wiring, is applied directly to each spark plug. The spark of the spark plugs passes from the center electrode to the ground electrodes.
The ECM determines the ignition timing and transmits the ignition (IGT) signals to each cylinder. Using the IGT signal, the ECM turns the power transistor inside the igniter on and off. The power transistor, in turn, switches the current supplied to the primary coil on and off. When the current to the primary coil is cut off, a powerful voltage is generated in the secondary coil. This voltage is applied to the spark plugs, causing them to spark inside the cylinders. As the ECM cuts the current to the primary coil, the igniter sends back an ignition confirmation (IGF) signal to the ECM for each cylinder ignition.
DTC No. | Detection Item | DTC Detection Condition | Trouble Area | MIL | Memory | Note |
|---|---|---|---|---|---|---|
P035113 |
Ignition Coil "A" Circuit Open |
No IGF signal to the ECM while the engine is running (1 trip detection logic). |
|
Comes on |
DTC stored |
SAE Code: P0351 |
P035213 |
Ignition Coil "B" Circuit Open |
No IGF signal to the ECM while the engine is running (1 trip detection logic). |
|
Comes on |
DTC stored |
SAE Code: P0352 |
P035313 |
Ignition Coil "C" Circuit Open |
No IGF signal to the ECM while the engine is running (1 trip detection logic). |
|
Comes on |
DTC stored |
SAE Code: P0353 |
P035413 |
Ignition Coil "D" Circuit Open |
No IGF signal to the ECM while the engine is running (1 trip detection logic). |
|
Comes on |
DTC stored |
SAE Code: P0354 |
P035513 |
Ignition Coil "E" Circuit Open |
No IGF signal to the ECM while the engine is running (1 trip detection logic). |
|
Comes on |
DTC stored |
SAE Code: P0355 |
P035613 |
Ignition Coil "F" Circuit Open |
No IGF signal to the ECM while the engine is running (1 trip detection logic). |
|
Comes on |
DTC stored |
SAE Code: P0356 |
- Reference: Inspection using an oscilloscope.
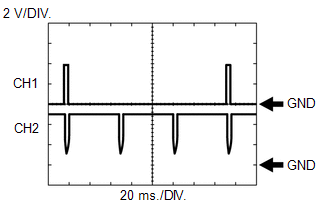
HINT:
- The correct waveform is as shown.
- While idling the engine, check the waveform between terminals IGT (1 to 6) and E1, and IGF (1 or 2) and E1 of the ECM connector.
ECM Terminal Name
CH1: Between IGT (1 to 6) and E1
CH2: Between IGF (1 or 2) and E1
Tester Range
2 V/DIV., 20 ms./DIV.
Condition
Idling with warm engine
MONITOR DESCRIPTION
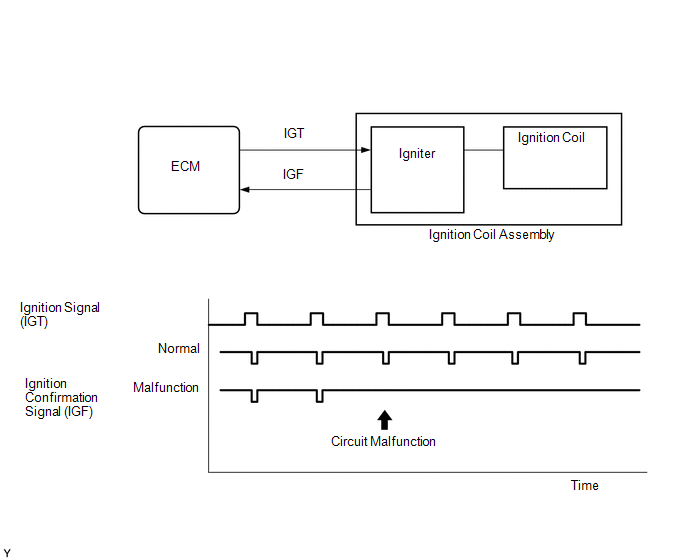
If the ECM does not receive any IGF signals despite transmitting the IGT signal, it interprets this as a fault in the igniter and stores a DTC.
MONITOR STRATEGY
Related DTCs |
P0351: Ignition coil (cylinder 1) primary control circuit/open P0352: Ignition coil (cylinder 2) primary control circuit/open P0353: Ignition coil (cylinder 3) primary control circuit/open P0354: Ignition coil (cylinder 4) primary control circuit/open P0355: Ignition coil (cylinder 5) primary control circuit/open P0356: Ignition coil (cylinder 6) primary control circuit/open |
Required Sensors/Components (Main) |
Igniter |
Required Sensors/Components (Related) |
Crankshaft position sensor |
Frequency of Operation |
Continuous |
Duration |
- |
MIL Operation |
Immediate |
Sequence of Operation |
None |
TYPICAL ENABLING CONDITIONS
Monitor runs whenever the following DTCs are not stored |
None |
All of the following conditions are met |
- |
Spark cut |
Not operating |
Either of the following conditions is met |
A or B |
A. Engine speed |
1500 rpm or less |
B. Starter |
Off |
Either of the following conditions is met |
C or D |
C. Both of the following conditions are met |
- |
Engine speed |
500 rpm or less |
Battery voltage |
6 V or higher |
D. All of the following conditions are met |
- |
Engine speed |
Higher than 500 rpm |
Battery voltage |
10 V or higher |
Number of sparks after CPU reset |
5 sparks or more |
TYPICAL MALFUNCTION THRESHOLDS
Confirmed ignition signal |
No signal |
CONFIRMATION DRIVING PATTERN
HINT:
- After repair has been completed, clear the DTC and then check that the vehicle has returned to normal by performing the following All Readiness check procedure.
Click here

- When clearing the permanent DTCs, refer to the "CLEAR PERMANENT DTC" procedure.
Click here
- Connect the Techstream to the DLC3.
- Turn the engine switch on (IG).
- Turn the Techstream on.
- Clear the DTCs (even if no DTCs are stored, perform the clear DTC procedure).
- Turn the engine switch off and wait for at least 30 seconds.
- Start the engine [A].
- Turn the Techstream on.
- Idle the engine for 10 seconds or more [B].
- Enter the following menus: Powertrain / Engine / Trouble Codes [C].
- Read the pending DTCs.
HINT:
- If a pending DTC is output, the system is malfunctioning.
- If a pending DTC is not output, perform the following procedure.
- Enter the following menus: Powertrain / Engine / Utility / All Readiness.
- Input the DTC: P035113, P035213, P035313, P035413, P035513 or P035613.
- Check the DTC judgment result.
Techstream Display
Description
NORMAL
- DTC judgment completed
- System normal
ABNORMAL
- DTC judgment completed
- System abnormal
INCOMPLETE
- DTC judgment not completed
- Perform driving pattern after confirming DTC enabling conditions
HINT:
- If the judgment result is NORMAL, the system is normal.
- If the judgment result is ABNORMAL, the system is malfunctioning.
- If the judgment result is INCOMPLETE, perform steps [B] through [C] again.
- [A] to [C]: Normal judgment procedure.
The normal judgment procedure is used to complete DTC judgment and also used when clearing permanent DTCs.
- When clearing the permanent DTCs, do not disconnect the cable from the battery terminal or attempt to clear the DTCs during this procedure, as doing so will clear the universal trip and normal judgment histories.
WIRING DIAGRAM
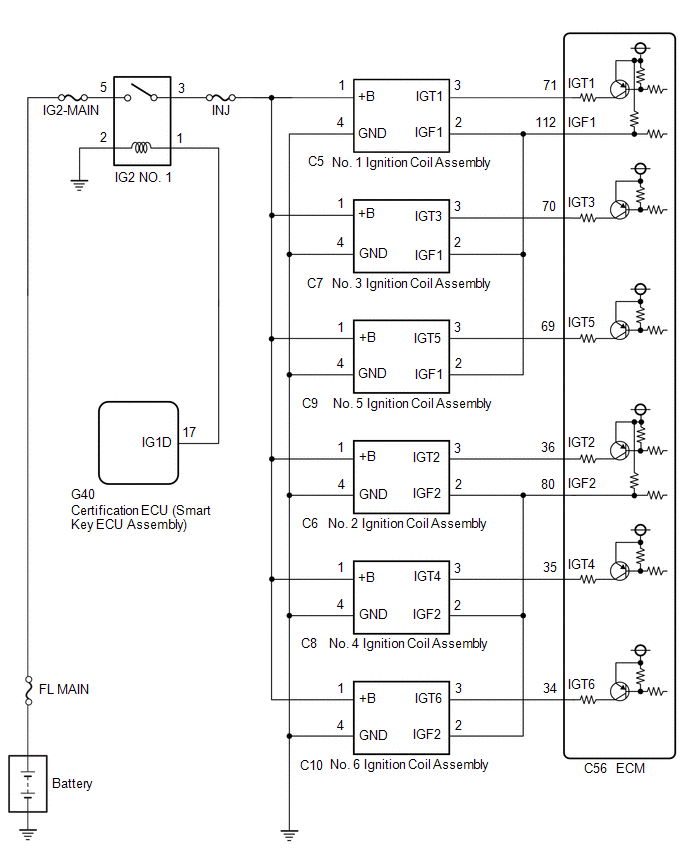
NOTICE:
Inspect the fuses for circuits related to this system before performing the following procedure.
HINT:
Read freeze frame data using the Techstream. The ECM records vehicle and driving condition information as freeze frame data the moment a DTC is stored. When troubleshooting, freeze frame data can help determine if the vehicle was moving or stationary, if the engine was warmed up or not, if the air fuel ratio was lean or rich, and other data from the time the malfunction occurred.
PROCEDURE
CLEAR DTC
(a) Connect the Techstream to the DLC3.
(b) Turn the engine switch on (IG).
(c) Turn the Techstream on.
(d) Clear the DTC.
Powertrain > Engine > Clear DTCs(e) Turn the engine switch off and wait for at least 30 seconds.
|

CHECK WHETHER DTC OUTPUT RECURS (DTC P035113, P035213, P035313, P035413, P035513 OR P035613)
(a) Shuffle the arrangement of the ignition coil assemblies (among No. 1 to No. 6 cylinders).
NOTICE:
Do not change the location of the connectors.
(b) Drive the vehicle in accordance with the driving pattern described in Confirmation Driving Pattern.
(c) Enter the following menus: Powertrain / Engine / Trouble Codes.
(d) Read the DTCs.
Powertrain > Engine > Trouble CodesResult | Proceed to |
|---|---|
Same DTC output |
A |
Different ignition coil DTC output |
B |
HINT:
Perform "Inspection After Repair" after replacing the ignition coil assembly.
Click here
| B |  |
REPLACE IGNITION COIL ASSEMBLY |
|
CHECK TERMINAL VOLTAGE (POWER SOURCE OF IGNITION COIL ASSEMBLY)
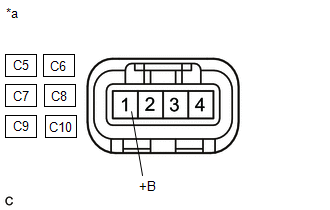
*a |
Front view of wire harness connector (to Ignition Coil Assembly) |
(a) Disconnect the ignition coil assembly connector.
(b) Turn the engine switch on (IG).
(c) Measure the voltage according to the value(s) in the table below.
Standard Voltage:
Tester Connection | Condition | Specified Condition |
|---|---|---|
C5-1 (+B) - Body ground |
Engine switch on (IG) |
11 to 14 V |
C6-1 (+B) - Body ground |
Engine switch on (IG) |
11 to 14 V |
C7-1 (+B) - Body ground |
Engine switch on (IG) |
11 to 14 V |
C8-1 (+B) - Body ground |
Engine switch on (IG) |
11 to 14 V |
C9-1 (+B) - Body ground |
Engine switch on (IG) |
11 to 14 V |
C10-1 (+B) - Body ground |
Engine switch on (IG) |
11 to 14 V |
| NG | |
GO TO STEP 6 |
|
CHECK HARNESS AND CONNECTOR (IGNITION COIL ASSEMBLY - BODY GROUND)
(a) Disconnect the ignition coil assembly connector.
(b) Measure the resistance according to the value(s) in the table below.
Standard Resistance:
Tester Connection | Condition | Specified Condition |
|---|---|---|
C5-4 (GND) - Body ground |
Always |
Below 1 Ω |
C6-4 (GND) - Body ground |
Always |
Below 1 Ω |
C7-4 (GND) - Body ground |
Always |
Below 1 Ω |
C8-4 (GND) - Body ground |
Always |
Below 1 Ω |
C9-4 (GND) - Body ground |
Always |
Below 1 Ω |
C10-4 (GND) - Body ground |
Always |
Below 1 Ω |
| NG | |
REPAIR OR REPLACE HARNESS OR CONNECTOR |
|
CHECK HARNESS AND CONNECTOR (IGNITION COIL ASSEMBLY - ECM)
(a) Disconnect the ignition coil assembly connector.
(b) Disconnect the ECM connector.
(c) Measure the resistance according to the value(s) in the table below.
Standard Resistance:
Tester Connection | Condition | Specified Condition |
|---|---|---|
C5-2 (IGF1) - C56-112 (IGF1) |
Always |
Below 1 Ω |
C6-2 (IGF2) - C56-80 (IGF2) |
Always |
Below 1 Ω |
C7-2 (IGF1) - C56-112 (IGF1) |
Always |
Below 1 Ω |
C8-2 (IGF2) - C56-80 (IGF2) |
Always |
Below 1 Ω |
C9-2 (IGF1) - C56-112 (IGF1) |
Always |
Below 1 Ω |
C10-2 (IGF2) - C56-80 (IGF2) |
Always |
Below 1 Ω |
C5-3 (IGT1) - C56-71 (IGT1) |
Always |
Below 1 Ω |
C6-3 (IGT2) - C56-36 (IGT2) |
Always |
Below 1 Ω |
C7-3 (IGT3) - C56-70 (IGT3) |
Always |
Below 1 Ω |
C8-3 (IGT4) - C56-35 (IGT4) |
Always |
Below 1 Ω |
C9-3 (IGT5) - C56-69 (IGT5) |
Always |
Below 1 Ω |
C10-3 (IGT6) - C56-34 (IGT6) |
Always |
Below 1 Ω |
C5-2 (IGF1) or C56-112 (IGF1) - Body ground and other terminals |
Always |
10 kΩ or higher |
C6-2 (IGF2) or C56-80 (IGF2) - Body ground and other terminals |
Always |
10 kΩ or higher |
C7-2 (IGF1) or C56-112 (IGF1) - Body ground and other terminals |
Always |
10 kΩ or higher |
C8-2 (IGF2) or C56-80 (IGF2) - Body ground and other terminals |
Always |
10 kΩ or higher |
C9-2 (IGF1) or C56-112 (IGF1) - Body ground and other terminals |
Always |
10 kΩ or higher |
C10-2 (IGF2) or C56-80 (IGF2) - Body ground and other terminals |
Always |
10 kΩ or higher |
C5-3 (IGT1) or C56-71 (IGT1) - Body ground and other terminals |
Always |
10 kΩ or higher |
C6-3 (IGT2) or C56-36 (IGT2) - Body ground and other terminals |
Always |
10 kΩ or higher |
C7-3 (IGT3) or C56-70 (IGT3) - Body ground and other terminals |
Always |
10 kΩ or higher |
C8-3 (IGT4) or C56-35 (IGT4) - Body ground and other terminals |
Always |
10 kΩ or higher |
C9-3 (IGT5) or C56-69 (IGT5) - Body ground and other terminals |
Always |
10 kΩ or higher |
C10-3 (IGT6) or C56-34 (IGT6) - Body ground and other terminals |
Always |
10 kΩ or higher |
| OK | |
REPLACE ECM |
| NG | |
REPAIR OR REPLACE HARNESS OR CONNECTOR |
CHECK HARNESS AND CONNECTOR (IG2 NO. 1 RELAY - IGNITION COIL ASSEMBLY)
(a) Remove the IG2 NO. 1 relay from the No. 1 engine room relay block and No. 1 junction block assembly.
(b) Disconnect the ignition coil assembly connector.
(c) Measure the resistance according to the value(s) in the table below.
Standard Resistance:
Tester Connection | Condition | Specified Condition |
|---|---|---|
3 (IG2 NO. 1 relay) - C5-1 (+B) |
Always |
Below 1 Ω |
3 (IG2 NO. 1 relay) - C7-1 (+B) |
Always |
Below 1 Ω |
3 (IG2 NO. 1 relay) - C9-1 (+B) |
Always |
Below 1 Ω |
3 (IG2 NO. 1 relay) - C6-1 (+B) |
Always |
Below 1 Ω |
3 (IG2 NO. 1 relay) - C8-1 (+B) |
Always |
Below 1 Ω |
3 (IG2 NO. 1 relay) - C10-1 (+B) |
Always |
Below 1 Ω |
3 (IG2 NO. 1 relay) or C5-1 (+B) - Body ground and other terminals |
Always |
10 kΩ or higher |
3 (IG2 NO. 1 relay) or C7-1 (+B) - Body ground and other terminals |
Always |
10 kΩ or higher |
3 (IG2 NO. 1 relay) or C9-1 (+B) - Body ground and other terminals |
Always |
10 kΩ or higher |
3 (IG2 NO. 1 relay) or C6-1 (+B) - Body ground and other terminals |
Always |
10 kΩ or higher |
3 (IG2 NO. 1 relay) or C8-1 (+B) - Body ground and other terminals |
Always |
10 kΩ or higher |
3 (IG2 NO. 1 relay) or C10-1 (+B) - Body ground and other terminals |
Always |
10 kΩ or higher |
| OK | |
GO TO ECM POWER SOURCE CIRCUIT |
| NG | |
REPAIR OR REPLACE HARNESS OR CONNECTOR (IG2 NO. 1 RELAY - IGNITION COIL ASSEMBLY) |
Camshaft Position Sensor "B" Bank 1 Circuit Short to Ground (P036511,P036515,P039011,P039015)
DESCRIPTION
The VVT sensor (for exhaust camshaft) (EV1, EV2 signal) consists of a magnet and MRE (Magneto Resistance Element).
The exhaust camshaft has a timing rotor for the VVT sensor. When the exhaust camshaft rotates, changes occur in the air gaps between the timing rotor and MRE, which affects the magnetic field. As a result, the resistance of the MRE material fluctuates. The VVT sensor converts the camshaft rotation data to pulse signals, uses the pulse signals to determine the camshaft angle, and sends it to the ECM. Then the ECM uses this data to control fuel injection duration, injection timing and the Variable Valve Timing (VVT) system.
DTC No. | Detection Item | DTC Detection Condition | Trouble Area | MIL | Memory | Note |
|---|---|---|---|---|---|---|
P036511 |
Camshaft Position Sensor "B" Bank 1 Circuit Short to Ground |
The VVT sensor (for exhaust camshaft of bank 1) output voltage is less than 0.3 V for 4 seconds or more (1 trip detection logic). |
|
Comes on |
DTC stored |
SAE Code: P0367 |
P036515 |
Camshaft Position Sensor "B" Bank 1 Circuit Short to Battery or Open |
The VVT sensor (for exhaust camshaft of bank 1) output voltage is higher than 4.7 V for 4 seconds or more (1 trip detection logic). |
|
Comes on |
DTC stored |
SAE Code: P0368 |
P039011 |
Camshaft Position Sensor "B" Bank 2 Circuit Short to Ground |
The VVT sensor (for exhaust camshaft of bank 2) output voltage is less than 0.3 V for 4 seconds or more (1 trip detection logic). |
|
Comes on |
DTC stored |
SAE Code: P0392 |
P039015 |
Camshaft Position Sensor "B" Bank 2 Circuit Short to Battery or Open |
The VVT sensor (for exhaust camshaft of bank 2) output voltage is higher than 4.7 V for 4 seconds or more (1 trip detection logic). |
|
Comes on |
DTC stored |
SAE Code: P0393 |
Reference: Inspection using an oscilloscope.
Click here 
MONITOR DESCRIPTION
If the output voltage transmitted by the VVT sensor (for exhaust camshaft) remains low or high, the ECM interprets this as a malfunction in the sensor circuit, illuminates the MIL and stores a DTC.
MONITOR STRATEGY
Related DTCs |
P0367: Exhaust VVT sensor (bank 1) range check (low voltage) P0368: Exhaust VVT sensor (bank 1) range check (high voltage) P0392: Exhaust VVT sensor (bank 2) range check (low voltage) P0393: Exhaust VVT sensor (bank 2) range check (high voltage) |
Required Sensors/Components (Main) |
VVT sensor (for exhaust camshaft) |
Required Sensors/Components (Related) |
Crankshaft position sensor |
Frequency of Operation |
Continuous |
Duration |
4 seconds |
MIL Operation |
Immediate |
Sequence of Operation |
None |
TYPICAL ENABLING CONDITIONS
P0367 and P0368: Exhaust VVT Sensor (Bank 1) Range Check (Low Voltage, High Voltage)All of the following conditions are met |
- |
Starter |
Off |
Engine switch |
On (IG) |
Time after engine switch off to on (IG) |
2 seconds or more |
Exhaust VVT sensor verify pulse input fail (P0365) |
Not detected |
Battery voltage |
8 V or higher |
All of the following conditions are met |
- |
Starter |
Off |
Engine switch |
On (IG) |
Time after engine switch off to on (IG) |
2 seconds or more |
Exhaust VVT sensor verify pulse input fail (P0390) |
Not detected |
Battery voltage |
8 V or higher |
TYPICAL MALFUNCTION THRESHOLDS
P0367 and P0392: Exhaust VVT Sensor Range Check (Low Voltage)Exhaust VVT sensor voltage |
Less than 0.3 V |
Exhaust VVT sensor voltage |
Higher than 4.7 V |
CONFIRMATION DRIVING PATTERN
HINT:
- After repair has been completed, clear the DTC and then check that the vehicle has returned to normal by performing the following All Readiness check procedure.
Click here
- When clearing the permanent DTCs, refer to the "CLEAR PERMANENT DTC" procedure.
Click here
- Connect the Techstream to the DLC3.
- Turn the engine switch on (IG).
- Turn the Techstream on.
- Clear the DTCs (even if no DTCs are stored, perform the clear DTC procedure).
- Turn the engine switch off and wait for at least 30 seconds.
- Turn the engine switch on (IG) [A].
- Turn the Techstream on.
- Wait for 5 seconds or more [B].
- Enter the following menus: Powertrain / Engine / Trouble Codes [C].
- Read the pending DTCs.
HINT:
- If a pending DTC is output, the system is malfunctioning.
- If a pending DTC is not output, perform the following procedure.
- Enter the following menus: Powertrain / Engine / Utility / All Readiness.
- Input the DTC: P036511, P036515, P039011 or P039015.
- Check the DTC judgment result.
Techstream Display
Description
NORMAL
- DTC judgment completed
- System normal
ABNORMAL
- DTC judgment completed
- System abnormal
INCOMPLETE
- DTC judgment not completed
- Perform driving pattern after confirming DTC enabling conditions
HINT:
- If the judgment result is NORMAL, the system is normal.
- If the judgment result is ABNORMAL, the system is malfunctioning.
- [A] to [C]: Normal judgment procedure.
The normal judgment procedure is used to complete DTC judgment and also used when clearing permanent DTCs.
- When clearing the permanent DTCs, do not disconnect the cable from the battery terminal or attempt to clear the DTCs during this procedure, as doing so will clear the universal trip and normal judgment histories.
WIRING DIAGRAM
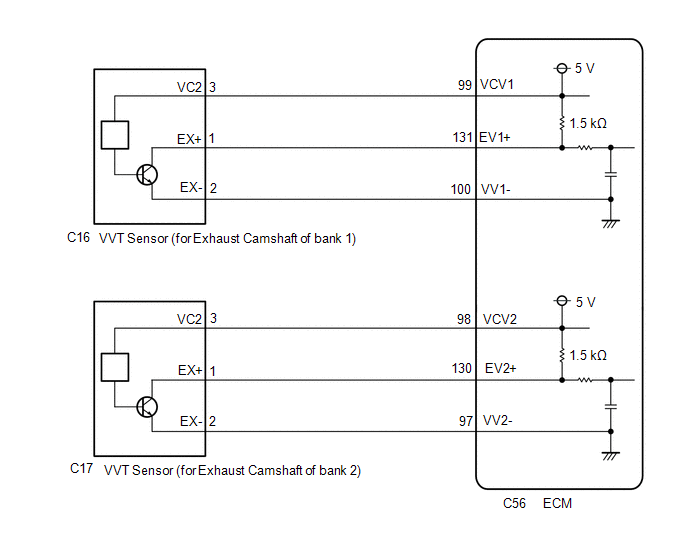
HINT:
- Bank 1 refers to the bank that includes the No. 1 cylinder*.
*: The No. 1 cylinder is the cylinder which is farthest from the transaxle.
- Bank 2 refers to the bank that does not include the No. 1 cylinder.
- Read freeze frame data using the Techstream. The ECM records vehicle and driving condition information as freeze frame data the moment a DTC is stored. When troubleshooting, freeze frame data can help determine if the vehicle was moving or stationary, if the engine was warmed up or not, if the air fuel ratio was lean or rich, and other data from the time the malfunction occurred.
PROCEDURE
CHECK HARNESS AND CONNECTOR
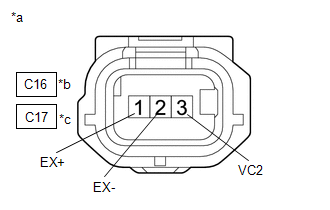
*a |
Front view of wire harness connector (to VVT Sensor (for Exhaust Camshaft)) |
*b |
Bank 1 |
*c |
Bank 2 |
HINT:
Make sure that the connector is properly connected. If it is not, securely connect it and check for DTCs again.
(a) Disconnect the VVT sensor (for exhaust camshaft) connector.
(b) Turn the engine switch on (IG).
(c) Measure the voltage according to the value(s) in the table below.
Standard Voltage:
Tester Connection | Condition | Specified Condition |
|---|---|---|
C16-3 (VC2) - Body ground |
Engine switch on (IG) |
4.5 to 5.5 V |
C17-3 (VC2) - Body ground |
Engine switch on (IG) |
4.5 to 5.5 V |
C16-1 (EX+) - Body ground |
Engine switch on (IG) |
3.0 to 5.0 V |
C17-1 (EX+) - Body ground |
Engine switch on (IG) |
3.0 to 5.0 V |
(d) Turn the engine switch off and wait for at least 30 seconds.
(e) Measure the resistance according to the value(s) in the table below.
Standard Resistance:
Tester Connection | Condition | Specified Condition |
|---|---|---|
C16-3 (VC2) - C16-1 (EX+) |
Engine switch off |
1.425 to 1.575 kΩ |
C17-3 (VC2) - C17-1 (EX+) |
Engine switch off |
1.425 to 1.575 kΩ |
C16-2 (EX-) - Body ground |
Always |
Below 1 Ω |
C17-2 (EX-) - Body ground |
Always |
Below 1 Ω |
| OK |  |
REPLACE VVT SENSOR (FOR EXHAUST CAMSHAFT) |
|

CHECK HARNESS AND CONNECTOR (VVT SENSOR (FOR EXHAUST CAMSHAFT) - ECM)
(a) Disconnect the VVT sensor (for exhaust camshaft) connector.
(b) Disconnect the ECM connector.
(c) Measure the resistance according to the value(s) in the table below.
Standard Resistance:
Tester Connection | Condition | Specified Condition |
|---|---|---|
C16-1 (EX+) - C56-131 (EV1+) |
Always |
Below 1 Ω |
C16-2 (EX-) - C56-100 (VV1-) |
Always |
Below 1 Ω |
C16-3 (VC2) - C56-99 (VCV1) |
Always |
Below 1 Ω |
C17-1 (EX+) - C56-130 (EV2+) |
Always |
Below 1 Ω |
C17-2 (EX-) - C56-97 (VV2-) |
Always |
Below 1 Ω |
C17-3 (VC2) - C56-98 (VCV2) |
Always |
Below 1 Ω |
C16-1 (EX+) or C56-131 (EV1+) - Body ground and other terminals |
Always |
10 kΩ or higher |
C16-2 (EX-) or C56-100 (VV1-) - Body ground and other terminals |
Always |
10 kΩ or higher |
C16-3 (VC2) or C56-99 (VCV1) - Body ground and other terminals |
Always |
10 kΩ or higher |
C17-1 (EX+) or C56-130 (EV2+) - Body ground and other terminals |
Always |
10 kΩ or higher |
C17-2 (EX-) or C56-97 (VV2-) - Body ground and other terminals |
Always |
10 kΩ or higher |
C17-3 (VC2) or C56-98 (VCV2) - Body ground and other terminals |
Always |
10 kΩ or higher |
| OK | |
REPLACE ECM |
| NG | |
REPAIR OR REPLACE HARNESS OR CONNECTOR |