Cylinder Head Gasket
Components
COMPONENTS
ILLUSTRATION
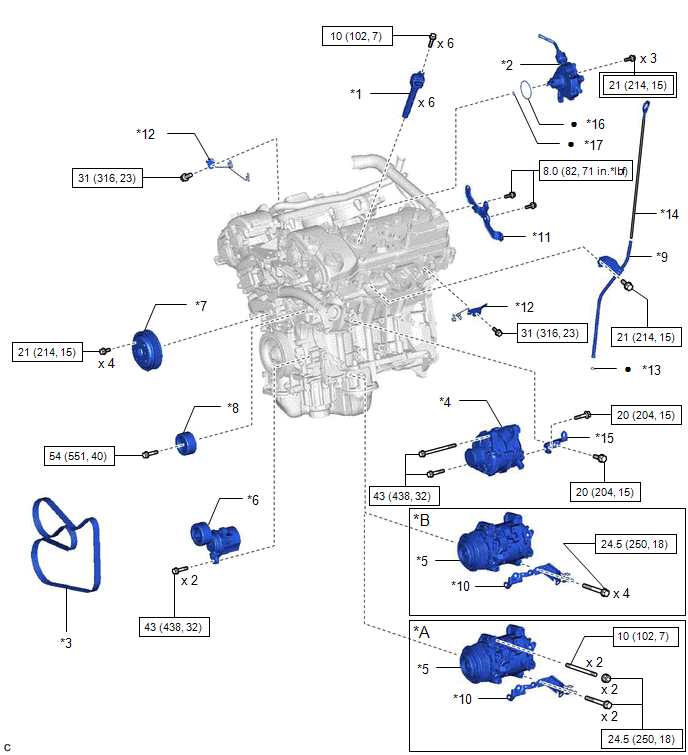
*A |
Type A |
*B |
Type B |
*1 |
IGNITION COIL ASSEMBLY |
*2 |
VACUUM PUMP ASSEMBLY |
*3 |
V-RIBBED BELT |
*4 |
GENERATOR ASSEMBLY |
*5 |
COMPRESSOR ASSEMBLY WITH MAGNETIC CLUTCH |
*6 |
V-RIBBED BELT TENSIONER ASSEMBLY |
*7 |
WATER PUMP PULLEY |
*8 |
NO. 2 IDLER PULLEY SUB-ASSEMBLY |
*9 |
ENGINE OIL LEVEL DIPSTICK GUIDE |
*10 |
BRACKET |
*11 |
WATER FILLER BRACKET |
*12 |
WIRE HARNESS CLAMP BRACKET |
*13 |
ENGINE OIL LEVEL DIPSTICK GUIDE O-RING |
*14 |
ENGINE OIL LEVEL DIPSTICK |
*15 |
GENERATOR ASSEMBLY BRACKET |
*16 |
NO. 2 O-RING |
*17 |
NO. 3 O-RING |
- |
- |
 |
Tightening torque for "Major areas involving basic vehicle performance such as moving/turning/stopping" : N*m (kgf*cm, ft.*lbf) |
 |
N*m (kgf*cm, ft.*lbf): Specified torque |
● |
Non-reusable part |
- |
- |
ILLUSTRATION
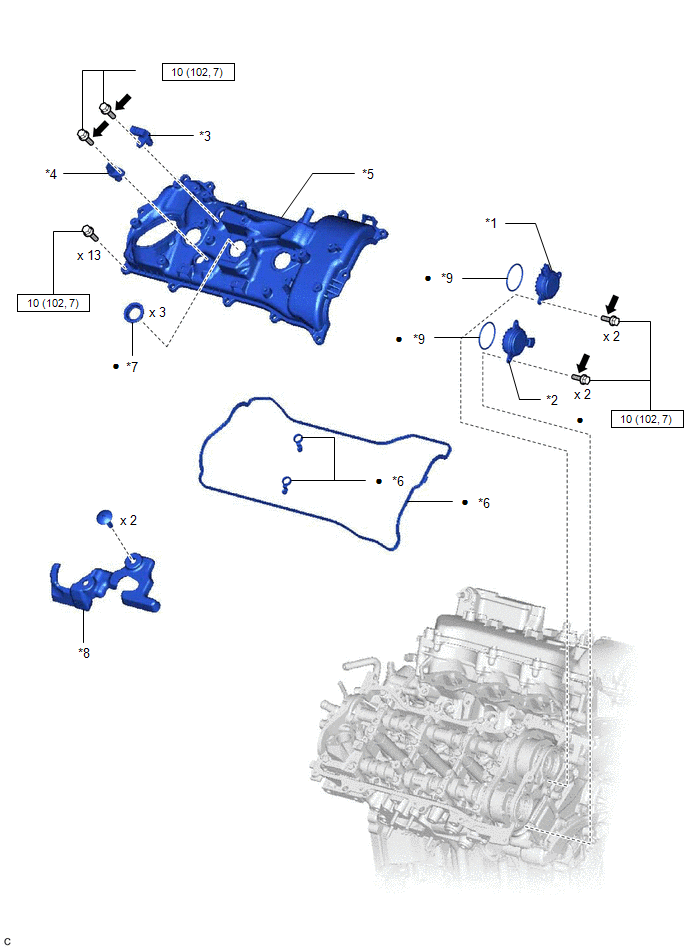
*1 |
CAMSHAFT TIMING OIL CONTROL SOLENOID ASSEMBLY (for Intake Side of Bank 1) |
*2 |
CAMSHAFT TIMING OIL CONTROL SOLENOID ASSEMBLY (for Exhaust Side of Bank 1) |
*3 |
VVT SENSOR (for Intake Side of Bank 1) |
*4 |
VVT SENSOR (for Exhaust Side of Bank 1) |
*5 |
CYLINDER HEAD COVER SUB-ASSEMBLY |
*6 |
CYLINDER HEAD COVER GASKET |
*7 |
SPARK PLUG TUBE GASKET |
*8 |
NO. 1 ENGINE COVER SUB-ASSEMBLY |
*9 |
O-RING |
- |
- |
|
N*m (kgf*cm, ft.*lbf): Specified torque |
● |
Non-reusable part |
 |
Adhesive 1324 |
★ |
Precoated part |
ILLUSTRATION
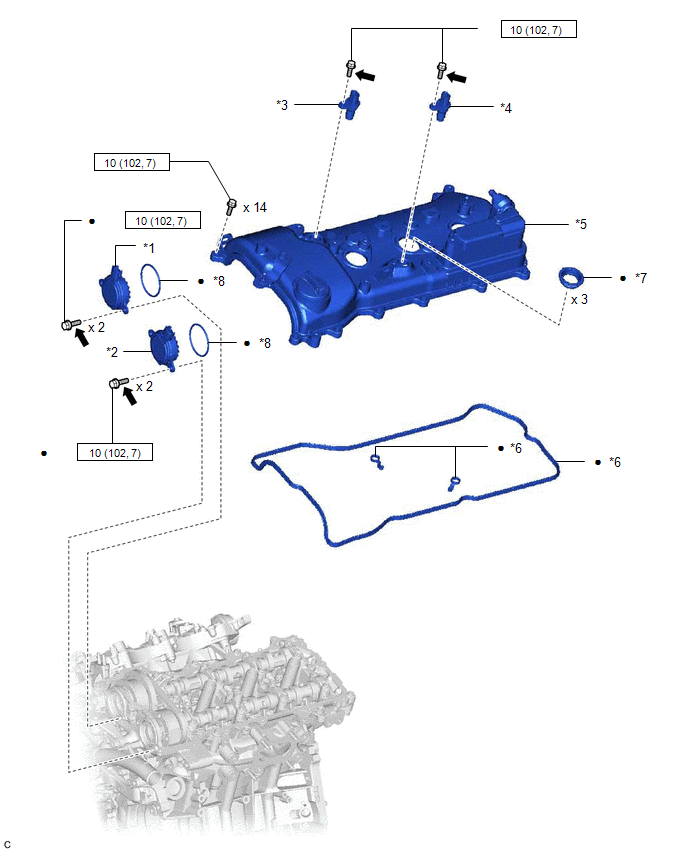
*1 |
CAMSHAFT TIMING OIL CONTROL SOLENOID ASSEMBLY (for Intake Side of Bank 2) |
*2 |
CAMSHAFT TIMING OIL CONTROL SOLENOID ASSEMBLY (for Exhaust Side of Bank 2) |
*3 |
VVT SENSOR (for Intake Side of Bank 2) |
*4 |
VVT SENSOR (for Exhaust Side of Bank 2) |
*5 |
CYLINDER HEAD COVER SUB-ASSEMBLY LH |
*6 |
NO. 2 CYLINDER HEAD COVER GASKET |
*7 |
SPARK PLUG TUBE GASKET |
*8 |
O-RING |
|
N*m (kgf*cm, ft.*lbf): Specified torque |
● |
Non-reusable part |
|
Adhesive 1324 |
★ |
Precoated part |
ILLUSTRATION
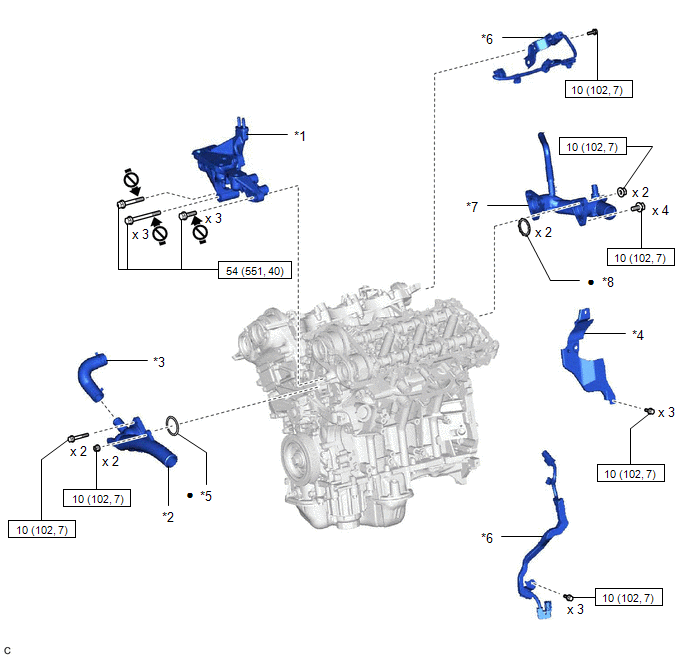
*1 |
FRONT NO. 1 ENGINE MOUNTING BRACKET LH |
*2 |
WATER INLET WITH THERMOSTAT SUB-ASSEMBLY |
*3 |
WATER BY-PASS HOSE |
*4 |
CRANKSHAFT POSITION SENSOR PROTECTOR |
*5 |
GASKET |
*6 |
SENSOR WIRE |
*7 |
WATER OUTLET |
*8 |
NO. 2 WATER INLET HOUSING GASKET |
|
N*m (kgf*cm, ft.*lbf): Specified torque |
● |
Non-reusable part |
 |
Do not apply lubricants to the threaded parts |
- |
- |
ILLUSTRATION
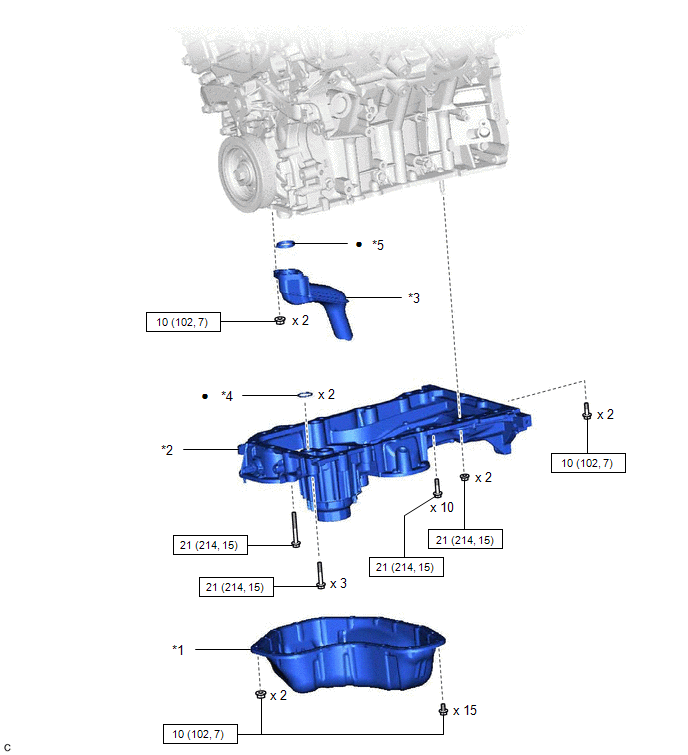
*1 |
NO. 2 OIL PAN SUB-ASSEMBLY |
*2 |
OIL PAN SUB-ASSEMBLY |
*3 |
OIL STRAINER SUB-ASSEMBLY |
*4 |
OIL PAN GASKET |
*5 |
OIL STRAINER GASKET |
- |
- |
|
N*m (kgf*cm, ft.*lbf): Specified torque |
● |
Non-reusable part |
ILLUSTRATION
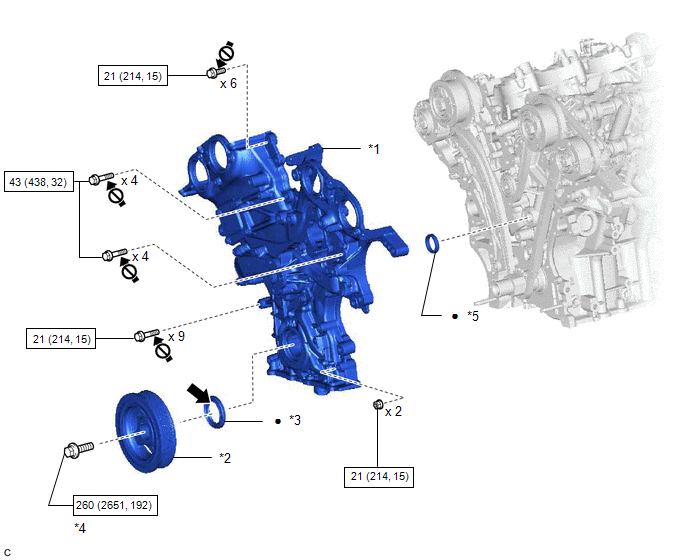
*1 |
TIMING CHAIN COVER ASSEMBLY |
*2 |
CRANKSHAFT PULLEY |
*3 |
TIMING CHAIN CASE OIL SEAL |
*4 |
CRANKSHAFT PULLEY SET BOLT |
*5 |
OIL PUMP GASKET |
- |
- |
|
N*m (kgf*cm, ft.*lbf): Specified torque |
● |
Non-reusable part |
|
MP grease |
|
Do not apply lubricants to the threaded parts |
ILLUSTRATION
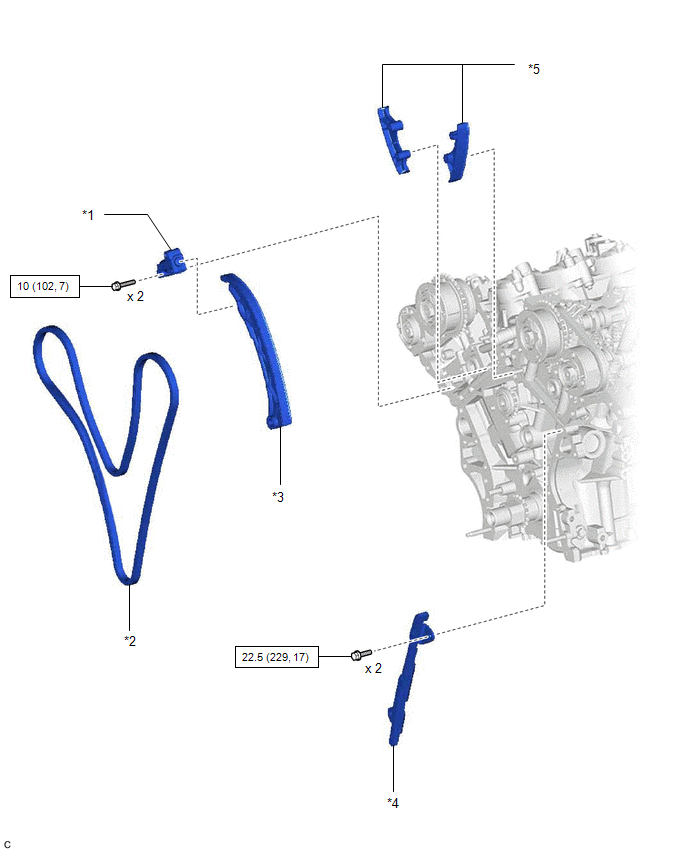
*1 |
NO. 1 CHAIN TENSIONER ASSEMBLY |
*2 |
CHAIN SUB-ASSEMBLY |
*3 |
CHAIN TENSIONER SLIPPER |
*4 |
NO. 1 CHAIN VIBRATION DAMPER |
*5 |
NO. 2 CHAIN VIBRATION DAMPER |
- |
- |
|
N*m (kgf*cm, ft.*lbf): Specified torque |
- |
- |
ILLUSTRATION
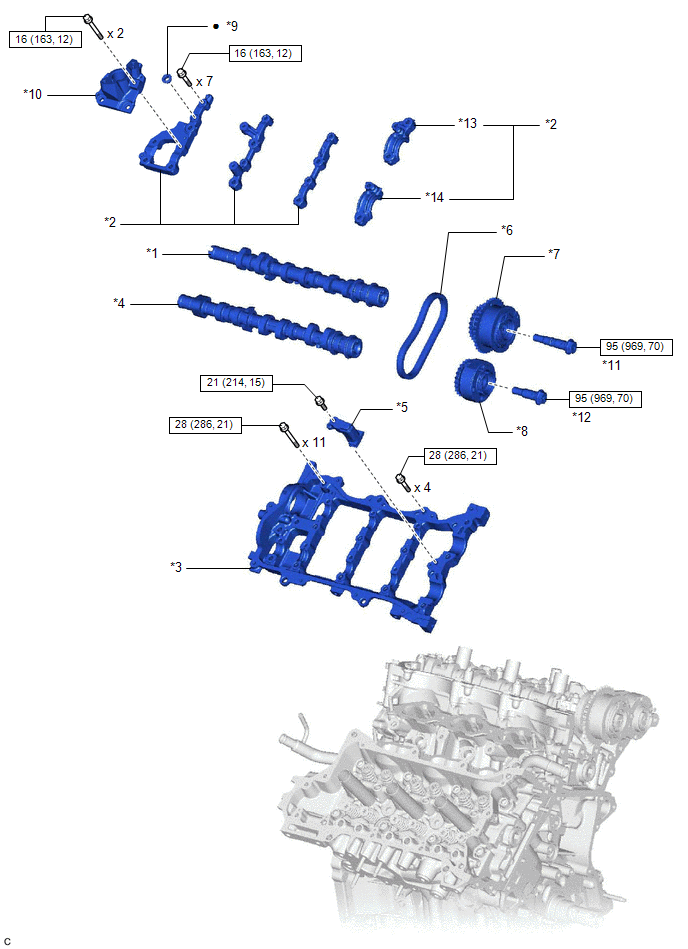
*1 |
CAMSHAFT |
*2 |
CAMSHAFT BEARING CAP (for Bank 1) |
*3 |
CAMSHAFT HOUSING SUB-ASSEMBLY |
*4 |
NO. 2 CAMSHAFT |
*5 |
NO. 2 CHAIN TENSIONER ASSEMBLY |
*6 |
NO. 2 CHAIN SUB-ASSEMBLY (for Bank 1) |
*7 |
CAMSHAFT TIMING GEAR ASSEMBLY (for Bank 1) |
*8 |
CAMSHAFT TIMING EXHAUST GEAR ASSEMBLY (for Bank 1) |
*9 |
CAMSHAFT BEARING CAP OIL HOLE GASKET |
*10 |
FUEL PUMP LIFTER HOUSING |
*11 |
CAMSHAFT TIMING GEAR BOLT (for Intake Side of Bank 1) |
*12 |
CAMSHAFT TIMING GEAR BOLT (for Exhaust Side of Bank 1) |
*13 |
NO. 1 CAMSHAFT BEARING CAP |
*14 |
NO. 2 CAMSHAFT BEARING CAP |
|
N*m (kgf*cm, ft.*lbf): Specified torque |
● |
Non-reusable part |
ILLUSTRATION
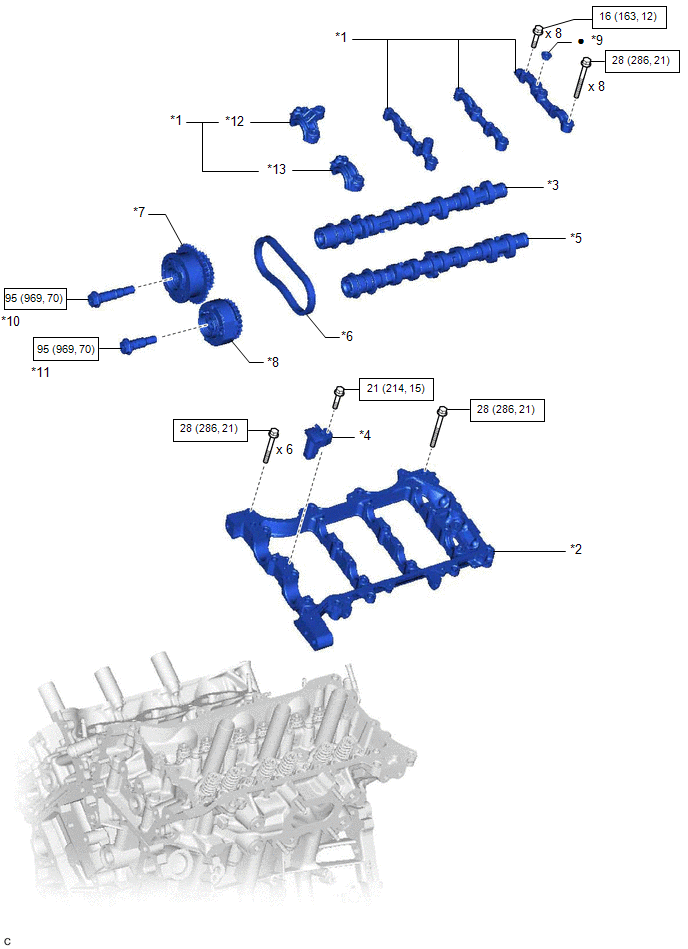
*1 |
CAMSHAFT BEARING CAP (for Bank 2) |
*2 |
CAMSHAFT HOUSING SUB-ASSEMBLY LH |
*3 |
NO. 3 CAMSHAFT SUB-ASSEMBLY |
*4 |
NO. 3 CHAIN TENSIONER ASSEMBLY |
*5 |
NO. 4 CAMSHAFT SUB-ASSEMBLY |
*6 |
NO. 2 CHAIN SUB-ASSEMBLY (for Bank 2) |
*7 |
CAMSHAFT TIMING GEAR ASSEMBLY (for Bank 2) |
*8 |
CAMSHAFT TIMING EXHAUST GEAR ASSEMBLY (for Bank 2) |
*9 |
CAMSHAFT BEARING CAP OIL HOLE GASKET LH |
*10 |
CAMSHAFT TIMING GEAR BOLT (for Intake Side of Bank 2) |
*11 |
CAMSHAFT TIMING GEAR BOLT (for Exhaust Side of Bank 2) |
*12 |
NO. 3 CAMSHAFT BEARING CAP |
*13 |
NO. 4 CAMSHAFT BEARING CAP |
- |
- |
|
N*m (kgf*cm, ft.*lbf): Specified torque |
● |
Non-reusable part |
ILLUSTRATION
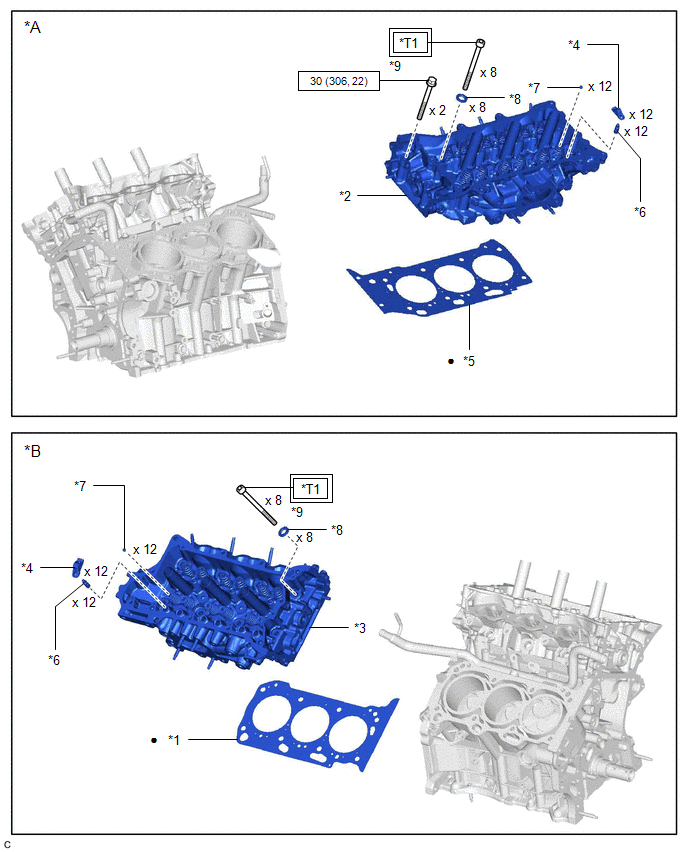
*A |
for Bank 2 |
*B |
for Bank 1 |
*1 |
CYLINDER HEAD GASKET |
*2 |
CYLINDER HEAD LH |
*3 |
CYLINDER HEAD SUB-ASSEMBLY |
*4 |
NO. 1 VALVE ROCKER ARM SUB-ASSEMBLY |
*5 |
NO. 2 CYLINDER HEAD GASKET |
*6 |
VALVE LASH ADJUSTER ASSEMBLY |
*7 |
VALVE STEM CAP |
*8 |
CYLINDER HEAD SET PLATE WASHER |
*9 |
CYLINDER HEAD SET BOLT |
- |
- |
|
Tightening torque for "Major areas involving basic vehicle performance such as moving/turning/stopping" : N*m (kgf*cm, ft.*lbf) |
|
N*m (kgf*cm, ft.*lbf): Specified torque |
● |
Non-reusable part |
- |
- |
*T1 |
1st: 36 (367, 27) 2nd: Turn 90° 3rd: Turn 90° |
- |
- |
Installation
INSTALLATION
PROCEDURE
1. INSTALL NO. 2 CYLINDER HEAD GASKET
(a) Place a new No. 2 cylinder head gasket on the cylinder block sub-assembly as shown in the illustration.
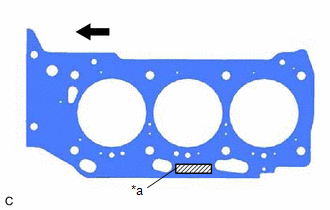
*a |
Lot No. |
 |
Front of Engine |
NOTICE:
- Remove any oil from the contact surfaces.
- Make sure to install the No. 2 cylinder head gasket in the correct direction.
(b) Apply seal packing to the No. 2 cylinder head gasket as shown in the illustration.
Seal Packing:
Toyota Genuine Seal Packing Black, Three Bond 1207B or equivalent
NOTICE:
- Remove any oil from the contact surfaces.
- Install the No. 2 cylinder head gasket within 3 minutes and tighten the cylinder head set bolts within 15 minutes of applying seal packing.
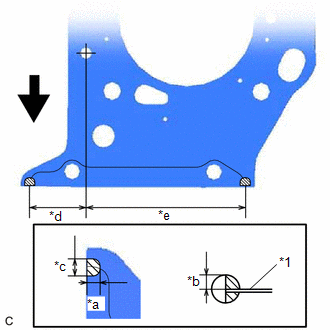
*1 |
No. 2 Cylinder Head Gasket |
*a |
5.0 to 7.0 mm (0.197 to 0.276 in.) |
*b |
3.0 to 5.0 mm (0.118 to 0.197 in.) |
*c |
7.0 to 9.0 mm (0.276 to 0.354 in.) |
*d |
38.2 mm (1.50 in.) |
*e |
110.0 mm (4.33 in.) |
|
Front of Engine |
 |
Seal Packing |
2. INSTALL CYLINDER HEAD LH
Click here 
3. INSTALL CYLINDER HEAD GASKET
(a) Place a new cylinder head gasket on the cylinder block sub-assembly as shown in the illustration.
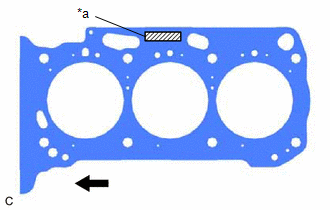
*a |
Lot No. |
|
Front of Engine |
NOTICE:
- Remove any oil from the contact surfaces.
- Make sure to install the cylinder head gasket in the correct direction.
(b) Apply seal packing to the cylinder head gasket as shown in the illustration.
Seal Packing:
Toyota Genuine Seal Packing Black, Three Bond 1207B or equivalent
NOTICE:
- Remove any oil from the contact surfaces.
- Install the cylinder head gasket within 3 minutes and tighten the cylinder head set bolts within 15 minutes of applying seal packing.
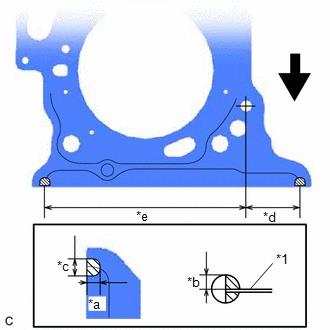
*1 |
Cylinder Head Gasket |
*a |
5.0 to 7.0 mm (0.197 to 0.276 in.) |
*b |
3.0 to 5.0 mm (0.118 to 0.197 in.) |
*c |
7.0 to 9.0 mm (0.276 to 0.354 in.) |
*d |
38.5 mm (1.52 in.) |
*e |
144.0 mm (5.67 in.) |
|
Front of Engine |
|
Seal Packing |
4. INSTALL CYLINDER HEAD SUB-ASSEMBLY
Click here
5. INSTALL WATER OUTLET
Click here
6. INSTALL VALVE STEM CAP
Click here
7. INSTALL VALVE LASH ADJUSTER ASSEMBLY
Click here
8. INSTALL NO. 1 VALVE ROCKER ARM SUB-ASSEMBLY
Click here
9. INSTALL NO. 1 CHAIN VIBRATION DAMPER
Click here
10. INSTALL NO. 2 CHAIN VIBRATION DAMPER
Click here
11. INSTALL SENSOR WIRE
Click here
12. INSTALL NO. 3 CAMSHAFT SUB-ASSEMBLY
Click here
13. INSTALL NO. 4 CAMSHAFT SUB-ASSEMBLY
Click here
14. INSTALL CAMSHAFT BEARING CAP (for Bank 2)
Click here
15. SET CAMSHAFT TIMING GEAR ASSEMBLY, CAMSHAFT TIMING EXHAUST GEAR ASSEMBLY AND NO. 2 CHAIN SUB-ASSEMBLY (for Bank 2)
Click here
16. TEMPORARILY INSTALL CAMSHAFT TIMING GEAR BOLT (for Intake Side of Bank 2)
Click here
17. TEMPORARILY INSTALL CAMSHAFT TIMING GEAR BOLT (for Exhaust Side of Bank 2)
Click here
18. INSTALL CAMSHAFT HOUSING SUB-ASSEMBLY LH
Click here
19. TIGHTEN CAMSHAFT TIMING GEAR BOLT (for Intake Side of Bank 2)
Click here
20. TIGHTEN CAMSHAFT TIMING GEAR BOLT (for Exhaust Side of Bank 2)
Click here
21. INSTALL CAMSHAFT
Click here
22. INSTALL NO. 2 CAMSHAFT
Click here
23. INSTALL CAMSHAFT BEARING CAP (for Bank 1)
Click here
24. SET CAMSHAFT TIMING GEAR ASSEMBLY, CAMSHAFT TIMING EXHAUST GEAR ASSEMBLY AND NO. 2 CHAIN SUB-ASSEMBLY (for Bank 1)
Click here
25. TEMPORARILY INSTALL CAMSHAFT TIMING GEAR BOLT (for Intake Side of Bank 1)
Click here
26. TEMPORARILY INSTALL CAMSHAFT TIMING GEAR BOLT (for Exhaust Side of Bank 1)
Click here
27. INSTALL CAMSHAFT HOUSING SUB-ASSEMBLY
Click here
28. TIGHTEN CAMSHAFT TIMING GEAR BOLT (for Intake Side of Bank 1)
Click here
29. TIGHTEN CAMSHAFT TIMING GEAR BOLT (for Exhaust Side of Bank 1)
Click here
30. INSTALL NO. 3 CHAIN TENSIONER ASSEMBLY
Click here
31. INSTALL NO. 2 CHAIN TENSIONER ASSEMBLY
Click here
32. INSTALL CHAIN SUB-ASSEMBLY
Click here
33. INSTALL CHAIN TENSIONER SLIPPER
Click here
34. INSTALL NO. 1 CHAIN TENSIONER ASSEMBLY
Click here
35. INSPECT VALVE TIMING
Click here
36. INSTALL TIMING CHAIN COVER ASSEMBLY
Click here
37. INSTALL TIMING CHAIN CASE OIL SEAL
Click here
38. INSTALL OIL PAN SUB-ASSEMBLY
(a) Install 2 new oil pan gaskets to the timing chain cover assembly.
(b) Apply seal packing in a continuous line as shown in the illustration. Seal Packing: Toyota Genuine Seal Packing Black, Three Bond 1207B or equivalent Seal Packing Diameter: 3.0 to 4.0 mm (0.118 to 0.157 in.) NOTICE:
|
|
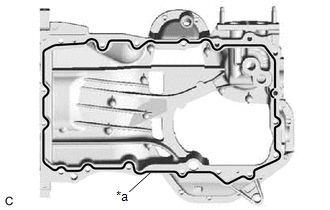
(c) Install the oil pan sub-assembly with the 16 bolts and 2 nuts in the order shown in the illustration.
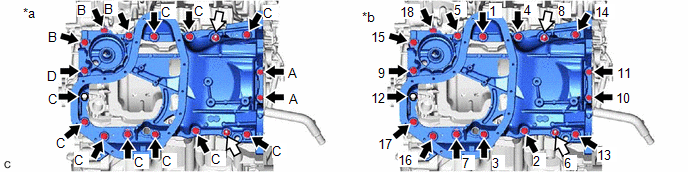
*a |
Torque |
*b |
Bolt and Nut Tightening Order |
|
Bolt |
 |
Nut |
Torque:
Bolt (A) :
10 N·m {102 kgf·cm, 7 ft·lbf}
Bolt (B), (C), (D) :
21 N·m {214 kgf·cm, 15 ft·lbf}
Nut :
21 N·m {214 kgf·cm, 15 ft·lbf}
Bolt Length:
Item | Length |
|---|---|
Bolt (A) |
16 mm (0.630 in.) |
Bolt (B) |
45 mm (1.77 in.) |
Bolt (C) |
25 mm (0.984 in.) |
Bolt (D) |
70 mm (2.76 in.) |
(d) Wipe off any excess seal packing with a clean piece of cloth.
NOTICE:
Do not allow seal packing to contact the No. 1 crankshaft position sensor plate.
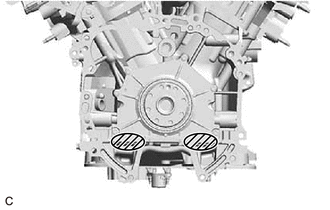
|
Wipe off the Seal Packing |
39. INSTALL OIL STRAINER SUB-ASSEMBLY
Click here
40. INSTALL NO. 2 OIL PAN SUB-ASSEMBLY
Click here
41. INSTALL SPARK PLUG TUBE GASKET
Click here
42. INSTALL CYLINDER HEAD COVER SUB-ASSEMBLY LH
Click here
43. INSTALL CYLINDER HEAD COVER SUB-ASSEMBLY
Click here
44. INSTALL SENSOR WIRE
Click here
45. INSTALL CRANKSHAFT POSITION SENSOR PROTECTOR
Click here
46. INSTALL CAMSHAFT TIMING OIL CONTROL SOLENOID ASSEMBLY (for Intake Side of Bank 2)
Click here
47. INSTALL CAMSHAFT TIMING OIL CONTROL SOLENOID ASSEMBLY (for Exhaust Side of Bank 2)
Click here
48. INSTALL CAMSHAFT TIMING OIL CONTROL SOLENOID ASSEMBLY (for Exhaust Side of Bank 1)
Click here
49. INSTALL CAMSHAFT TIMING OIL CONTROL SOLENOID ASSEMBLY (for Intake Side of Bank 1)
Click here
50. INSTALL WATER INLET WITH THERMOSTAT SUB-ASSEMBLY
Click here
51. CONNECT WATER BY-PASS HOSE
Click here
52. INSTALL FRONT NO. 1 ENGINE MOUNTING BRACKET LH
Click here
53. INSTALL CRANKSHAFT PULLEY
Click here
54. INSTALL WATER FILLER BRACKET
Click here
55. INSTALL WIRE HARNESS CLAMP BRACKET
Click here
56. INSTALL ENGINE OIL LEVEL DIPSTICK GUIDE
Click here
57. INSTALL WATER PUMP PULLEY
Click here
58. INSTALL V-RIBBED BELT TENSIONER ASSEMBLY
Click here
59. INSTALL NO. 2 IDLER PULLEY SUB-ASSEMBLY
Click here
60. INSTALL COMPRESSOR ASSEMBLY WITH MAGNETIC CLUTCH
Click here
61. INSTALL GENERATOR ASSEMBLY
Click here
62. INSTALL V-RIBBED BELT
Click here
63. INSTALL VACUUM PUMP ASSEMBLY
Click here
64. INSTALL IGNITION COIL ASSEMBLY
Click here
65. INSTALL KNOCK CONTROL SENSOR
Click here
66. INSTALL ENGINE HANGERS
Click here
67. REMOVE ENGINE ASSEMBLY FROM ENGINE STAND
Click here
Removal
REMOVAL
The necessary procedures (adjustment, calibration, initialization or registration) that must be performed after parts are removed and installed, or replaced during cylinder head gasket removal/installation are shown below.
Necessary Procedure After Parts Removed/Installed/ReplacedReplaced Part or Performed Procedure | Necessary Procedure | Effect/Inoperative Function when Necessary Procedure not Performed | Link |
|---|---|---|---|
Battery terminal is disconnected/reconnected |
Perform steering sensor zero point calibration |
Lane departure alert system (w/ Steering Control) |
 |
Pre-collision system |
|||
Intelligent Clearance Sonar System*1 |
|||
Lighting System (for Gasoline Model with Cornering Light) |
|||
Memorize steering angle neutral point |
Parking Assist Monitor System |
|
|
Panoramic View Monitor System |
|
||
Replacement of ECM |
Vehicle Identification Number (VIN) registration |
MIL comes on |
|
ECU communication ID registration (Immobiliser system) |
Engine start function |
|
|
|
Inspection after repair |
|
|
Replacement of automatic transaxle assembly |
|
|
|
Replacement of ECM (If transaxle compensation code read from ECM) |
|
||
Replacement of ECM (If transaxle compensation code not read from ECM) |
|
||
Replacement of automatic transaxle fluid |
ATF thermal degradation estimate reset |
The value of the Data List item "ATF Thermal Degradation Estimate" is not estimated correctly |
|
Replacement of ECM |
Code registration (Smart Key System (for Start Function)) |
|
|
Suspension, tires, etc. |
|
|
|
Rear television camera assembly optical axis adjustment (Back camera position setting) |
Parking Assist Monitor System |
|
|
|
Panoramic View Monitor System |
|
|
Perform headlight ECU sub-assembly LH initialization |
Lighting system (for Gasoline Model with Cornering Light) |
|
|
Front wheel alignment adjustment |
Perform system variant learning and acceleration sensor zero point calibration. |
|
|
- *1: When performing learning using the Techstream.
Click here
- *2: Not necessary when ECM replaced with new one.
PROCEDURE
1. INSTALL ENGINE ASSEMBLY TO ENGINE STAND
Click here
2. REMOVE ENGINE HANGERS
Click here
3. REMOVE KNOCK CONTROL SENSOR
Click here
4. REMOVE IGNITION COIL ASSEMBLY
Click here
5. REMOVE VACUUM PUMP ASSEMBLY
Click here
6. REMOVE V-RIBBED BELT
Click here
7. REMOVE GENERATOR ASSEMBLY
Click here
8. REMOVE COMPRESSOR ASSEMBLY WITH MAGNETIC CLUTCH
Click here
9. REMOVE NO. 2 IDLER PULLEY SUB-ASSEMBLY
Click here
10. REMOVE V-RIBBED BELT TENSIONER ASSEMBLY
Click here
11. REMOVE WATER PUMP PULLEY
Click here
12. REMOVE ENGINE OIL LEVEL DIPSTICK GUIDE
Click here
13. REMOVE WIRE HARNESS CLAMP BRACKET
Click here
14. REMOVE WATER FILLER BRACKET
Click here
15. REMOVE CRANKSHAFT PULLEY
Click here
16. REMOVE FRONT NO. 1 ENGINE MOUNTING BRACKET LH
Click here
17. DISCONNECT WATER BY-PASS HOSE
Click here
18. REMOVE WATER INLET WITH THERMOSTAT SUB-ASSEMBLY
Click here
19. REMOVE CAMSHAFT TIMING OIL CONTROL SOLENOID ASSEMBLY (for Intake Side of Bank 1)
Click here
20. REMOVE CAMSHAFT TIMING OIL CONTROL SOLENOID ASSEMBLY (for Exhaust Side of Bank 1)
Click here
21. REMOVE CAMSHAFT TIMING OIL CONTROL SOLENOID ASSEMBLY (for Exhaust Side of Bank 2)
Click here
22. REMOVE CAMSHAFT TIMING OIL CONTROL SOLENOID ASSEMBLY (for Intake Side of Bank 2)
Click here
23. REMOVE VVT SENSOR (for Intake Side of Bank 1)
Click here
24. REMOVE VVT SENSOR (for Exhaust Side of Bank 1)
Click here
25. REMOVE VVT SENSOR (for Intake Side of Bank 2)
Click here
26. REMOVE VVT SENSOR (for Exhaust Side of Bank 2)
Click here
27. REMOVE CRANKSHAFT POSITION SENSOR PROTECTOR
Click here
28. REMOVE SENSOR WIRE
Click here
29. REMOVE CYLINDER HEAD COVER SUB-ASSEMBLY
Click here
30. REMOVE CYLINDER HEAD COVER SUB-ASSEMBLY LH
Click here
31. REMOVE SPARK PLUG TUBE GASKET
Click here
32. REMOVE NO. 2 OIL PAN SUB-ASSEMBLY
Click here
33. REMOVE OIL STRAINER SUB-ASSEMBLY
Click here
34. REMOVE OIL PAN SUB-ASSEMBLY
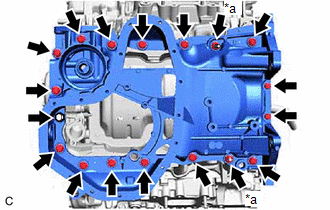
(a) Remove the 16 bolts and 2 nuts from the oil pan sub-assembly. NOTICE: Make sure to clean the bolts and stud bolts and check the threads for cracks or other damage. |
|
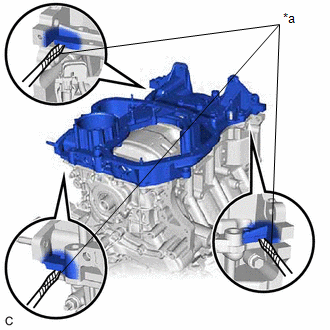
(b) Remove the oil pan sub-assembly by prying between the oil pan sub-assembly and timing chain cover assembly or cylinder block sub-assembly with a screwdriver wrapped with protective tape. NOTICE: Be careful not to damage the contact surfaces of the cylinder block sub-assembly, timing chain cover assembly and oil pan sub-assembly. |
|
(c) Remove the 2 oil pan gaskets from the timing chain cover assembly. |
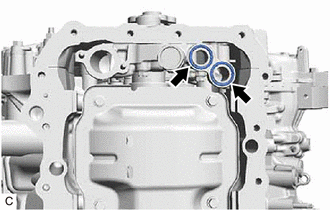 |
35. REMOVE TIMING CHAIN COVER ASSEMBLY
Click here
36. REMOVE TIMING GEAR CASE OR TIMING CHAIN CASE OIL SEAL
Click here
37. SET NO. 1 CYLINDER TO TDC (COMPRESSION)
Click here
38. REMOVE NO. 1 CHAIN TENSIONER ASSEMBLY
Click here
39. REMOVE CHAIN TENSIONER SLIPPER
Click here
40. REMOVE CHAIN SUB-ASSEMBLY
Click here
41. REMOVE CAMSHAFT TIMING GEAR ASSEMBLY, CAMSHAFT TIMING EXHAUST GEAR ASSEMBLY AND NO. 2 CHAIN SUB-ASSEMBLY (for Bank 1)
Click here
42. REMOVE NO. 2 CHAIN TENSIONER ASSEMBLY
Click here
43. REMOVE CAMSHAFT BEARING CAP (for Bank 1)
Click here
44. REMOVE CAMSHAFT
Click here
45. REMOVE NO. 2 CAMSHAFT
Click here
46. REMOVE CAMSHAFT HOUSING SUB-ASSEMBLY
Click here
47. REMOVE CAMSHAFT TIMING GEAR ASSEMBLY, CAMSHAFT TIMING EXHAUST GEAR ASSEMBLY AND NO. 2 CHAIN SUB-ASSEMBLY (for Bank 2)
Click here
48. REMOVE NO. 3 CHAIN TENSIONER ASSEMBLY
Click here
49. REMOVE CAMSHAFT BEARING CAP (for Bank 2)
Click here
50. REMOVE NO. 3 CAMSHAFT SUB-ASSEMBLY
Click here
51. REMOVE NO. 4 CAMSHAFT SUB-ASSEMBLY
Click here
52. REMOVE CAMSHAFT HOUSING SUB-ASSEMBLY LH
Click here
53. REMOVE SENSOR WIRE
Click here
54. REMOVE NO. 1 CHAIN VIBRATION DAMPER
Click here
55. REMOVE NO. 2 CHAIN VIBRATION DAMPER
Click here
56. REMOVE NO. 1 VALVE ROCKER ARM SUB-ASSEMBLY
Click here
57. REMOVE VALVE LASH ADJUSTER ASSEMBLY
Click here
58. REMOVE VALVE STEM CAP
Click here
59. REMOVE WATER OUTLET
Click here
60. REMOVE CYLINDER HEAD SUB-ASSEMBLY
Click here
61. REMOVE CYLINDER HEAD GASKET
(a) Remove the cylinder head gasket from the cylinder block sub-assembly.
62. REMOVE CYLINDER HEAD LH
Click here
63. REMOVE NO. 2 CYLINDER HEAD GASKET
(a) Remove the No. 2 cylinder head gasket from the cylinder block sub-assembly.
64. INSPECT CYLINDER HEAD SET BOLT
Click here